
Get all the new deals and savings hacks straight to your inbox
Will be used in accordance with our Privacy Policy
Add these crayon crafts to your arsenal of activities to pull out when your kids announce they’re bored.
Please note that some of these require the use of a hot glue gun or a stove, so be sure young children are supervised. Many of these are an older child’s dream project.
1. Try melted crayon art on a canvas with watercolors.

For this craft, you’ll need canvas panels or watercolor paper, crayons, and liquid watercolor paint.
First, heat the oven to 350 degrees and set the canvas panels in the oven for about five minuets at a time. Once the canvas is warm enough, move it to your work space, and let your kids draw with the crayons. The heat from the canvas will melt the crayons.
After that, paint over the melted crayons with liquid watercolor paints and let dry.
Find full instructions on The Artful Parent.
2. Give your kids crayons and sandpaper to make a custom printed T-shirt.

Via Alpha Mom
You’ll need crayons, a plain white T-shirt, an iron and fine sandpaper.
Let your kids color a design directly onto the sandpaper but remember — the image will be reversed when ironed on. Once their creation is colored, go back over the design to create an extra thick layer of crayon.
Place a piece of cardboard on the inside of the shirt to prevent bleeding. Set the sandpaper right-side down onto the T-shirt, place parchment paper or a paper towel on the sandpaper to protect the iron, and iron until the crayon is transferred.
Find full instructions on Alpha Mom.
3. Use a muffin tin to make multi-colored chunky crayons.

Via Makes and Takes
For this craft, you only need crayon pieces, a muffin tin and cooking spray.
Take off the paper from the crayons and break them into ½-1 inch pieces. Spray the muffin tin with cooking spray, and add crayon pieces to each spot. Put the muffin tin in the oven at 275 degrees, and bake them for 7-8 minutes.
Find full instructions on Make and Takes.
4. Make “stained glass” with crayons and wax paper.

Via Activity Mama
To create the “stained glass” artwork, you’ll need crayons, scissors, glue, wax paper, aluminum foil, construction paper, an iron and an old dish towel.
Cut two pieces of wax paper to the same size as the construction paper. Then, shave or grate the crayons into piles or containers. Put a line of glue around the edges of the wax paper and let your kids go to town sprinkling the crayon shavings around the paper. After they’re done, place the other piece of wax paper on top.
Set your iron on low, and put two pieces of foil and a dish towel on top of the wax paper. The heat from the iron will make designs with the shaved crayons.
Find full instructions on Activity Mama.
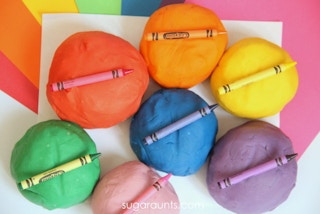
5. Make custom-color play dough using crayons.

Via The OT Toolbox
To make this, you’ll need 2 tablespoons of oil, 2 ½ broken crayons per color, 2 cups of water, 3 cups of flour, 1 ½ cup of salt and 2 tablespoons cream of tartar.
In a large bowl, mix together the flour, salt and cream of tartar. Then heat the oil in a pan, and add the crayons, stirring until they’re completely melted. From there, slowly stir in the water and then add the dry ingredients. Once the dough pulls together, take it out of the pan to cool and then knead for a few minutes until it’s smooth.
Find full instructions on The OT Toolbox.
6. Use crayons to make color-block votive candles.

Via Brit + Co
You’ll need Dixie cups, wax, crayons, wicks, votives and popsicle sticks.
Pour wax into the cups, microwave for one minute, stir and pour a thin layer into the bottom of a votive and place the candle wick in the center.
Then, use one crayon per color and fill the Dixie cups up with wax. Microwave for two minutes, stir and microwave for two more minutes.
Prop your votives on their side and pour in the colored wax. Let each layer dry for 20-30 minutes and repeat!
Find full instructions on Brit + Co.
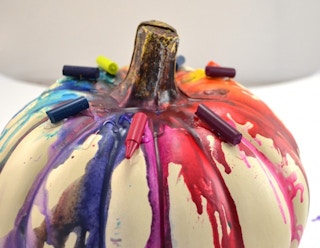
7. Melt crayons on a pumpkin for a colorful Halloween decoration.
Via Mom Spark
To make this craft, you need a white pumpkin, crayons, glue and a blow dryer. Cut the crayons and glue them near the stem of the pumpkin. Use the blow dryer until the crayons start melting down!
Find full instructions on Mom Spark.
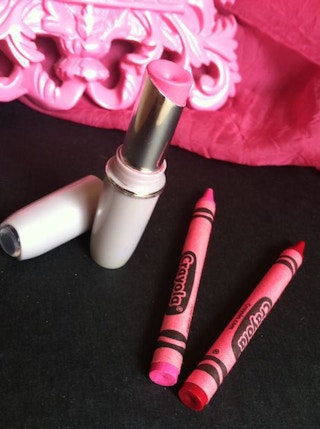
8. Use crayons to make non-toxic lipstick for dress-up play.
Via Instructables
Technically, you can wear this lipstick too, if you really want to.
First, you’ll need crayons, ½ tsp of oil (coconut oil, olive oil, almond oil, jojoba oil, etc.), Vaseline or Shea butter, a stick to stir, a small container, a metal spoon and a stove top (or candle) to melt the ingredients.
To make a whole tube of lipstick, you only need half of a crayon. Add the oil and a dab of Vaseline or Shea butter to the crayon. Heat up the ingredients with a spoon over a candle or stove top. Then, transfer to any container like an old ChapStick or lipstick tube or an old contact case!
Let it dry for about a half hour and you’re done!
Find full instructions on Instructables.
RELATED: 27 Michaels Store Hacks You Need to Know
9. Make a crayon-themed picture frame.

Via Felt So Cute
For this one you’ll need a picture frame with wide edges, several boxes of new crayons, a hot glue gun, a knife and fine-grit sandpaper for a more refined and smooth look.
From there, just pick a spot on the frame and start gluing the crayons. At some point, the crayons will no longer fit, so you’ll need to cut them down and then continue to glue.
Find full instructions on Felt So Cute.
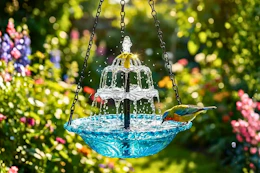
10. Glue crayons to a glass bowl to hold art supplies (or items for a crayon-themed party).
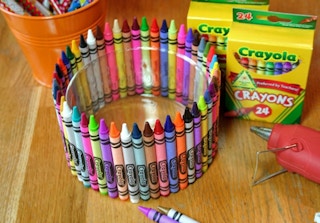
Grab a glass bowl from the dollar store and hot-glue crayons to it. Simple as that.
Use this bowl as a centerpiece for a birthday party, table setting or on your kids’ art table.
Find full instructions on The Celebrations Hope.
11. Make marbled Easter eggs using crayon pieces.
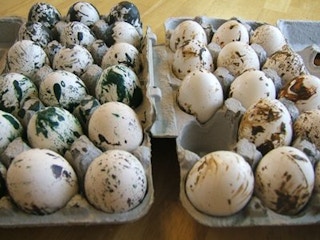
To make marbled eggs, you’ll need eggs (and their cartons), crayons, wax paper, a glass jar, tongs, a spoon and a grater.
First, make hard-boiled eggs. Then, grate the crayons over wax paper. Boil about two cups of hot water and pour it into the glass jar. Add the grated crayons to the water and stir. Using your tongs, immerse an egg into the mixture. Place in the egg carton to dry!
Find full instructions on The Thrifty Couple.
12. Make your children’s teachers a monogrammed picture using crayons.

To make this, you’ll need a picture frame, crayons and a hot glue gun.
Buy a frame in any size you’d like (the one pictured is an 8×10 frame), and remove the glass. Use your printer to print the outline of a giant letter.
Use a sharp knife to cut the crayon. Rolling the crayon while pressing on the knife works best. Then, use a hot glue gun to put the crayons over the outlined letter. Once you glue the crayons to the outlined letter, glue that to a piece of thin cardboard for a super sturdy picture.
Find full instructions on Confidence Meets Parenting.
13. Use shredded crayons to add color to a child’s “calm-down bottle.”

Via Dr. Jean
Make crayon shavings by grating broken crayons. Put a few tablespoons into a plastic bottle, and fill it with water.
Shake and observe. This should help anxious-feeling children relax and feel more calm.
Find full instructions on Dr. Jean.
14. Melt crayons inside a clear glass ornament.

To make this, you’ll need clear glass ornaments, crayons, newspaper, a blow dryer and embellishments if desired.
Before you start, lay out newspapers for easy cleanup — then break up or cut small chunks of crayons, and put them in the center of the glass ornament. Use your blow dryer on high, and twirl the ornament as the wax drips along the inside.
Find full instructions on The Swell Designer.
15. Use broken crayon pieces to make upcycled letters and numbers..

To make these, you’ll need letter molds, crayons and a baking sheet.
Break the crayons into small pieces that’ll fit into the letter or number molds. Set your oven to 350 degrees, and put the molds into the oven for 15 minutes. Once the crayons are melted, let them sit for a few minutes and then put them into the freezer for 15-30 minutes.
After that, carefully pop out your letters and numbers, and use them or give them as gifts.
Find full instructions on One Charming Party.
16. Use melted crayons to decorate salt-dough ornaments for Christmas.

Bake salt-dough ornaments, and while they’re still hot, draw on them with crayons. The heat from the ornaments having been in the oven will melt the crayons, leaving a shiny, waxy coating of color.
Find full instructions on The Artful Parent.
UP NEXT: How to Know When Every Item at Hobby Lobby Goes on Sale

Download the KCL app to add and redeem coupons in store


For iOS and Android users.
Get all the new deals and savings hacks straight to your inbox
Will be used in accordance with our Privacy Policy