
Get all the new deals and savings hacks straight to your inbox
Will be used in accordance with our Privacy Policy
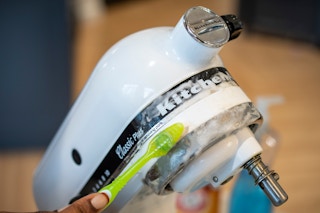
Maintaining your KitchenAid mixer with the proper care and cleaning is the best way to prolong your mixer’s lifetime. On top of the many KitchenAid mixer hacks and recipes, these maintenance tips will keep your mixer in tip-top shape:
1. If your mixer isn’t working, eliminate the most common causes first.

Before you have your KitchenAid mixer in a million different pieces, be sure to check the simplest, most common causes first:
- Is the power cord plugged in? This seems silly but let’s be real — it’s a mistake we’ve all made.
- Does the outlet you’re using have power? Try plugging in a different appliance to see if it turns on. If not, check the circuit breaker in your home to ensure it’s delivering power to the outlet.
- Did you turn it off for 15 seconds before turning it back on? The classic “turn it off then on again” trick works more often than not.
2. Use the heck out of your new mixer for the first 30 days.

Your KitchenAid mixer comes with a one-year limited warranty, but it doesn’t cover damage from accidents, alterations, misuse, or use with non-KitchenAid products.
With that being said, it’s best to catch any pre-existing defects within the first 30 days. That way, any defects you find can’t be attributed to anything else.
Try using your mixer a few times a week — in a number of ways — while it’s still new and fully covered under its warranty. If you do catch a defect, KitchenAid will send you a new unit and arrange to have your original mixer returned.
3. Check your KitchenAid mixer beater-to-bowl clearance with the “dime test.”

If your beater height is too high, it could fail to mix ingredients at the bottom of your bowl. If your beater height is too low, it could scratch the bowl or wear down the coating on your beater attachments.
The “dime test” is a great way to check if your beater is properly adjusted:
- Place the dime in the bowl and attach your KitchenAid Flat Beater.
- Turn your mixer on low speed (1).
If the dime doesn’t move at all, the beater is too high.
If the dime is moving continuously, the beater is too low (possibly scraping your bowl).
If the dime travels slowly around the bowl, your beater is properly adjusted!
NOTE: The dime test only works for stainless steel bowls — not ceramic or glass bowls.
4. Turn the screw on the neck of your mixer to adjust the beater height.

If you’re looking at your mixer head on, you’ll notice a screw on the neck of it (behind where the mixer bowl goes). Turning this screw will adjust the height of your beater so it’s not too high or low.
Using a flathead screwdriver, turn the screw clockwise to lower the beater.
Turn the screw counterclockwise to raise the beater.
WARNING: Don’t adjust the screw on the side of your mixer head. This affects the carbon brushes in your KitchenAid mixer (aka the components that help power up your appliance). If you aren’t careful, turning this screw can wear out those parts prematurely and they’ll have to be replaced.
5. If your mixer overheats, give it time to rest.

It’s normal for your mixer to feel hot to the touch after heavy or extended mixing periods. If it gets TOO hot, some mixers will automatically turn off to prevent overheating. If your mixer feels warm but isn’t turning on, let it cool down for at least 30 minutes before attempting to use it again.
6. Always start your mixer at the lowest possible speed.

No matter what you’re mixing, always start off at the lowest possible speed (1). Once your mixer gets started, gradually increase the speed with the speed control lever.
Starting your mixer at high speed or using the wrong speed for certain ingredients can seriously damage your unit — or at the very least, make a mess of splatter all over your kitchen.
You can avoid damage or potential repairs with this speed control chart for stirring, mixing, beating, and whipping common ingredients:

7. Let your mixer “warm up” after periods of non-use.

Your KitchenAid mixer uses food-grade grease lubricant (as a legal requirement if for some reason oil gets in your food). But this type of lubricant separates easily in cool temperatures. This can cause the liquid part of the lubricant to leak from your mixer.
If it’s been more than a few days since you last used your mixer, let it run on low speed (1) for two to three minutes to allow the lubricant solids and liquids to recombine. This will help keep your mixer running smoothly and prevent it from leaking oil.
8. Buy KitchenAid replacement parts on Amazon.

If something in your KitchenAid mixer breaks, you can buy factory-certified replacement parts from the KitchenAid Store on Amazon. These are Original Equipment Manufacturer (OEM) parts approved by KitchenAid, so they’re covered under your one-year warranty. You can even enter your mixer’s model number to make sure the part will fit before you buy.
The most common replacement parts are:
- Whirlpool W11192795 Stand Mixer Worm Follower Gear (reg. $17.79)
- WP240309-2 240309-2 Gear for KitchenAid Mixer (reg. $27.41)
- KitchenAid Replacement Cord-Power Parts (reg. $16.27)
Ready for a new mixer? Get one for a good price with these KitchenAid deals.
9. Never spray cleaner directly onto your mixer.

You can clean your KitchenAid mixer with a mild or natural household cleaner — as long as you don’t spray it directly onto your unit. The spray might seep into the little nooks and crannies, which could damage the mechanism inside.
Always spray cleaner onto a cloth FIRST before gently wiping down your mixer.
10. Don’t put your Wire Whip in the dishwasher.

Your KitchenAid Wire Whip is made of aluminum. Placing aluminum utensils in the dishwasher can lead to oxidation. When you combine the high heat of your dishwasher with minerals in the water and chemicals in your detergent, it causes the aluminum to permanently blacken.
Most KitchenAid attachments are safe to put in the dishwasher, but your Wire Whip attachment should always be hand-washed.
11. Scrub hard-to-reach areas with baking soda and a toothbrush.

It can be tricky to thoroughly clean areas like the speed control lever or bowl clamp plate. But no worries — you can easily reach these smaller spaces and scrub away dirt and grime with a toothbrush.
Mix warm water, baking soda, and a small amount of dish detergent. Dip the toothbrush into the mixer and scrub away!
12. Use olive oil to clean residue from your mixer bowl.

It’s almost impossible to see, but some new KitchenAid mixers have a stubborn residue in the bowl that no amount of scrubbing will remove. But don’t worry — the residue is completely harmless and is a common result of polishing stainless products.
A great way to remove the residue is to use olive oil. Pour a small amount of olive oil into your mixer bowl and spread it around. Let it sit for several minutes before you wipe it down. After removing the olive oil, wash the bowl with extra hot water and a good dish detergent.
13. Use a toothpick to get rid of crumbs and dust in the rear vent.

The tiny holes on the back of your mixer are a part of its ventilation system. If you notice little pieces of food or dust lodged in the holes, a toothpick is a great tool for easily reaching and removing them from the vent.
14. When all else fails, consult your KitchenAid Mixer Manual.

I’ve made a bad habit of neglecting manuals and trying to figure things out on my own. But I learned this the hard way: manuals typically have answers to all your questions and include valuable info you wouldn’t think to look for. So DO NOT underestimate the owner’s manual!
The KitchenAid Stand Mixer Manual has plenty of tips and “how-tos” to properly maintain, assemble, and repair your KitchenAid mixer.
UP NEXT: The Best Home Hacks That Will Make Your Life Easier

Download the KCL app to add and redeem coupons in store


For iOS and Android users.
Get all the new deals and savings hacks straight to your inbox
Will be used in accordance with our Privacy Policy