
Get all the new deals and savings hacks straight to your inbox
Will be used in accordance with our Privacy Policy
You found the best pumpkin prices around, and you even have your pumpkin carving kits ready. But now,
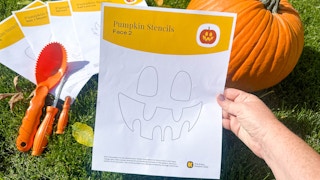
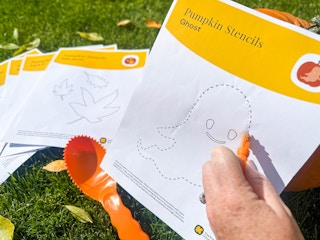
Just pick the Halloween pumpkin stencil you want, lay it on your pumpkin (no transfer paper needed), and use a straight pin to make closely spaced pin pricks along the lines of the pattern. Remove the pattern from the pumpkin and carve the pumpkin by cutting completely through solid lines or peeling away the skin (etch) within dotted lines. We recommend etching before you carve to avoid breakage.
Once you’re ready to clean out your pumpkin, don’t forget to roast the pumpkin seeds. Download The Krazy Coupon Lady app for more holiday ideas and money-saving deals, tips, and coupons.
Which Pumpkins are the Best Carving Pumpkins?

Whether you search in your local grocery store or pumpkin patch, it’s important to know not all pumpkins are created equal when it comes to carving. Common orange-colored varieties noted for carving include the Hobbit pumpkin, Autumn Gold, Gold Rush, Wolf, Captain Jack, Harvest Moon, Howden, and Jack-o’-Lantern pumpkins. For white-colored carving pumpkins, look for Lumina, Baby Boo, or Full Moon.
Tips for picking a pumpkin for carving:
- Pick up your pumpkin and tap it. If the pumpkin sounds hollow, it’s sturdy enough for carving.
- Look for consistent color.
- Check for any scratches, wormholes, cuts, or splits in the surface. Once the skin of a pumpkin is broken, the faster the pumpkin will rot.
- Feel the bottom of the pumpkin to see if the underside is sturdy. Skip the pumpkin if it feels soft or gives way when you apply pressure with both of your thumbs.
- Make sure the pumpkin sits flat (unless you want it to sit crooked).
- Avoid carrying a pumpkin by the stem. Instead, carry it from the bottom either with your arms or bag.
Related: Where to Buy Pumpkins
12 Free Printable Halloween Pumpkin Stencils
If you’re new to pumpkin carving, you have kids wanting to carve pumpkins, or you’re looking for some uncomplicated pumpkin carving designs, our free printable Halloween pumpkin stencils set is ideal.
Depending on the size gourd you’re trying to carve, you can adjust the printed size of the stencil. The best part is, you can print the stencils over and over. The only things you’ll need outside of a carving kit are some newspaper, a strainer if you’re planning on using the seeds, and a few straight pins.
Click the link below each photo so that you can print the stencil in a bigger size.
Free bat & moon pumpkin stencil

Bat and Moon free pumpkin stencil.
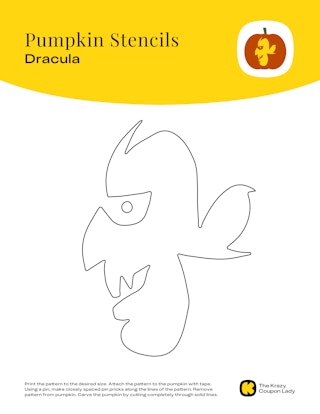
Dracula pumpkin stencil
Cat pumpkin stencil

Ghost

Fall leaves

Lightning bolt

Lightning bolt pumpkin stencil.
Spider

Witch’s hat

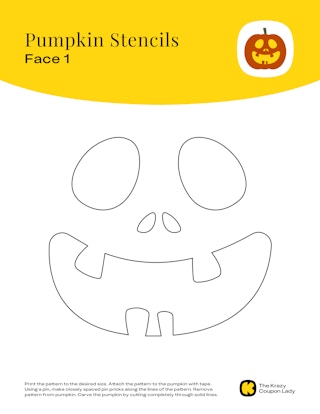
Face 1
Face 2

Face 3

Face 4

Prefer not to cut into your pumpkin? You can still enjoy our free Halloween stencils as coloring sheets and decorate your pumpkin with easy no-carve ideas. Happy Halloween!
Download the KCL app to add and redeem coupons in store


For iOS and Android users.
Get all the new deals and savings hacks straight to your inbox
Will be used in accordance with our Privacy Policy