Get all the new deals and savings hacks straight to your inbox
Will be used in accordance with our Privacy Policy
Oh, home hacks are just the best, aren’t they? I look for the easiest ways to solve pesky problems, like stretching laundry supplies, organizing my pantry, and cleaning dirty vents. With social media, everyone seems to have a simple and creative solution to just about every household problem. Thanks, TikTok.
Hacks can make your life easier and more efficient. Whether you’re looking to save time or just make your living space more comfortable, there’s a shortcut for just about everything. Plus, when you successfully implement a home hack, it can give you a real sense of accomplishment and satisfaction.
Here are the best home shortcuts—from using toothpaste on walls to blow drying your sheets, check out these mind-blowing surprises that save us time and money! Download the Krazy Coupon Lady app to stay abreast of all of your favorite home deals and cleaning supply products.
1. Put a jar in your toilet tank.
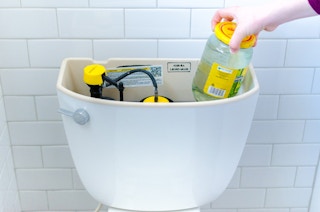
Flushing the toilet uses a lot of water, so adding a jug of water or a glass jar can help. By displacing some of the water in the tank, the jar reduces the amount of water used with each flush, lowering your water bill. I’m sure you’ve heard of using a brick, but I’m not going to recommend that because it could damage the toilet.
Note: Modern high-efficiency toilets use less water, so use this home hack for older models.
2. Rinse your air conditioning vent covers in the dishwasher.
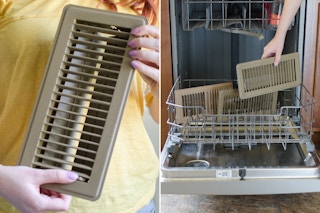
Close the vents before washing so there’s more surface area that gets cleaned. Then, blow dry any remaining water from the covers on the cool setting before installing them back over your vents.
Related: 14 Unexpected Dishwasher Hacks to Clean Everything
3. Keep salads cold with a shower cap.

Add ice to a shower cap, then place a bowl filled with cold food like pasta salad in the cap, allowing the elastic to stretch over the sides to create an ice-box effect. Your food should stay cool for hours!
4. You can also use a shower cap as a travel dog bowl.

Use a shower cap for those hot days when your furry friends need some hydration and you’re without a bowl. Fill a shower cap with water, open it up, and let them drink up.
Need another idea for shower caps? Check out these packing tips.
5. Use your blow dryer to squeeze every last drop of ink out of a cartridge.

Find the spot where the ink comes out of a cartridge (it should be the area that has colored patches and what appears to be a circuit printed on adhesive tape). Aim your blow dryer at that spot for 2-3 minutes. The heat will thin out any remaining ink and clear blockages in the tiny nozzles of the cartridge.
6. Use a blow dryer to warm up your bed if you don’t have an electric blanket.

I don’t know about you, but cold sheets aren’t my thing. Grab a blow dryer and warm up your sheets before you head to bed. Don’t forget the pillowcase, too.
7. Turn an empty cardboard box into drawer dividers.

Drawer dividers can set you back about $15, so use cardboard to get the job done. All you need is some cardboard, a ruler, and a box cutter to make these easy dividers perfect for your sock or junk drawer! Get detailed directions here.
8. Home hacks for your grocery stockpile: Lay boxed foods on their sides so more can fit.

If you’ve gone a little crazy with buy one, get one offers, laying your goods’ boxes on their sides allow you to store more. Plus, you’ll be able to view the labels and see what you have. Organize them by expiration date, too, to optimize freshness.
Use these stockpile tips to maximize your savings on household fundamentals.
9. Make a bag clip with a wine cork.

In desperate snack times, use a sliced cork as a unique DIY bag clip. Slice a cork halfway up one end, and slide it over a folded bag to keep it in place.
Related: 14 Reusable Items That You Shouldn’t Be Throwing Away
10. Keep water bottles together in cabinets with magazine holders.

Magazine holders are versatile vessels for lots of things other than, well, magazines. Look for heavy duty holders (not flimsy) to store all of your Stanley Tumblers when space is tight.
11. Organize flats and flip-flops in magazine holders as well.

I told you that magazine holders are useful! Here’s your chance to organize your closet on a budget. These holders are the perfect size for your stylish flats, sandals, and flip-flops.
Get inspired with our other Dollar Tree organization hacks.
12. Make dryer sheets last longer by cutting them in half.

A box of laundry dryer sheets like Gain and Bounce can cost $5. Lengthen their use by literally cutting them in half. Given the strength of each sheet, you’ll get the freshness that you would normally expect, but you won’t have to worry about stocking up as often.
As long as you’re dealing with laundry hacks, learn how to make your own dishwashing and laundry detergent tabs.
13. Remove a permanent marker stain from nearly any surface with regular toothpaste.

- Choose a non-gel toothpaste that contains baking soda. The baking soda can help to scrub away the stain.
- Apply a small amount of toothpaste to the stain, using a soft-bristled toothbrush or a cloth.
- Gently scrub the stain with the toothpaste, using circular motions. Be careful not to scrub too hard, as this could damage some surfaces.
- Let the toothpaste sit on the stain for several minutes, allowing it to penetrate and break down the ink.
- Wipe away the toothpaste and the ink with a damp cloth. Rinse the cloth frequently to avoid spreading the ink to other areas.
Repeat the process if necessary until the stain is completely gone. Using toothpaste may not work on all surfaces and types of ink, so it’s important to test it in a small, inconspicuous area first before using it on a larger stain.
14. You can also fill small holes in your drywall with toothpaste.

- Clean the area around the hole with a dry cloth to remove any dust or debris.
- Squeeze a small amount of toothpaste onto your finger or a putty knife.
- Apply the toothpaste to the hole, using a putty knife or your finger to press it in.
- Smooth the surface of the toothpaste so that it’s flush with the wall.
- Allow the toothpaste to dry completely, which may take several hours.
- Once the toothpaste is dry, use a fine-grit sandpaper to gently sand the surface until it’s smooth.
While toothpaste is a quick fix, it’s not a long-term solution for fixing holes in drywall, as it may not hold up well over time. It’s best to use a proper drywall repair kit for larger or more permanent fixes.
15. Get the perfect caulk edge with painter’s tape.

Painter’s tape just makes sense when it comes to getting those picture-perfect lines after caulking or painting. Start by cleaning the surface with a dry cloth to get rid of debris. Then, follow these steps:
- Apply a strip of painter’s tape along both sides of the area you will be caulking, leaving a gap where you want to apply the caulk.
- Cut the tip of the caulk tube at a 45-degree angle.
- Apply a smooth, even bead of caulk along the gap between the painter’s tape.
- Use a caulk smoothing tool or your finger to smooth the caulk, pushing it into the gap and creating a neat, even finish.
- Immediately remove the painter’s tape while the caulk is still wet, pulling it away from the surface at a 45-degree angle.
- Allow the caulk to dry completely according to the manufacturer’s instructions.
Avoid leaving the painter’s tape on for too long after caulking, as this may cause the tape to bond with the caulk and become difficult to remove.
Related: 17 Ridiculously Easy Home Repair Hacks Anyone Can Do
16. Clean a toilet with cola.

The acids found in cola drinks break down stains just as well as regular bathroom cleaners. Pour the soda around the inside of your toilet bowl and let it sit for at least an hour before scrubbing with a brush and flushing. Soda coupons can help save you money so you can use this home hack.
17. Make your glass stovetop look new again with a Magic Eraser.

Be sure not to apply too much pressure so the surface doesn’t get scratched. Rinse the Magic Eraser frequently and continue scrubbing until all stains and dirt are removed. Use a clean, damp cloth to wipe away any residue.
Note: Some glass stovetops may have specific cleaning instructions from the manufacturer, so check the owner’s manual before using any cleaning products or methods.
We have a page dedicated to Mr. Clean coupons so you can save before you head to the grocery store.
18. Make finger paint with expired Greek yogurt.

19. Keep board game pieces together with Press’n Seal.

20. Stick a recipe card to a cabinet with Press’n Seal to keep it clean and at eye level.

21. Line the bottom of your fireplace with foil for easy cleanup.

By lining the bottom of your fireplace with foil, you can simplify the cleanup process and avoid the need to sweep or vacuum up ashes and debris after each use. And, this method can help to protect the bottom of your fireplace from damage due to heat or abrasion, extending its lifespan and reducing the need for repairs. After your fire, fold in the edges with the ashes inside and toss.
22. Maintain your collection of cords and chargers with a shoe organizer.

Whether you live alone or with a big family, all sorts of cords accumulate. Put them in their place with a familiar item—a hanging shoe organizer. Place the organizer inside of a closet and label each pocket with the type of cord.
23. Vacuum up some Downy Unstoppables or ground cinnamon if your vacuum releases a funky smell.

These options can freshen up your vacuum cleaner and neutralize any unpleasant odors that may be lingering inside the machine. And, your home will smell great! Let your vacuum run for a few minutes to help distribute the scent throughout the machine.
Check if the funky smell is still present. If it is, you may need to repeat the process a few more times until the smell disappears. Or, just buy a new one (ha, ha).
24. Use a pool noodle to fill your mop bucket as one of your cleaning home hacks.
By using a pool noodle to fill your mop bucket, you can prevent water from spilling over the sides and make the process faster and more efficient. Plus, this method can help to reduce the risk of injury or strain that may result from lifting a heavy bucket full of water.
Download the KCL app to add and redeem coupons in store


For iOS and Android users.
Get all the new deals and savings hacks straight to your inbox
Will be used in accordance with our Privacy Policy