

Get all the new deals and savings hacks straight to your inbox
Will be used in accordance with our Privacy Policy
I don’t know about you all, but fall is already here and I’m really far behind. I promised my kids this summer to make a fairy garden, and now they also want to decorate for Halloween, another family tradition. Because I ‘m running out of time before the holidays, I decided to do both at the same time.
So…I made a Halloween Fairy Garden! I collected cheap things from the dollar store and scoured the clearance section at local craft stores. For more expensive items I, of course, used coupons, ’cause that’s what I do best. Now, the kids are happy and I can start thinking about the holidays.
Here’s how I built mine…
Psst! Download the KCL app for craft supply deal alerts!
1. Buy ready-made cheap Halloween fairy garden decor.

I found white rocks, green moss and red acrylic rubies, at the Dollar Tree. The bridge and other Halloween themed items, like a witch’s house, a fairy witch, tombstones, mini pumpkins, fall floral picks, and cauldron pot, I picked up on sale or with coupons at local craft stores.
By searching through the clearance sections at Michaels, I found purple moss and faux moss stones for just over $1. If you can’t find the faux stones on clearance at your Michaels location, you can get a smaller version of faux moss stones at the Dollar Tree.
I finished off my shopping trip at a home improvement store, grabbing potting soil and a few plants.
PRO TIP: If you want to save on cost, collect rocks, sticks, and bark from nature to use in your witch’s garden. I made a DIY fence to save money.
2. Gather supplies to make a fairy garden graveyard fence.

A graveyard fence felt like a must. But, the only fence I liked was way too expensive and I couldn’t find a coupon that would work. So, I made my own. It was easy and a quarter of the price.
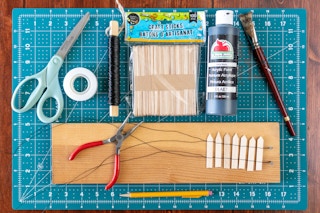
Here’s what you’ll need:
- Wooden Craft sticks (dollar store)
- Sharp (large) Scissors
- Pencil
- Black Wire
- Black Acrylic Paint
- Paint Brush
- Scrap wood
- Two nails
- Hammer
- Wire cutters
3. To begin, mark the center of your craft sticks.

Don’t worry if the halves aren’t completely equal in length. It’ll make the fence look more spooky.
4. Cut each stick in half using a pair of large, sharp scissors.

5. Draw a “point” on each rounded side of the craft stick.

6. Cut the craft sticks into pointed pickets.

Craft sticks from the Dollar Tree are thinner and easier to cut then high quality sticks from the craft store, plus they’re only $1!
7. Assemble your spooky fairy garden graveyard fence.

Using a hammer, secure two nails about one inch apart near the end of a scrap piece of wood.
Cut two pieces of wire three feet long and fold each piece evenly in half.
With your fingers, twist the folded end a couple of times to create a small loop that will fit over your nailhead. Make sure both wires/loops are the same size to keep your pickets evenly lined up.
PRO TIP: Cut pieces of wire slightly longer than you think you’ll need for the length of your fence. I guessed at the length of my fence and continued adding pickets until I felt it was long enough. It’s easier to cut off the excess wire than realize you’ve come up short.
8. Attach the fence pickets to the wire.
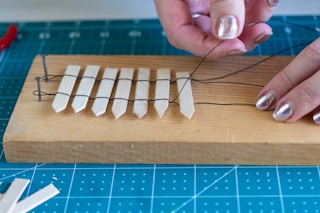
You want the bottom of your pickets to line up, or your fence will flop over. Use a ruler to draw a line along the length of the board.
Take a tiny picket and sandwich it between the two wires, butting it up against the loops. You’ll have one wire under the stick and the other over. Then make sure the bottom flat end lines up with the line you’ve drawn.
9. Secure the pickets in place by twisting the wire.

Secure each picket by twisting both wires (one on the top and the other near the bottom) two to three times, depending on the length you want between each picket. Make it tight so that the pickets stay in place. If you want them really tight, use a pair of pliers to really give them a firm final twist.
Repeat this process, adding pickets until you’ve reached the length you want for your fence. Twist the wires tightly at the end and leave the excess until after the next step.
10. Using black acrylic craft paint, cover the craft sticks front and back.

To keep your fence from moving while you paint it, tape the excess wires on each end to your newspaper or plastic you’re painting on top of. If you didn’t have excess on one end, wrap a scrap piece of wire around the last craft stick and secure that with a piece of tape.
When the fence is dry, cut the excess off the end, if you had any, and put the fence aside for the fun part.
Time to assemble your fairy garden (the fun part)!
11. Line the bottom of your pot with empty plastic water bottles.

If your pot doesn’t have a drainage hole in it, line the bottom with empty water bottles or small pebbles. Remember, plants don’t like “wet feet,” so you need to lift them out of the water that collects in the bottom of the pot. The water bottles or rocks create drainage and let the roots dry slightly between waterings. I like using water bottles in large pots, because I don’t need as much potting soil and it makes the pot lighter.
Fill the pot the remainder of the way with soil.
12. Plan your layout and plant your plants.

Begin laying out where you want things in your garden. Put large items in like your bridge, witch’s house, and graveyard fence, and shift them around to accommodate the plants.
Remove the items, keeping in mind where they’ll go and pot your plants.
PRO TIP: When selecting plants, choose varieties that need the same amount of water and sunlight.
13. Trim branches into spooky trees.

I pruned a few branches from a tree in my yard and trimmed them down to make them feel like large spooky trees.
14. And add extra color with floral picks.

JOANN carries fall “berry” floral picks for $1 on sale, regularly $2. When spread out, they look like miniature trees with changing leaves. They’re a perfect accompaniment to the spooky branch trees.
If you don’t have a JOANN near you, check out any of your local craft stores or even grocery store floral sections for similar options. These picks aren’t available online.
15. Place the large objects back in and add moss.

I covered up the dirt with green moss, which I placed in and around the graveyard and in the pumpkin patch. (See how cute the fence turned out?)
16. Add miniature tombstones.

17. And position the mini pumpkins.

18. Fill in the rest of the dirt with more moss.

To give a bit of contrast and “spooky Halloween” colors, I used purple moss to cover the rest of the dirt. You can use any color you wish, or even fill it in with small rocks.
19. Add a lava river with rubies from the dollar store.

A Halloween Fairy Witch’s Garden wouldn’t be complete without a lava river. Grab a pack of acrylic ruby gems from the Dollar Tree and add them on either side of your bridge, dividing your pumpkin patch from your graveyard.
20. Fill in gaps with faux moss stones and rocks.

Place white rocks and faux moss stones in and around the large objects to fill in any additional gaps and create dimension and contrast.
21. Finally, add a fairy witch to the scene and enjoy!


Watering Tip: To water your plants, use a water bottle with a small opening. Pour the water right into the soil where your plants are planted to avoid damaging or altering your miniature scene.
Download the KCL app to add and redeem coupons in store


For iOS and Android users.
Get all the new deals and savings hacks straight to your inbox
Will be used in accordance with our Privacy Policy