
Get all the new deals and savings hacks straight to your inbox
Will be used in accordance with our Privacy Policy
Easter is one of those holidays with lots of color and plenty of springtime vibes. Make your space extra festive with these cheap and easy Easter craft ideas. Whether you’re looking for some fun activities to do with your kids or just want to add some cheerful decor to your home, we’ve got you covered.
Easter is a wonderful time to get together with family and friends, enjoy a delicious Easter dinner, munch on mini cheesecakes, and have indoor Easter egg hunts! And, don’t forget to pick up affordable pre-filled easter baskets.
If you’re in the mood for some DIY projects, check out these affordable Easter crafts and decoration ideas that you can do with your family or on your own. From decorating Easter eggs (or egg alternatives) to creating your own bunny ears wreaths, there’s something for everyone.
Check out Krazy Coupon Lady’s Easter deals for great ways to save on everything for Easter. For more savings hacks and smart shopping tips, text HACKS to 57299.
1. Easily dye eggs with a wire whisk.

2. Make a DIY drying rack made from pins and thick foam board for your painted eggs.

Here’s how to do it:
Materials:
- Thick foam board
- Ruler
- Pencil
- Box cutter or craft knife
- Straight pins
Instructions:
- Measure and mark a grid of evenly spaced dots on the foam board, leaving about an inch between each dot. The size of the grid will depend on the size of your foam board and the number of eggs you want to dry at once.
- Use the box cutter or craft knife to make small slits at each dot, cutting about halfway through the foam board.
- Insert a straight pin into each slit, leaving enough of the pin sticking out to hold an egg.
- To use the drying rack, simply place your freshly dyed eggs onto the pins, allowing them to dry completely.
By creating your own DIY drying rack, you can ensure that your painted eggs dry evenly and without any smudging. This is also a great way to display your colorful eggs as part of your Easter decor.
3. Blow the yolk out of an egg with a rubber aspirator syringe from the dollar store.

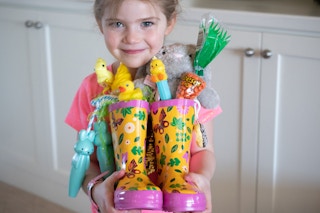
4. Assemble a non-traditional Easter “basket” with rubber boots.

Materials:
- Rubber boots
- Easter grass or shredded paper
- Easter treats and gifts
Instructions:
- Choose a pair of rubber boots in a fun and festive color or pattern. You can also decorate plain rubber boots with paint or stickers to make them more Easter-themed.
- Line the boots with Easter grass or shredded paper to create a nest-like base for your treats and gifts.
- Fill the boots with your Easter goodies, such as candy, small toys, or other treats.
- You can also add some decorative elements, such as silk flowers or ribbon, to give the “basket” a finishing touch.
The rubber boots not only make a unique and fun Easter basket, but they can also be reused after the holiday season for outdoor activities. This is a great way to repurpose items you already have at home and create a one-of-a-kind Easter display.
5. Easter craft ideas that transform a chocolate creme egg into a bunny.

6. Perfectly cook hard boiled eggs by steaming them.

Begin with an inch deep of boiling water in your pot. Place your eggs in a steamer basket, then put the basket in your boiling water. Cover your pot, turn the heat to medium-low, and let ’em cook for 13 minutes. When the 13 minutes are up, halt the cooking process and cool the eggs by placing them IMMEDIATELY in an ice bath for 15 minutes.
7. Soak eggs in vinegar for two full minutes before dying to get the color to stick.

8. Turn a potato into an Easter egg stamp.

RELATED: Painting Potatoes Instead of Easter Eggs? Fun, But Not a Money-Saver
9. Decorate eggs by swirling them in food coloring and whipped topping.

Fill each cup of a muffin tin with whipped topping. Using whipped topping instead of shaving cream will ensure they’re still safe to eat. Add three to four drops of liquid food coloring in your favorite color combinations to each cup. Using a toothpick, swirl the colors to create a marbled effect.
Roll the eggs in the whipped topping and let sit for 10-15 minutes. Remove the eggs and rinse them until no whipped topping remains. Let them dry and enjoy!

10. Use white flowers and food coloring for a fun centerpiece and springtime science experiment.

11. Celebrate with a glow-in-the-dark Easter egg hunt.

12. Make Easter egg bath bombs.

- 1 cup citric acid crystals
- 1 cup baking soda
- ½ cup corn starch
- ½ cup melted coconut oil
- Food coloring
- 8-10 drops essential oil
- Small Toys (optional)

Add 8-10 drops of your favorite essential oils. Pack the ingredients into plastic Easter eggs, and for an added bit of fun, place an Easter toy in the center of each egg.
To prevent the ingredients from drying out as you work, keep them covered with plastic wrap. Allow the ingredients to dry in the eggs overnight.
13. Dye eggs using Kool-Aid.

Keep eggs submerged until the desired color is reached.
14. Skip the Easter basket and fill a makeup bag with goodies for teenage girls.

Materials:
- Makeup bag
- Easter treats and gifts
Instructions:
- Choose a makeup bag in a fun and festive color or pattern. You can also personalize it with the recipient’s name or initials.
- Fill the makeup bag with Easter treats and gifts that teenage girls will love, such as:
- Lip balm or lipstick in a fun shade
- Nail polish or nail art supplies
- Hair accessories, like scrunchies or hair clips
- Face masks or skincare products
- Small toys or trinkets, such as mini plushies or keychains
- Candy or chocolates
Add a personal touch by including a handwritten note or card wishing the recipient a happy Easter.The makeup bag can also be reused after Easter for storing makeup or other small items.
15. Serve your kids their lunch in large plastic Easter eggs.

16. Turn a paper plate into a bunny ears hat for kids.

17. Decorate eggs with glue dots and glitter.


18. Use a brown paper bag and pom poms to make an Easter Bunny lunch bag.

Fill the bag with lunch, Easter eggs, candy or any other Easter goodies, and wrap with twine or string and the gift tag. Glue on a pom-pom ball as a cottontail.
19. Decorate Easter eggs using a plastic bag, food coloring, and glitter.


20. Turn plastic Easter eggs into holiday party lights.


First, open the plastic eggs and set one side on the wood block to prevent the drill bit from damaging the surface you’re working on.
Using a drill bit the same size as the light, slowly (and carefully) drill into your plastic egg. If there’s a small hole at the end of your egg (as most plastic eggs have), try drilling into that hole. Your egg will be less likely to crack.
Insert the light into the end of the egg.
Download the KCL app to add and redeem coupons in store


For iOS and Android users.
Get all the new deals and savings hacks straight to your inbox
Will be used in accordance with our Privacy Policy