
Get all the new deals and savings hacks straight to your inbox
Will be used in accordance with our Privacy Policy
Need easy and cheap DIY Halloween crafts even your kids can help make? A lot of the ideas are easy Halloween crafts for kids and require items that you probably have around your house such as paint, a Sharpie, cardstock paper, and tape.
However, some require a bit more work and that’s where any DIY-lover can have some Halloween fun. Meaning, you may have to break out the glue gun or power drill. From spider ice cubes to a stacked pumpkin DIY, we found some of the best DIY Halloween crafts for the whole family.
As long as you’re in the Halloween spirit, these tips could also help you in your spooky-holiday planning:
- Where to Buy Cheap Halloween Candy, Sorted by Price per Piece
- Ridiculously Easy DIY Halloween Costumes From Dollar Tree
- Scary Good Halloween Treat Ideas
For more savings hacks and smart shopping tips, text HACKS to 57299.
1. Make stacked pumpkin from plastic trick-or-treat pails.

Don’t limit your DIY Halloween crafts just to the indoors — impress your party guests and trick-or-treaters with a light up pumpkin totem.
You’ll need:
- 5 trick-or-treat pumpkin pails (Tip: Look for old pumpkins in your basement or garage first. If you can’t find any, hit up your local “Buy Nothing” group on Facebook. I was able to get five for free!)
- 1 garden stake or rebar* ($5, Home Depot)
- String of white lights
- Drill and 1.5-inch spade drill bit ($7, Home Depot)
- Witch’s hat ($2 each, Michaels) (Tip: Make one from black construction paper and tape!)
- Wire
*The length of the rebar depends on the height of the pails. As an estimate, the average pail height is 8-12 inches, which means your stake or rebar should be 3-4 feet.

Begin by cutting two holes in the bottom of each pumpkin pail:
- One center hole that’s barely larger than the stake used to assemble them
- One 1.5-inch hole to pull the sting of lights through.
The 1.5-inch hole is necessary for the light plug to fit through. To make the bottom pumpkin sit flat, run the light cord out the back instead of the bottom.
Insert your stake into the ground, then string white lights through the largest holes. One at a time, lower the pumpkins onto the stake.
Finish off your stacked pumpkins by using wire to attach a witch’s hat to the top.
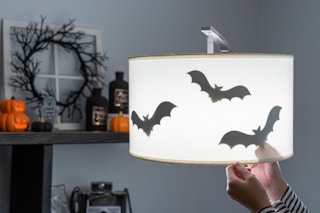
2. Attach DIY paper bats to the inside of a lamp shade with double-sided tape.

Here’s a DIY Halloween craft that your guests will go batty for. Using black cardstock ($1, Michaels) and a bat template (try the free one from Made Everyday), lay the template over the paper and cut out the bat. Repeat for each bat.
Add double-stick tape to the back of each bat, and place them strategically on the underside of your lamp shade.
3. Use a trick-or-treat pumpkin pail to dress up an outdoor light.
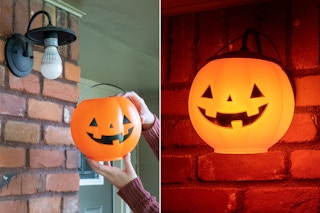
Secure the pail in place with zip ties ($1.25 for 8, Dollar Tree) and ensure that no part of the light bulb touches the plastic. If your outdoor light shade is large or hard to remove, try cutting a hole in the back of the pail, making it just large enough to slip onto the light.
4. Serve chilled creepy crawlies in drinks by freezing plastic spiders in an ice cube tray.

You may want to warn your guests before they scream at you. Grab a pack of plastic spiders (100-pack for $0.97, Walmart), add them to your ice tray with water, and freeze for several hours.
5. Tie craft pumpkins together to make a DIY fall bunting.

Pumpkin decorations are perfect for Halloween and other fall gatherings. Find styrofoam pumpkins at Dollar Tree, Walmart, or Amazon. Simply attach string to the pumpkin stems and hang in your desired area.
As for paint, use what you have at home first. My kids have several tubes of acrylic paint that would work perfectly for this Halloween craft. Otherwise, Walmart has craft acrylic paint for under a dollar. Consider adding some glitter (again, check your craft bin) or use glow-in-the-dark paint ($4, Michaels).
6. Make DIY Halloween craft monster pencils by gluing pom-poms and googly eyes onto eraser caps.

Glue a pom-pom ball (80-count for $1.25, Dollar Tree) to the top of a pencil eraser cap (25 for $0.99, Target). Then, add googly eyes (125 for $1.25, Dollar Tree) and pop the eraser cap onto a pencil. These make for great additions to Halloween treat bags. Halloween pencils are plentiful at dollar stores, but if you don’t want to wait for their seasonal stock, Target has Halloween themed pencils (6 for $0.70) available now.
7. Create the ultimate DIY Halloween teacher’s gift by turning a mason jar into a candy-filled pumpkin.

If you need a fun and creative Halloween craft to bring to school or pass out at a party, this is a project that everyone can help with. Whether it’s cutting out felt leaves or filling it with candy, make this your next weekend craft.
You’ll need:
- 8-ounce mason jars with lids (6 for $5.99, Michaels)
- Spray paint ($6, Walmart) Tip: Look in your garage first!
- Wooden knobs ($1.78 each, Amazon)
- Green felt ($1.25, Dollar Tree)
- Cardstock paper ($3, Michaels)
- Scissors
- Pencil for curling the paper
- Glue gun

Use orange spray paint to coat the outside of a mason jar. To ensure the paint sticks well, use a glass primer first (Rust-Oleum has a paint and primer spray). Try to avoid getting paint on the inside of the jar since you’ll be filling it with treats.
Paint the ring, cap, and a wooden knob (found in the wood section at your local craft store) with brown paint. Let the items dry thoroughly — at least one hour.

Attach felt leaves (here’s a leaf template) and curled green and brown paper to the knob, and secure it to the top of the jar. Fill the jar with candy and gift it. I’m pretty sure your gift recipients will be impressed.
8. Make this easy Halloween craft and DIY table lamp with a faux pumpkin and drill.

It’s time to light up your Halloween crafts with the help of a drill. This is definitely an adult-only project, but you could let the kiddos choose the pumpkin or help clean as you go. Now, get started.
You’ll need:
- Faux craft pumpkins
- Drill
- Drill bits ($5, Walmart) – Tip: Borrow some from a neighbor, family member or friend!
- 1-inch spade drill bit ($4, Walmart)
- Single light clip-in lamp cord (like the ones from Christmas village houses) ($4, Walmart)
- Trash bags for easy cleanup

Carefully drill holes all over your craft pumpkin. Create variation by using different-sized drill bits.
Using a 1-inch spade drill bit, cut a hole in the back of the pumpkin that’s large enough for the clip-in light. Voilà!
For a more nontraditional route, some stores sell faux pumpkins in bright colors like teal and hot pink for added fun.
9. Use spray paint to transform a trick-or-treat pumpkin pail into a DIY Halloween faux copper flower pot.

Spray the outside of a pumpkin pail with hammered copper spray paint ($10, Walmart). Once dry, pop in a fall plant and enjoy. When Halloween is over, turn the jack-o-lantern face around to continue enjoying this easy Halloween craft through the fall season.
10. Cut and hang black trash bags over doorways for an easy DIY Halloween decoration.

When you’re in a pinch for a quick DIY Halloween craft, a black trash bag can come in handy. With the bag laying flat, use sharp scissors to create a fringed look (1-inch wide strips). Be sure not to cut all the way through, and it’s ok if the lines aren’t straight. Tape or staple the fringed bag for a creepy doorway effect.
11. Turn candleholders into mummies with gauze and googly eyes for easy Halloween crafts.

Talk about cheap and easy Halloween crafts for kids. You literally only need three items to get this done.
You’ll need (all items are $1.25 from Dollar Tree):
Wrap gauze around each candle holder and secure it with a hot glue gun. Glue googly eyes to complete the look.

12. Turn lollipops into edible spiders with pipe cleaners and googly eyes.

I’m not a fan of real spiders, but edible ones are manageable as long as they don’t look too scary. Kids will get a kick out of making these tasty arachnids.
You’ll need:
- Pipe cleaners (25 for $0.82, Walmart)
- Lollipops ($1.25, Dollar Tree)
- Googly eyes ($1.25, Dollar Tree)
Twist four pipe cleaners around the base of a lollipop, bending the ends to look like feet. Finalize your design by gluing on googly eyes. If you’re afraid you’ll end up with too much candy, then check out these fun ways to use leftover Halloween candy.
13. Create an illuminated Halloween mason jar.

Mason jars are craft essentials because they’re so versatile … and super easy DIY Halloween crafts. Pour your desired acrylic paint ($0.58, Walmart) in the jar and swirl around to coat, pouring out the access. Let it dry. Add your favorite spooky (or friendly) face to the outside of the jar with a Sharpie.
You could add mini LED lights to really make the ghost glow.
14. Use a popsicle stick, paper, and glue for a Halloween craft for preschoolers.

Preschoolers will appreciate the opportunity to customize this craft with cutouts and brightly colored construction paper. Use letter stencils ($3, Walmart) to trace B-O-O on construction paper. Be sure to not separate the letters. Glue to the popsicle stick.
15. Give your guests DIY Halloween treat bags.

Even with store-bought treat bags, you can add some pizzazz with stickers; custom thank-you cards, and hand-selected candy and favors. Buying pre-printed Halloween paper bags (60 for $10.99, Amazon) saves time, but you can save some cash by using inexpensive Halloween loot bags from Five Below (10 for $1). They still have the ability to make fun Halloween crafts for kids by filling them with candy or small toys.
You can make the one above just by painting brown paper bags (50-count for $2, Target) orange and then giving guests black markers and stickers to decorate the bag.
16. Fill jars or vases with cotton balls, spider rings, and glow sticks to make Halloween centerpieces.

Not only does this craft tackle the theme, but it doubles as a light source — perfect for lining your porch, driveway, backyard, or on your party tables.
You’ll need ($1.25 each at Dollar Tree):
Add cotton balls to a glass Mason jar. Gently squeeze in spider rings along the sides and add glow sticks to create a spooky effect.
17. Build a Halloween fairy garden in a cauldron pot.

If you’re crafty (which you obviously are if you’re reading this), you can make this Halloween idea using a large terracotta pot, an apple crate, a witch’s cauldron, or even a mini teacup. Just add rocks, moss, flowers, and miniatures to finish your theme. We have the step-by-step instructions for the how to make a Halloween fairy garden so it’s easier to assemble.
18. Make Halloween toilet paper roll figures.

This DIY Halloween craft has the ability to be absolutely free since you only need construction paper, an empty toilet paper roll, and assorted accessories. Get your school glue ready, and get the kids involved so they can create their own.
19. Decorate rocks with silly faces using acrylic paint.

Acrylic paint from Walmart will keep this budget friendly. After the paint is dry, draw on faces and hot glue googly eyes. A fine tip Sharpie ($3, Joann) or a fine tip paintbrush can help with the small details. Glow-in-the-dark acrylic paint would be a good option for after-dark Halloween games.
20. Create a Halloween wreath for your front door.

Don’t you love Halloween front porch decor that only requires two items? I sure do. Grab a 14-inch (at least) foam wreath form ($6, Hobby Lobby) and then here’s where you can customize your wreath. Choose ribbon, washi tape, fabric, artificial leaves, etc. Use double-stick tape or hot glue to secure the items in place.
21. Serve party drinks in a carved out pumpkin.

Start by carving a wide, stout pumpkin. Create a barrier between the pumpkin and ice with cellophane or plastic wrap. Add your ice, then place your drinks into it.
22. Melt crayons over faux pumpkins to create a colorful downpour look.

You won’t need much to create this unique and colorful Halloween craft. It’s actually perfect for year-round decor.
You’ll need:
- White faux pumpkin (Tip: Save money by doing it to your real pumpkin!)
- 32 Crayola crayons (Tip: Ask local Facebook groups if anyone has old, broken crayons to give away for free)
- Clear tacky glue ($3, Michaels)
- Blow dryer or heat gun
- Drop cloth or old bed sheet

Instructions:
- Peel the paper from the crayons and glue to the top of the pumpkin, with the tip pointing outward.
- Before melting, place the pumpkin on a drop cloth to catch the drips.
- Point your blow dryer or heat gun directly over the crayons (then different angles) until they begin melting.
- Let cool to harden.
23. Use metallic acrylic paint to add elegance to your real pumpkins.

As you can tell, acrylic paint should be in your craft box year-round. Here’s a chance to jazz up your real pumpkins in any design you like.
24. Use a Sharpie to turn regular wine glasses into wicked goblets for Halloween drinks.

You’ll need wine glasses ($1.25 each, Dollar Tree) and an oil-based Sharpie ($4, Joann) for this craft, which is perfect for adults during and after your party.
Use an oil-based Sharpie to design a simple cobweb design on the stem of each wine glass. You may spend a little more on the Sharpie, but you can make a ton of Dollar Tree Halloween wine glasses with it.
Tip: Use the Sharpie to personalize each wine glass with a guest’s name and decorate the stems with this simple spider web effect.

You could even throw a party and make your own costume (be sure to use Spirit Halloween savings tips)!
25. Repurpose pumpkin seeds for a quick piece of artwork.

Download the KCL app to add and redeem coupons in store


For iOS and Android users.
Get all the new deals and savings hacks straight to your inbox
Will be used in accordance with our Privacy Policy