
We love good DIY Dollar Tree Christmas crafts during the holiday season. Not only do crafts save money, but they can also be a fun way to spend time with your friends and family during this special time of year.
Holiday decor can cost anywhere from $5 to $50, but we’ve got a handful of fun ideas that are all $15 and under. All of the supplies needed for these projects can be purchased for $1.25 at Dollar Tree. But, did you know that you can actually earn free stuff at Dollar Tree using apps? Head to our Freebies page for the latest deals.
With Christmas clearance sales on the horizon, you can also start your decor list for next year and stock up on the supplies this year for even less. Use this as a shopping list of sorts to help you plan your DIY crafts for this year and beyond.
If none of these projects spark inspiration, try browsing our Dollar Tree deals to see if anything else motivates you to get crafty. Want more crafting tips? Text HACKS to 57299 or just download the Krazy Coupon Lady app to view holiday deals and DIY ideas.
DIY Dollar Tree Christmas Crafts & Holiday Decoration Deals
Listen, Dollar Tree is already cheap, but it gets even better — especially when you pair coupons with name-brand items commonly found there. Yes, you can coupon at Dollar Tree. Here’s a quick rundown of the fine print of the Dollar Tree Coupon Policy
Check KCL’s Dollar Tree deals for items on your holiday shopping list. Things like batteries for toys and stocking stuffer candies, lip balm, and body care items have coupons and rebate app offers often.
For example, look for coupons for the following brands and these Dollar Tree items you should never buy anywhere else:
The DIY Dollar Tree Christmas crafts below can be created by items you’re likely to find at your Dollar Tree, but keep in mind that every store’s inventory varies. And some supplies – like special lights – can be purchased at craft stores or on Amazon. Before you start crafting, look in your craft bins for supplies. You’d be surprised what you already have. It will save you some cash (and gas).
1. Make Santa-themed Christmas tree lights ($6.25 for one 5-foot strand).
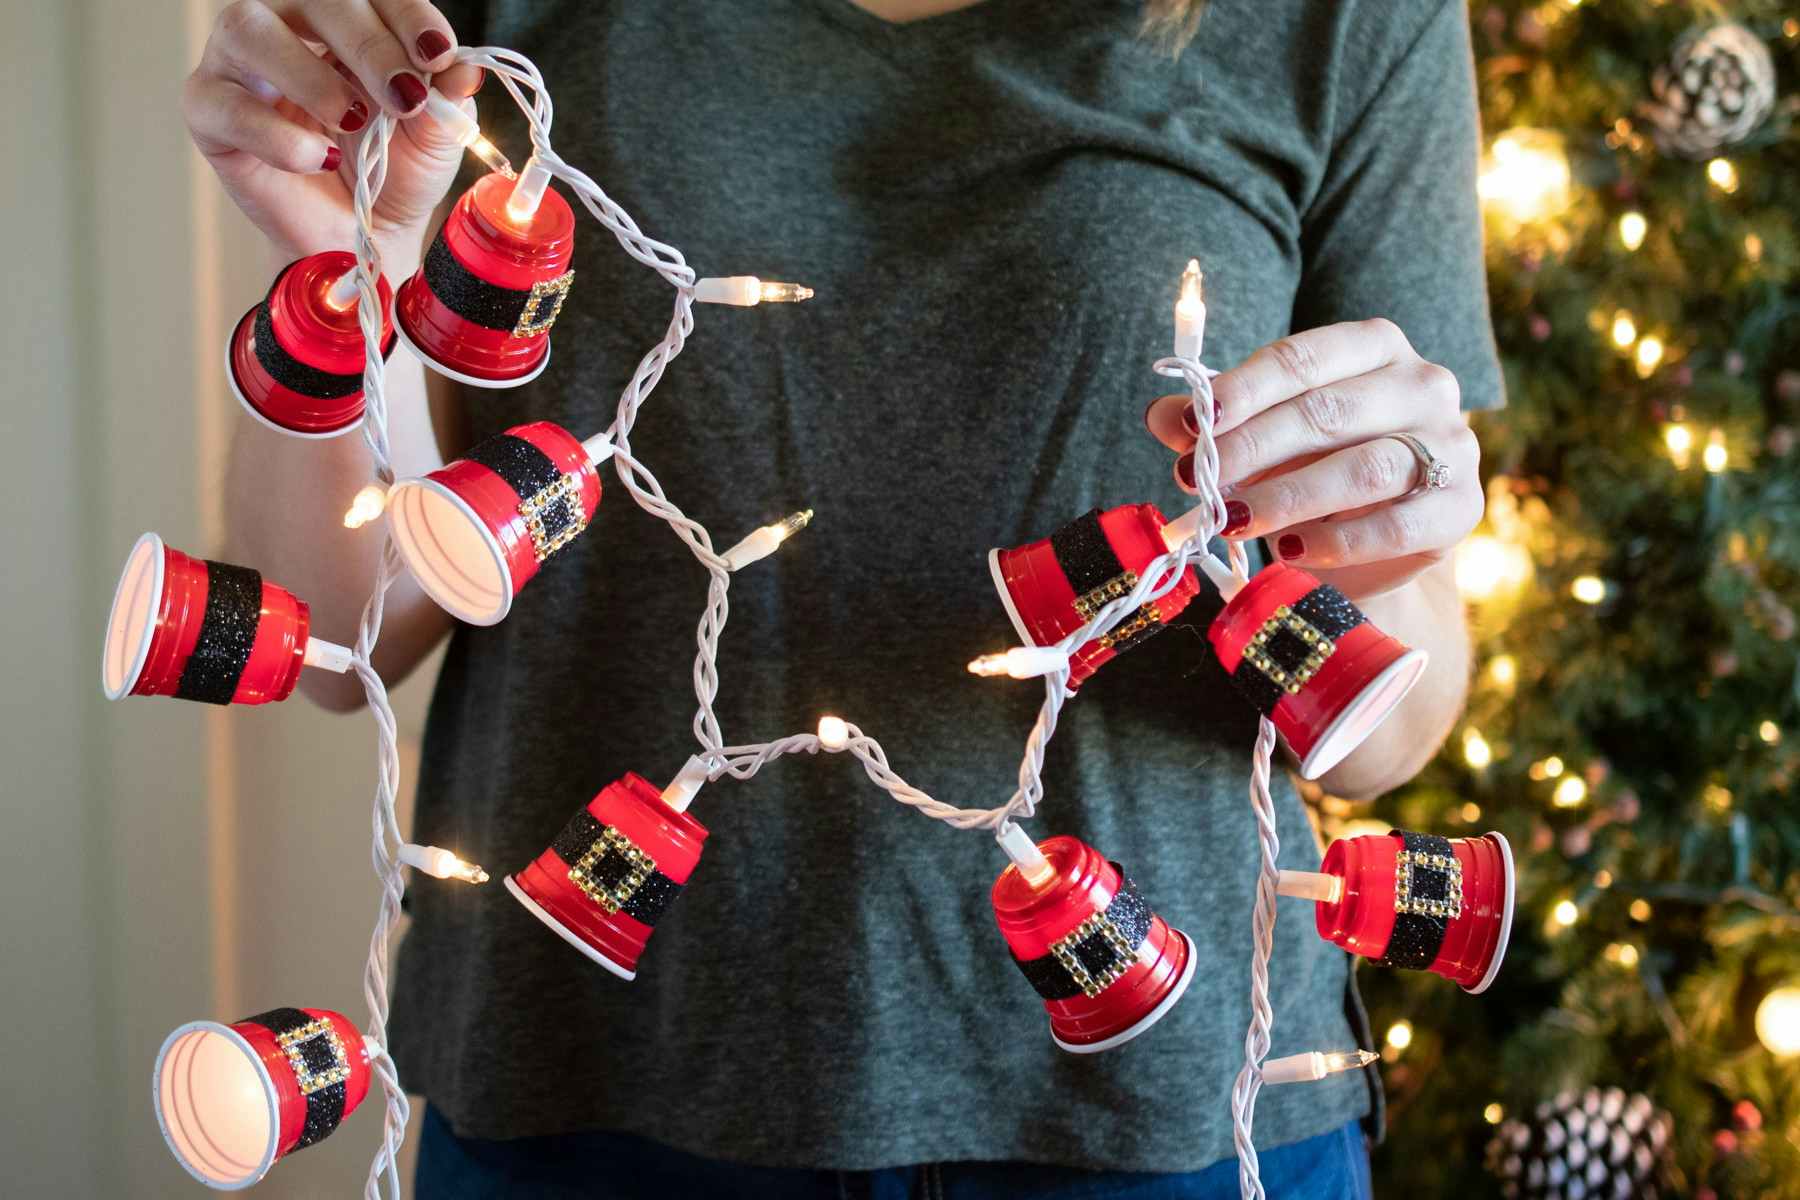
First, round up your supplies, then get ready to make these easy Dollar Tree Christmas decorations.
Dollar Tree supplies you’ll need:
- Christmas lights ($1.25 each)
- Mini red cups ($1.25, 22 cups)
- Black glitter ribbon ($1.25, 5-foot roll)
- Gold “rhinestone” adhesive sheet ($1.25, 6×10-inch sheet)
- Craft knife ($1.25)
- Hot glue and hot glue gun

What you’ll do:
- Using a craft knife, cut square buckles from an adhesive sheet of gold “rhinestones” found in the Dollar Tree craft section.
- Cut pieces of black glitter ribbon so they wrap completely around each cup and then secure them in place with hot glue.
- With a craft knife, carefully cut a small “x” into the bottom of each cup and insert a light into each hole.
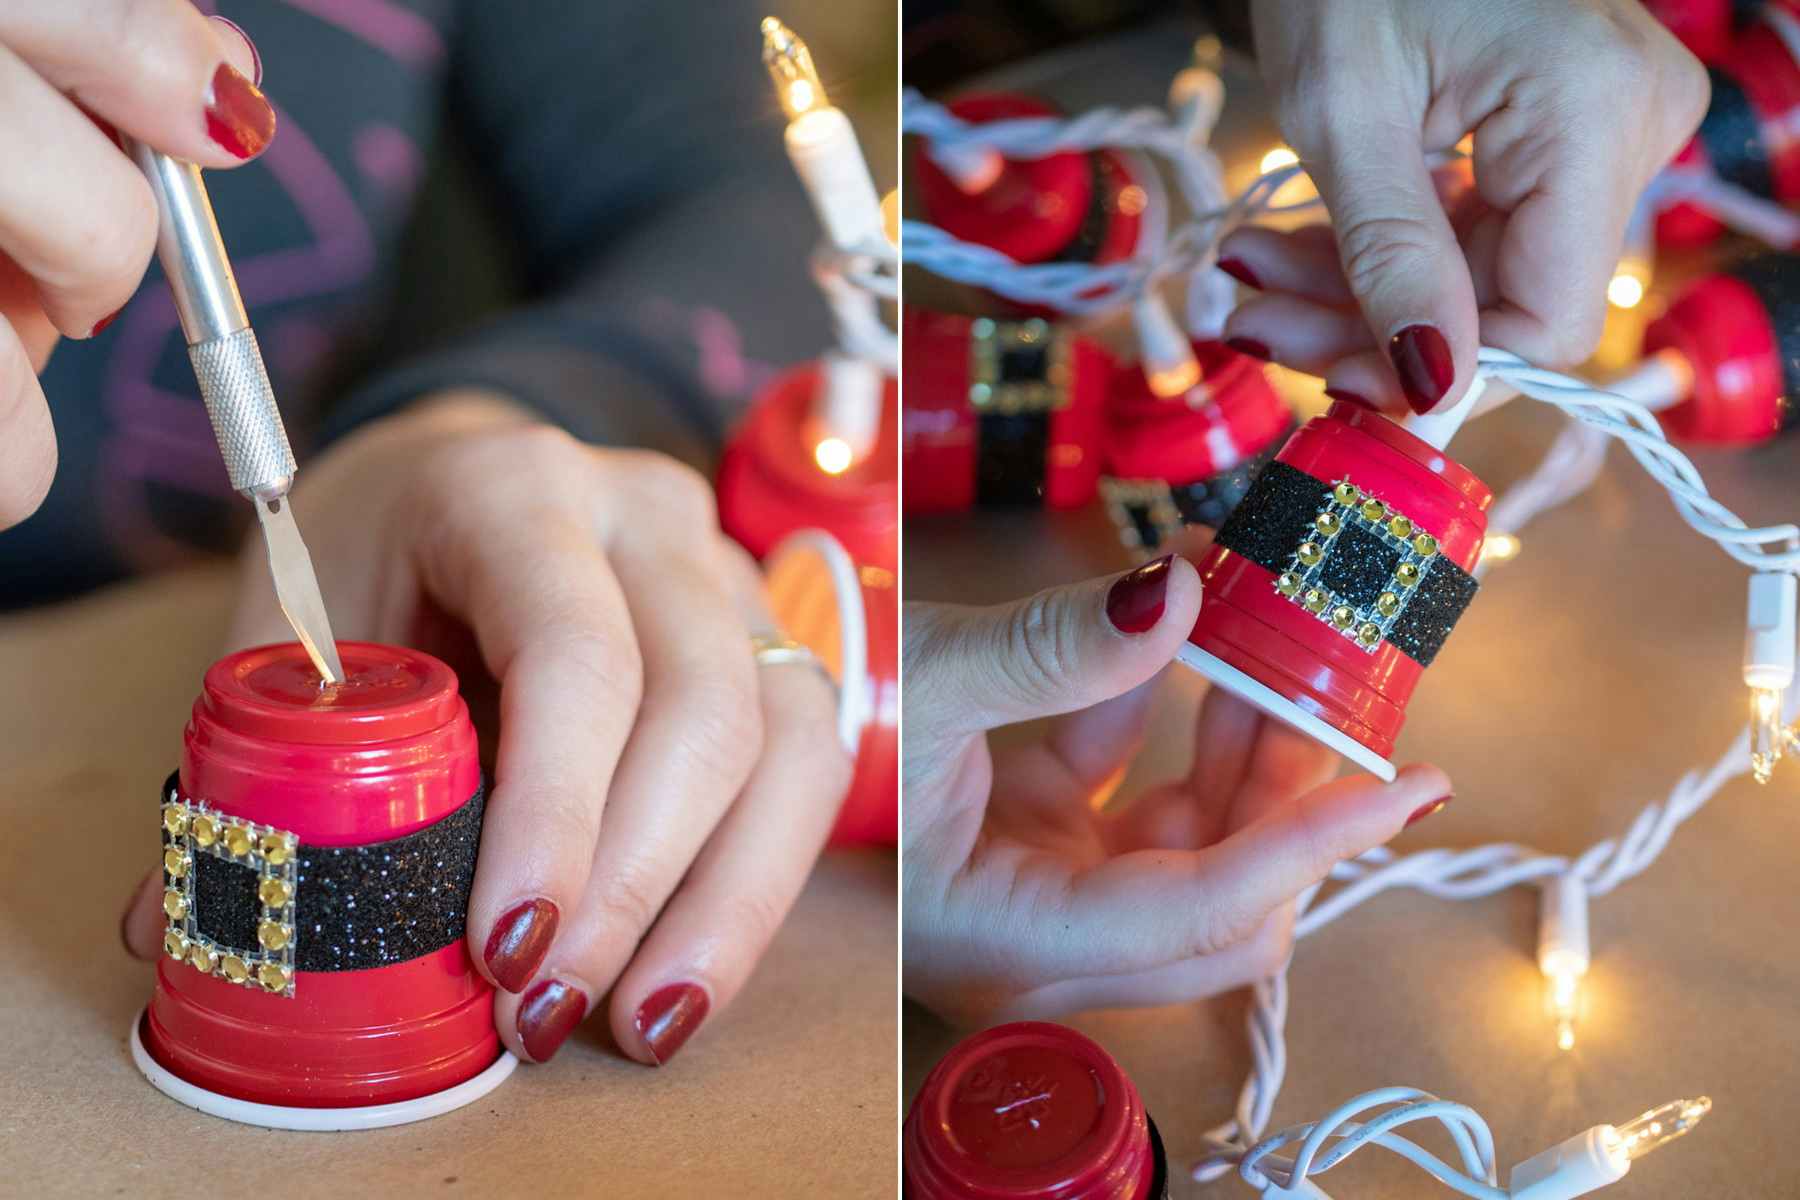
Use them as Christmas tree lights, for a holiday party, or put them above your kids’ beds for a festive night-light.
Need more lights? Use one of these deals on Christmas lights.
2. Make a DIY Dollar Tree snow globe decoration ($5 for one globe).

You’ll never have to worry about your kids breaking this snow globe (at least that’s the goal).
Dollar Tree supplies you’ll need:
- Faux snow ($1.25)
- Plastic snow globe ($1.25)
- Bottle brush trees ($1.25 for 3)
- Glittery ribbon ($1.25, 144-in roll)
- Hot glue and hot glue gun
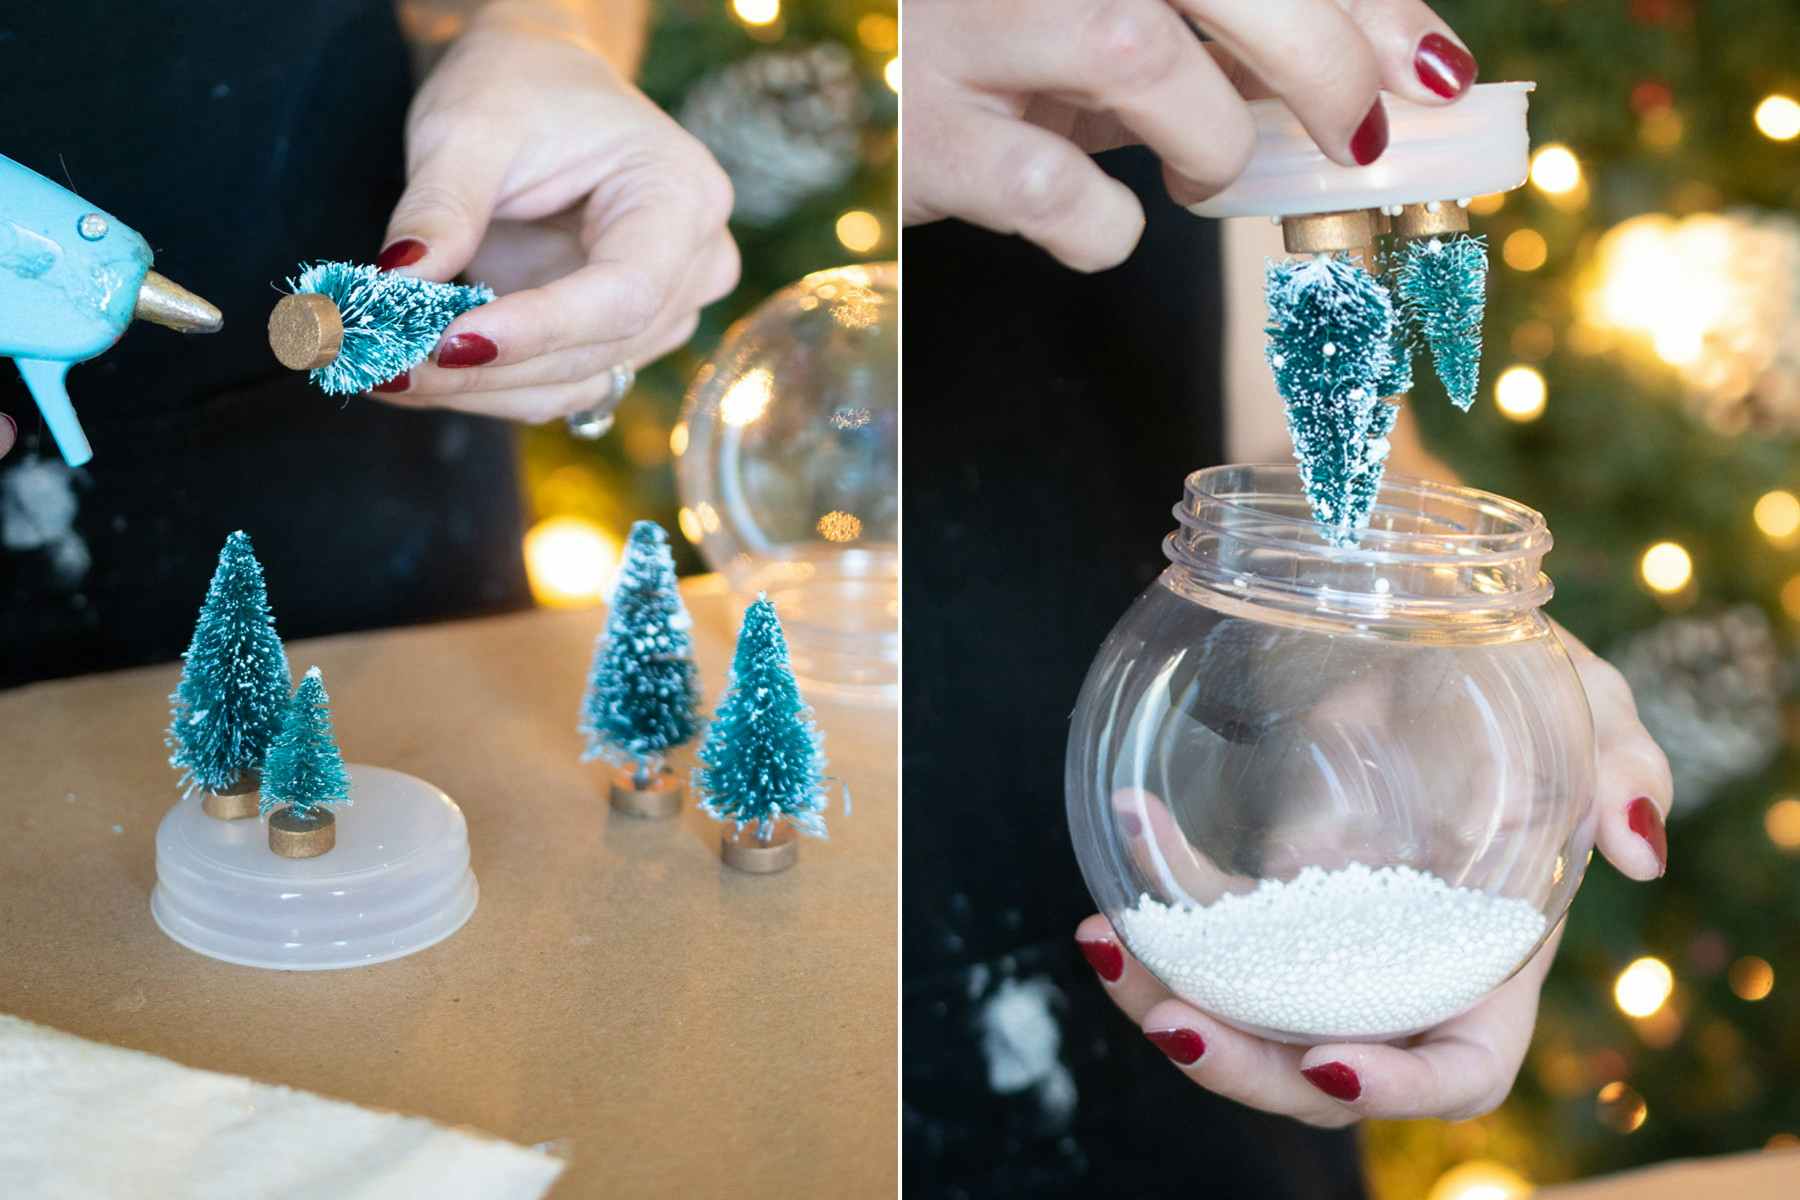
What you’ll do:
- Use hot glue to attach several bottle brush trees to the base of the snow globe.
- Fill the ball with faux snow and insert the base.
- Screw on the bottom and hot glue ribbon in place to dress it up.
3. DIY Dollar Tree Christmas crafts: Turn flameless tea light candles into snowman ornaments ($10 for 6).
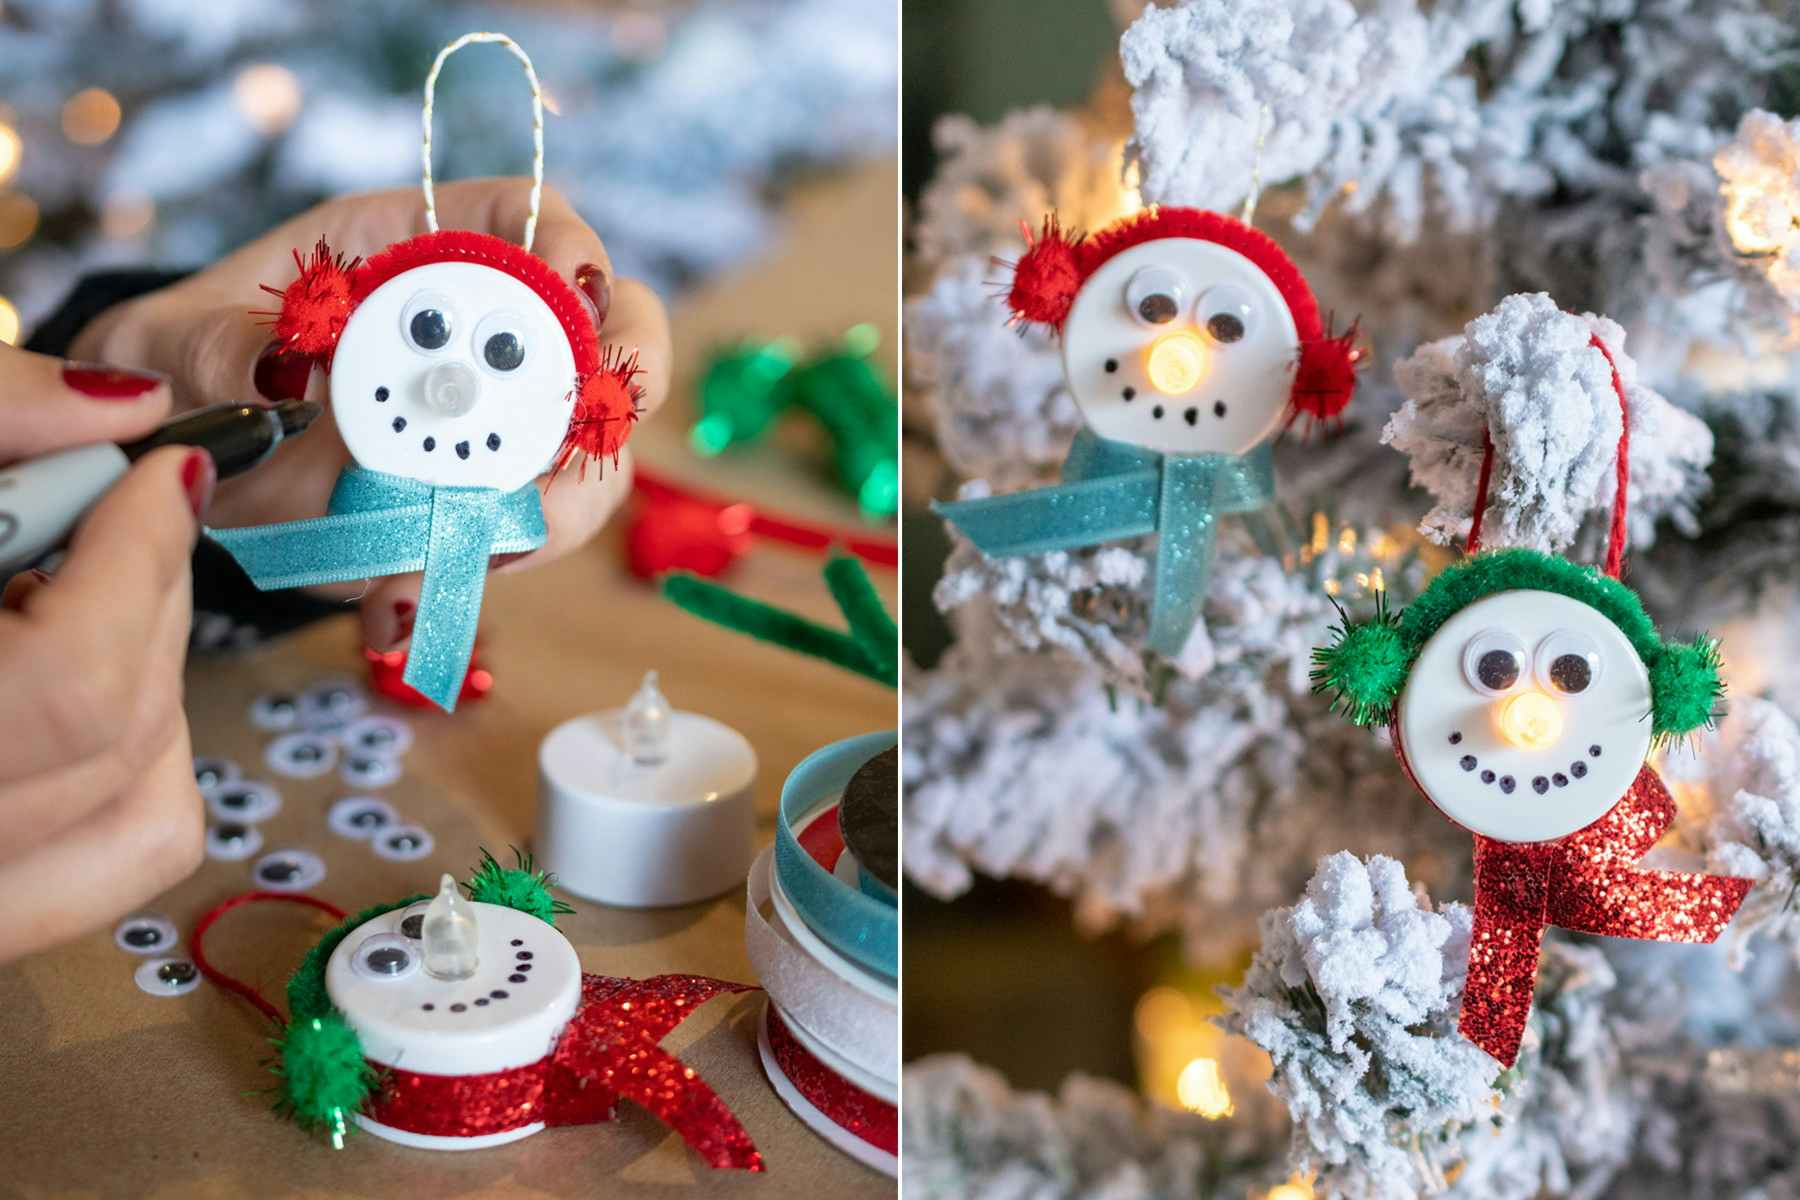
You can easily make several of these tea light snowman ornaments because (other than the tea lights) you’ll have lots of materials left over. To make the materials stretch, opt for buying a large box of candles. For instance, Walmart has a 6-pack of flameless lights for about $4, which is only $0.60 each. So technically you can make six of these for about $10, or $1.70 each.
Dollar Tree supplies you’ll need:
- Flameless tea light candle ($1.25 for 3)
- Pom-pom balls ($1.25 for 80 or 90-count bag)
- Pipe cleaners ($1.25, 45 pieces)
- Googly eyes ($1.25, 125 pieces)
- Glittery ribbon ($1.25, 144-in roll)
- Black permanent marker
- String ($1.25, 5-pack)
- Hot glue and hot glue gun
What you’ll do:
- Use hot glue to attach pipe cleaner and pom-poms to a tea light to make tiny earmuffs.
- Add googly eyes and then draw on your snowman’s mouth with a Sharpie.
- Wrap a piece of thin ribbon around the bottom to make a scarf.
- Attach a string for hanging your snowman ornament.
4. Create Dollar Tree Christmas decorations with old mason jars to decorate your holiday table ($11.25 for 3).

Using canning jars for DIY Dollar Tree Christmas crafts is a no-brainer because they’re convenient, cheap, and always turn into something I can use next year.
Dollar Tree supplies you’ll need:
- Glass canning jars ($1.25 each) or repurposed jars
- Mod Podge ($1.25)
- Foam brush ($1.25 for 8-pack)
- Epsom salt ($1.25 for 6-count tablets)
- Glitter
- Greenery ($1.25)
- Colored twine ($1.25 for 3-pack)
- Flameless tea light candle ($1.25 for 3)
- Hot glue and hot glue gun

What you’ll do:
- In a disposable bowl or cup, mix Epsom salt and glitter.
- Apply an even layer of Mod Podge on the exterior of your jar. Be careful not to layer it on too thick to avoid it dripping once the Epsom salt glitter mixture is applied.
- Sprinkle the Epsom salt glitter on the mason jar until it’s completely covered. For easy cleanup, do this over a paper plate to catch any excess. Place the jar on wax paper and allow it to dry overnight.
- When the glue is completely dry, wrap twine around the mouth of your mason jar and attach faux greenery with a dab of hot glue.
- Insert a flameless tea light into the jar, and use this Dollar Tree Christmas decoration on your table as a holiday centerpiece, on your mantel, or on your front porch.
5. Make light bulb Christmas ornaments out of burned-out light bulbs ($11.50 for 10).
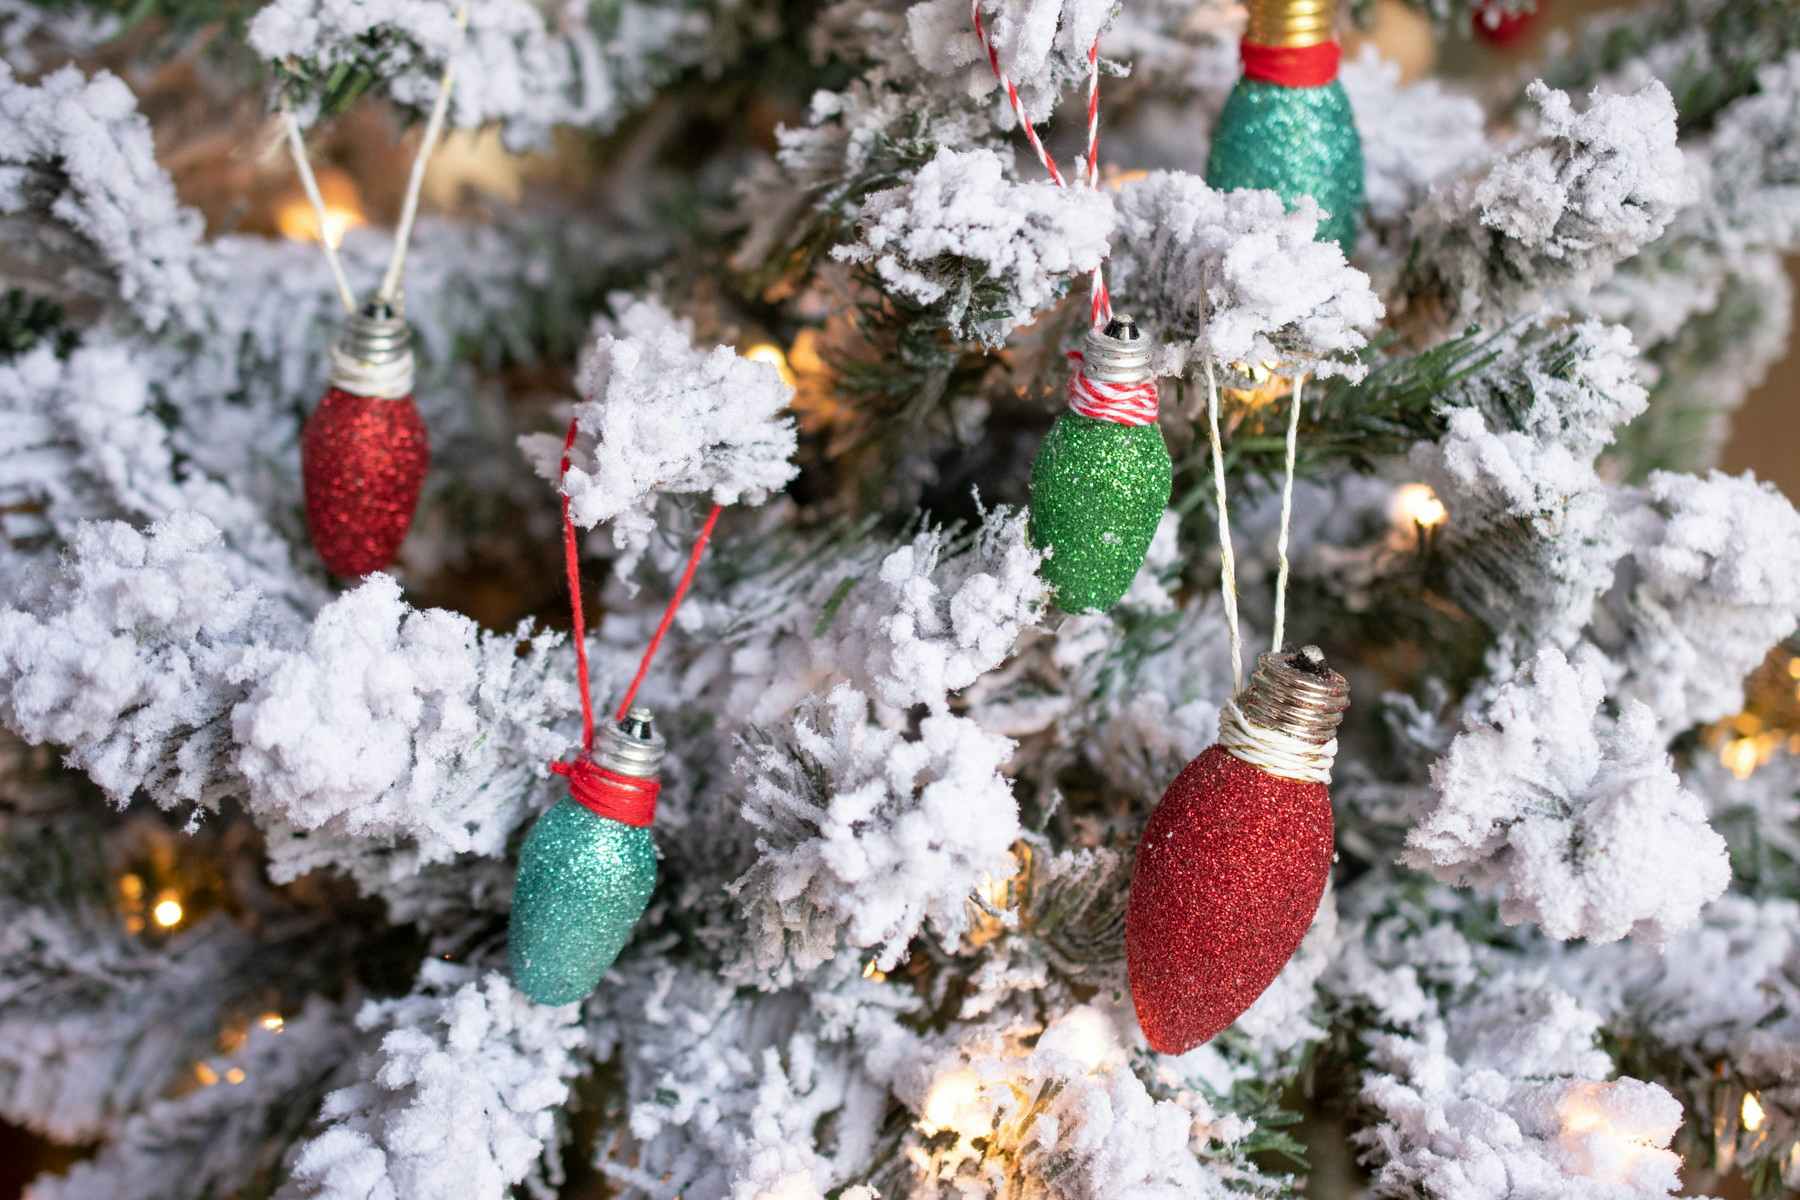
Never let another burned out Christmas light bulb go to waste. Reuse them or find them for cheap at Dollar Tree. This craft comes to about $1.15 per bulb if you’re painting ten.
Dollar Tree supplies you’ll need:
- C7 or C9 light bulbs (10-pack for $9)
- Mod Podge ($1.25)
- Spray adhesive glue ($1.25)
- Paint brush
- Glitter (in all your favorite colors)
- String
- Hot glue and hot glue gun

What you’ll do:
- Use a paintbrush to apply an even layer of Mod Podge to the exterior of your bulb.
- Dump glitter, found in the craft section of the Dollar Tree, over the glue, making sure the entire bulb is covered. Allow it to dry for 30 minutes.
- To avoid a huge glittery mess (you know the kind I’m talking about) carefully spray each bulb with a spray adhesive. This will prevent all of the glitter coming off when the bulbs are touched!
- Once it’s completely dry, attach a string to the neck of the light bulb Christmas ornament and hang it on your tree!
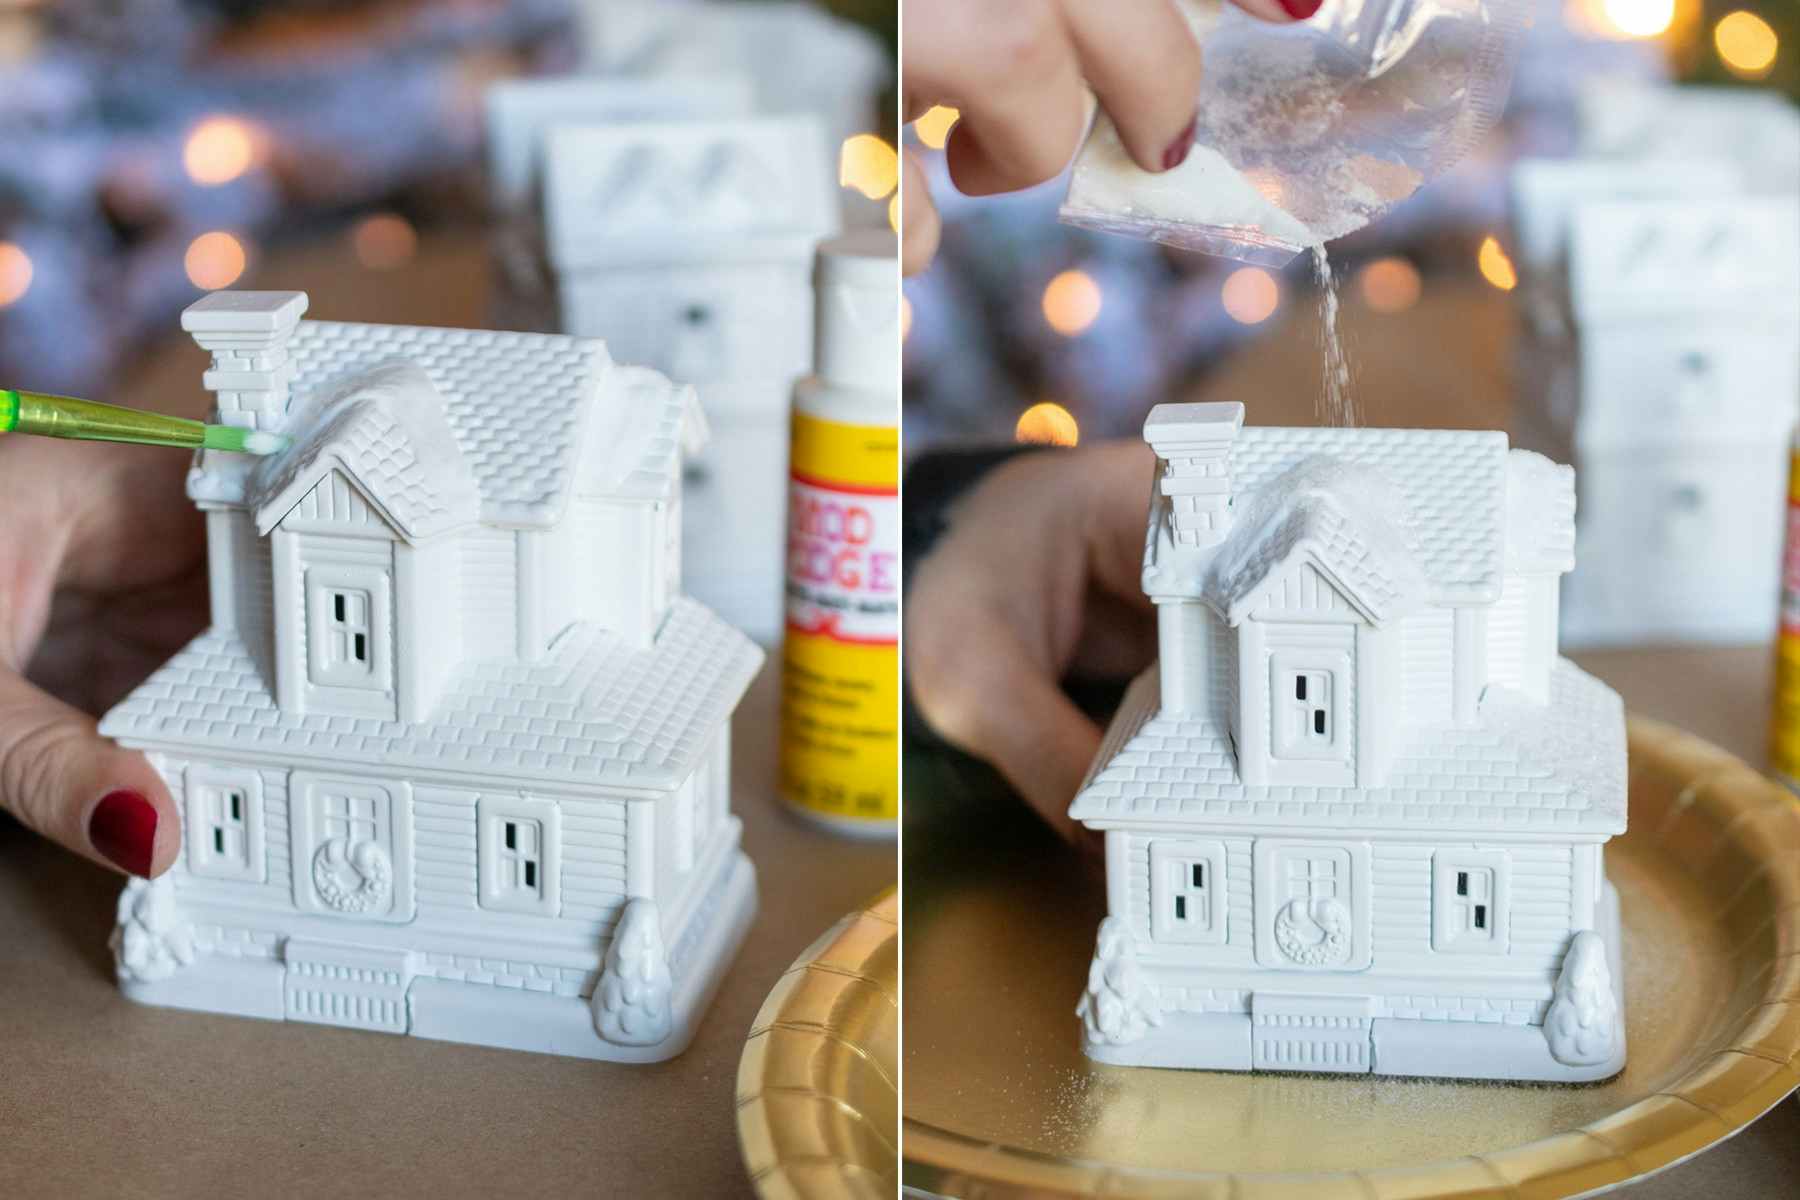
6. Use paint and glitter to make an unbreakable DIY Christmas village ($6.75).
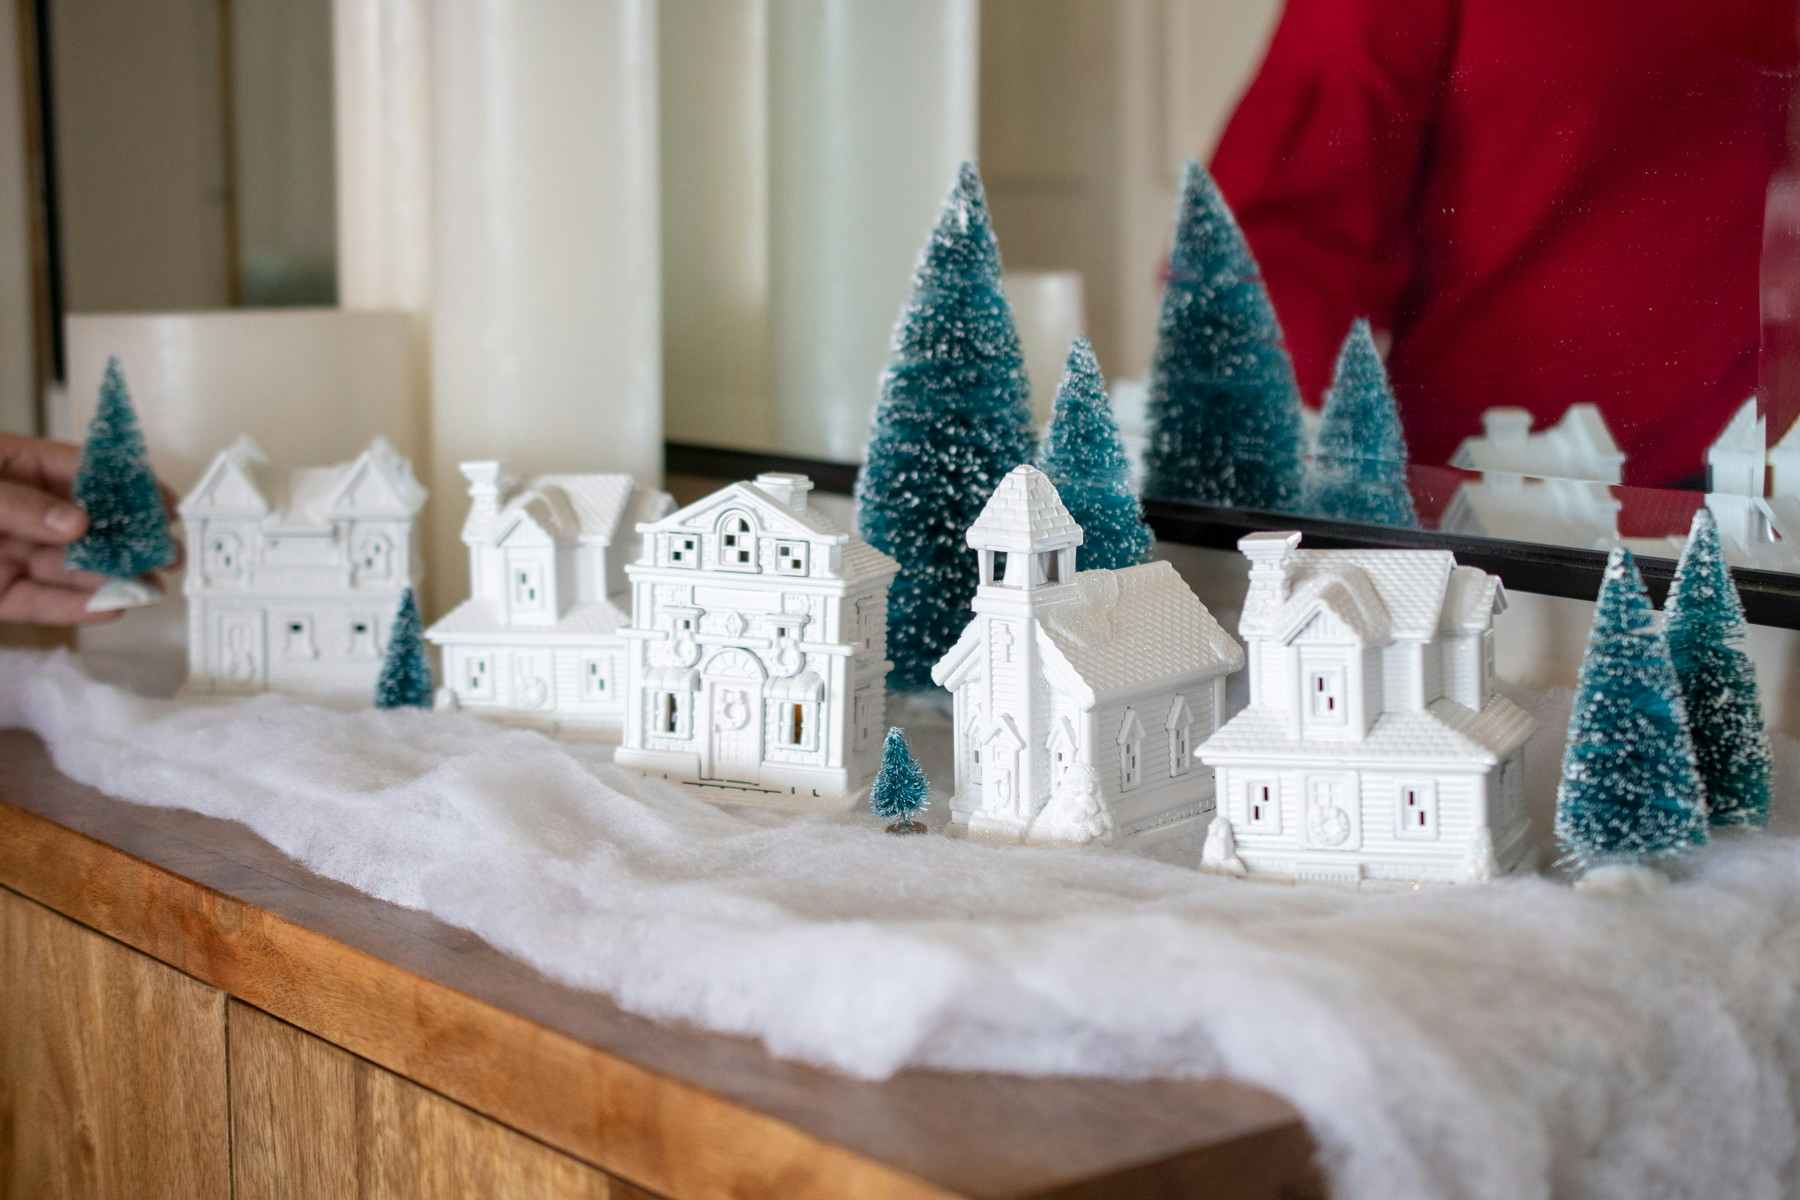
Actual village pieces are made of ceramic and are not only expensive but also very fragile. Save money and create a Christmas village your kids won’t break by using plastic village pieces!
Dollar Tree supplies you’ll need:
- Dollar Tree village pieces ($1.25, 62 pieces)
- Flameless tea light candle ($1.25 for 3)
- Mod Podge ($1.25)
- White spray paint ($3, Walmart)
- Paintbrush
- Glitter
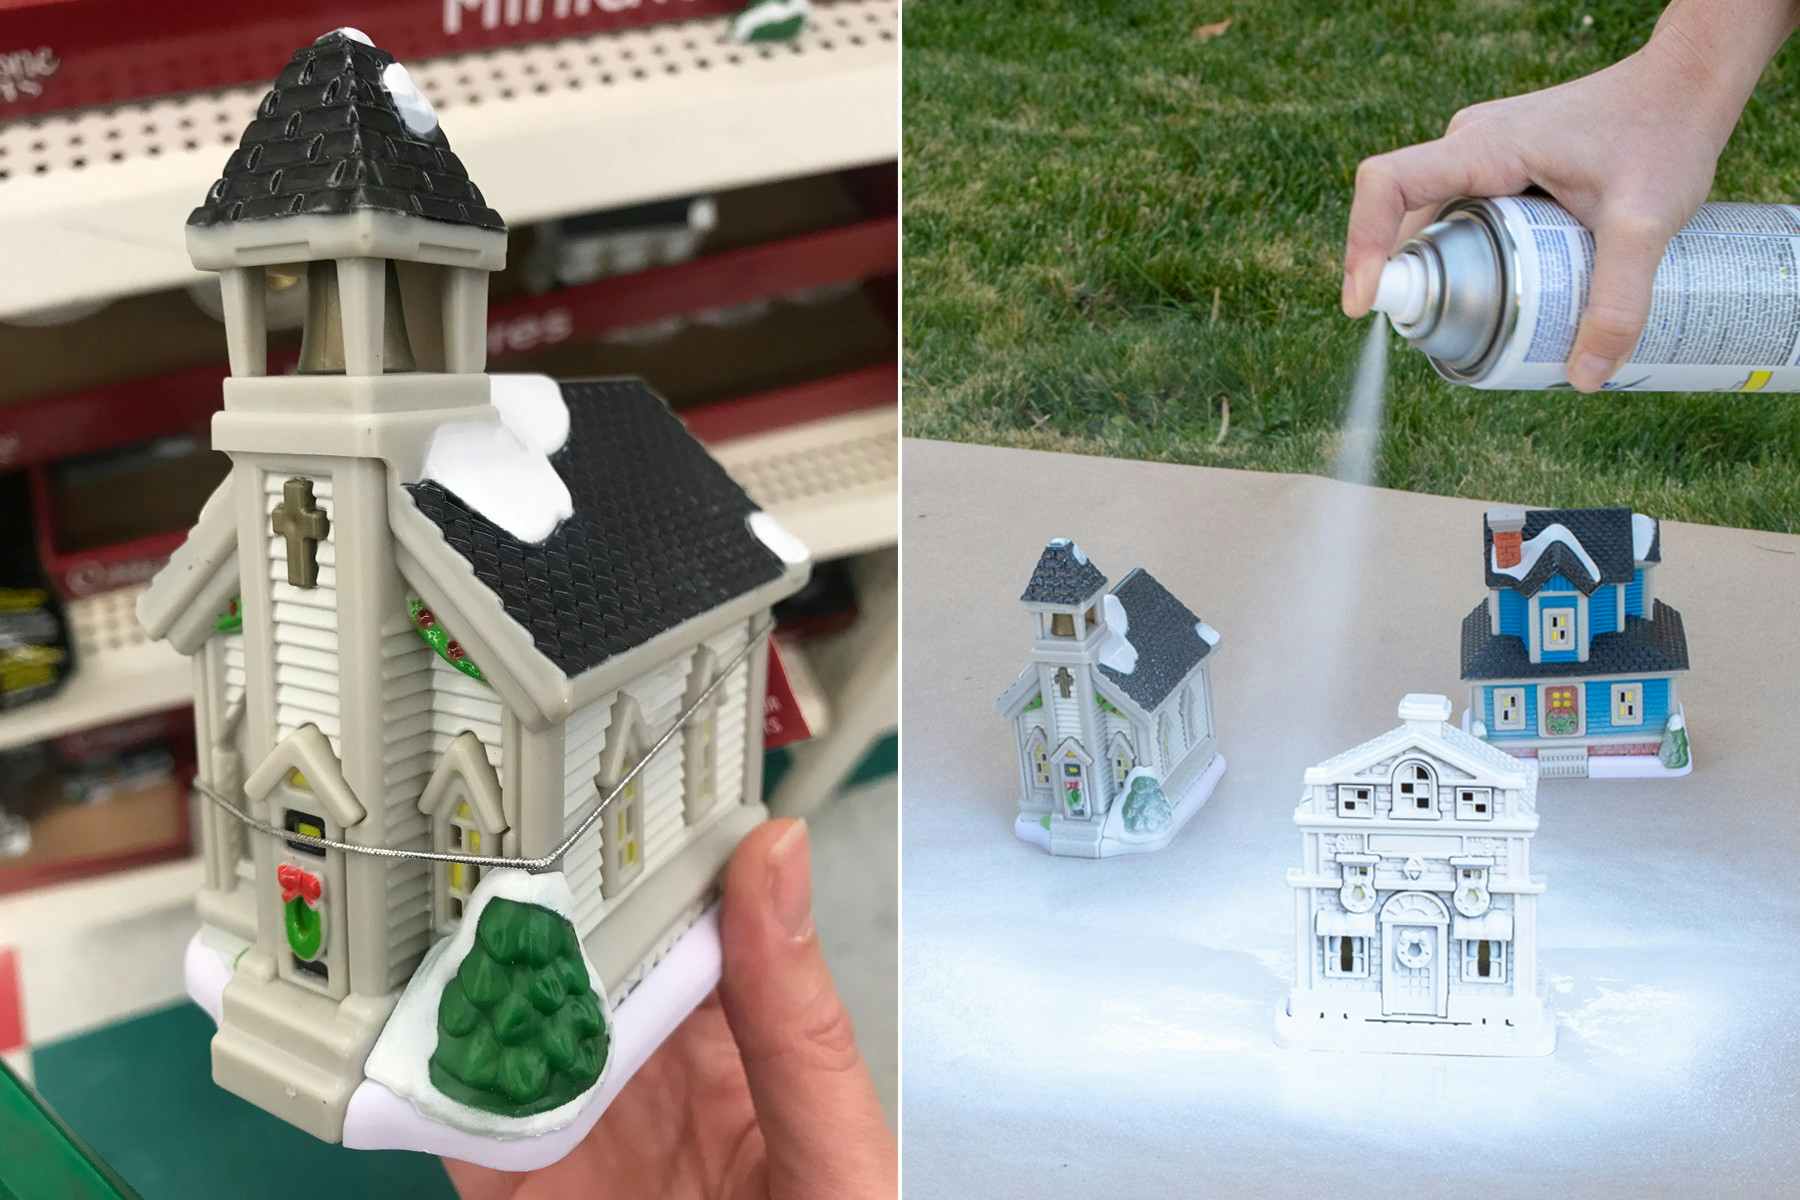
What you’ll do:
- Following the directions on your spray paint can, apply several even coats of spray paint to your plastic Christmas village pieces.
- Once the paint has completely dried, apply Mod Podge where you want it — I applied mine only to the areas that were previously white with snow — and then sprinkle on a layer of white glitter.
- Put a flameless tea light candle beneath each building and display your new village pieces for everyone to enjoy.
7. Transform a regular Christmas ball ornament into a Santa ornament ($7 each).

This is one of those DIY Dollar Tree Christmas crafts that comes together pretty quickly and is also quite impressive to look out.
Dollar Tree supplies you’ll need:
- Large red Christmas ball ornament ($1.25)
- Black glitter paper ($1.25)
- Gold glitter paper ($1.25)
- Craft knife ($1.25)
- Ruler
- Hot glue and hot glue gun

What you’ll do:
- Use a craft knife and ruler to cut a strip of black glitter paper 1.5″ thick to make your belt.
- Create a buckle by cutting a square out of thick gold glitter paper. Carefully cut out the center of the buckle, making sure the belt fills it completely.
- Assemble the belt with hot glue and attach it to your ball ornament.
8. Make your own jingle bell napkin rings and skip the expense (starting at $5.50).

Since Dollar Tree sells bells of various sizes, the cost of this craft may vary depending how big or small your bells are. You’ll likely need 20-30 bells to make one dinner napkin ring.
Dollar Tree Supplies you’ll need:
- 2 sizes of bells in desired colors ($1.25 per 20, 32, or 50-count bags)
- Wire ($3, Michaels)
- Needle-nose pliers ($1.25) (Borrow one or ask a friend!)
- Dinner napkins
What you’ll do:
- String jingle bells onto the wire alternating the pattern by size — for example, one large and two small, repeated until there are 10 large and 20 small bells on the wire.
- Cut the wire and use the pliers to twist ends tightly together, forming the napkin ring.
9. Turn a Christmas tin into a gift card holder decoration that can hang on your tree ($2.50 each).

Just like the other crafts here, take inventory of what you have first or borrow an item from a friend or family member. Of course, whatever you buy (like tissue paper or ribbon) can be used for other DIY projects.
Dollar Tree supplies you’ll need:
- Small Christmas gift box or tin ($1.25 each)
- Ornament hook ($1.25, 300 hooks)
- Ribbon
- Tissue paper
- Gift card or small gift
- Hot glue and hot glue gun

What you’ll do:
- Tie a ribbon around the outside of your tin and secure it in place with hot glue.
- Place a gift card inside the holder (honestly, you could opt for candy or a piece of fancy jewelry too).
- Add an ornament hook, and on Christmas Eve when Santa comes, hang it on your tree as an alternative to a boring envelope which is usually how gift cards are presented.
Check out these gift card deals while you’re here!
10. Make easy snowman candles (starting at $4.25).

Pillar candles are only $1.25 at Dollar Tree and you can decorate them any affordable way you like. Look for buttons, ribbons, or stickers at home. If you draw a face, you should opt for the suggested paint pens because they’re a no-mess way to write on glass. Plus, the tip is larger. Permanent markers can bleed and not properly adhere to glass.
Dollar Tree supplies you’ll need:
- White candle ($1.25)
- Black and orange paint pens ($3 each)
- Pipe cleaners (45-count for $1.25)
- Holiday ribbon ($1.25)
- Black buttons
- Hot glue and hot glue gun
What you’ll do:
- Twist together two pipe cleaners and attach them with hot glue to the back of your candle to make twig arms.
- Tie a ribbon just above the pipe cleaners for a scarf.
- Use paint pens to draw your snowman’s face, and finish off your snowman candle by hot gluing buttons in place.
11. Make a star ornament Christmas craft out of wooden dowels and twine ($3.25 for 10).

Finding wooden dowels at Dollar Tree can really depend on your store. I found a 50-pack of dowels at Walmart for about $2.
Dollar Tree supplies you’ll need:
- Wooden dowels ($2, 50-pack, Walmart)
- Colored twine ($1.25, 3-pack)
- Hot glue and hot glue gun
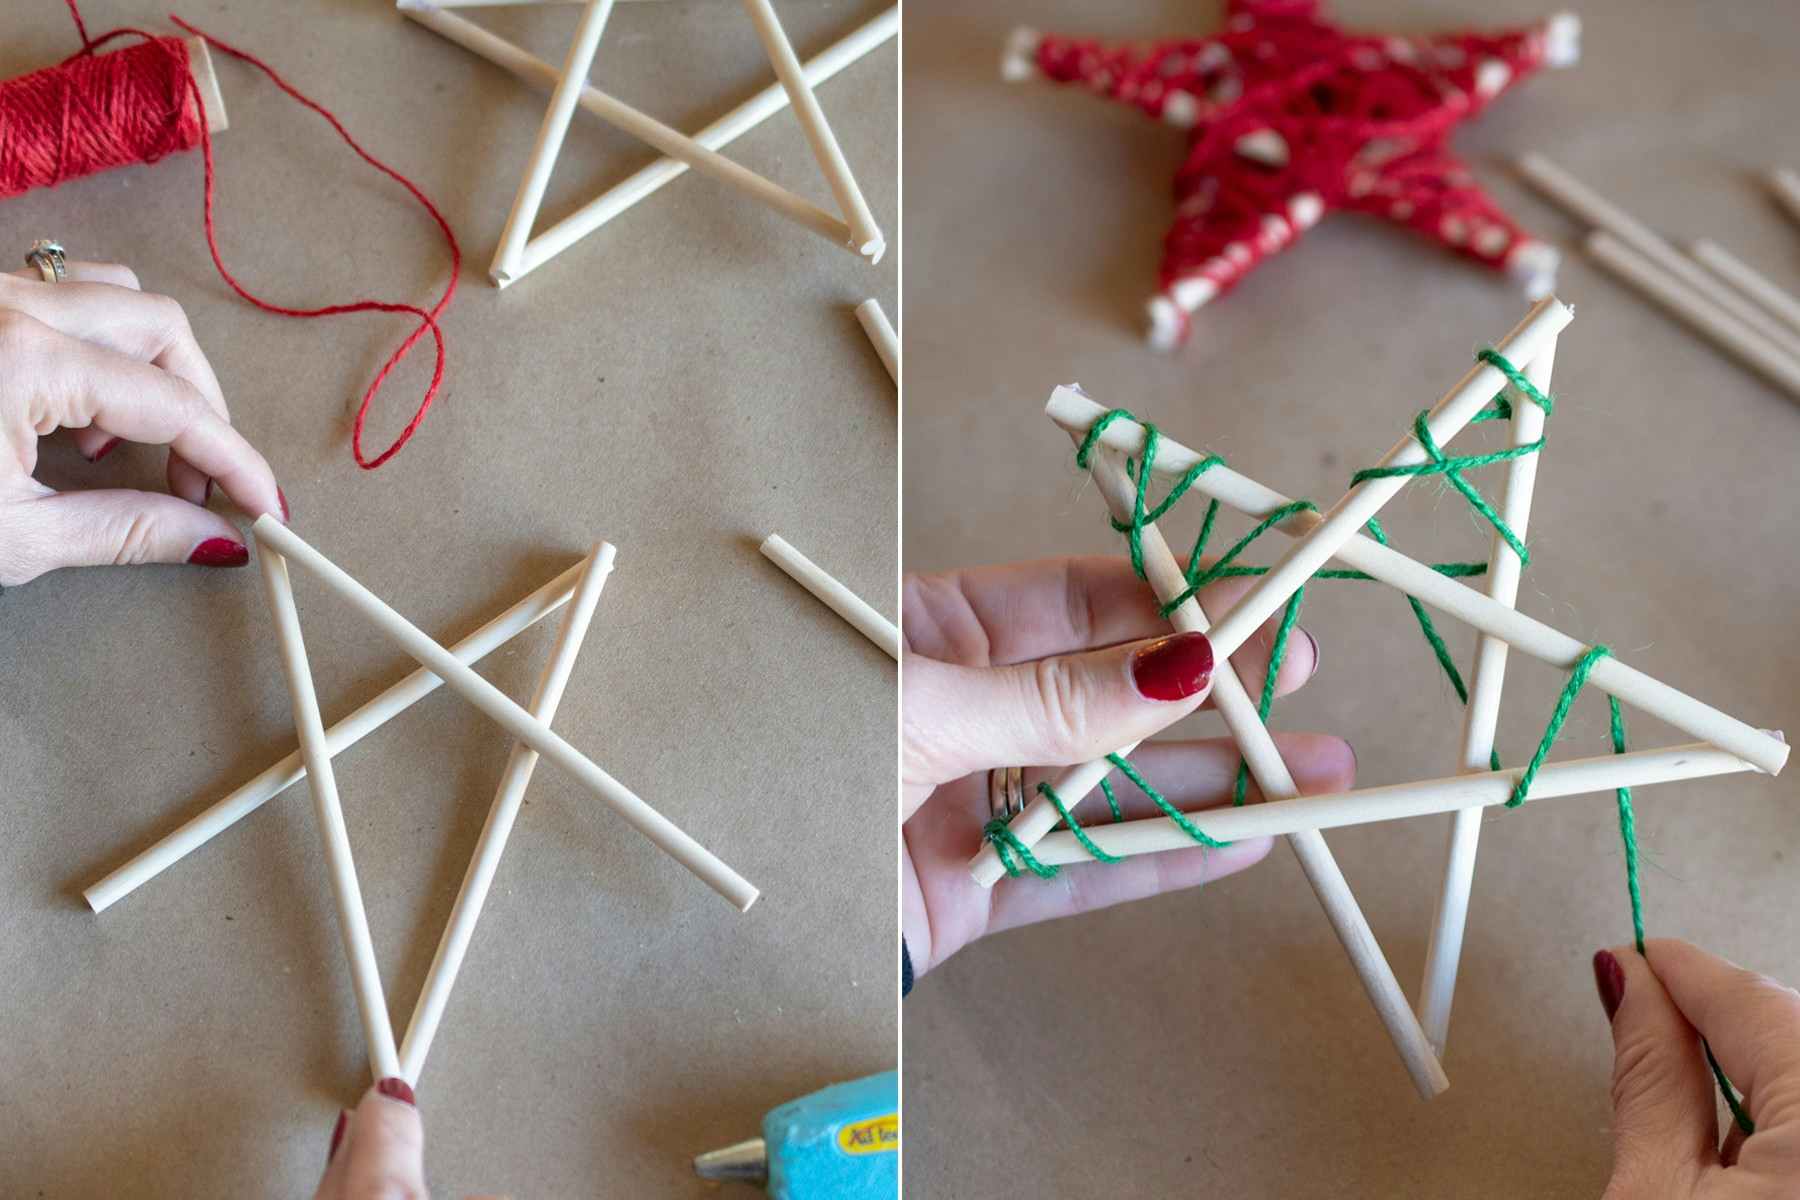
What you’ll do:
- Use hot glue to assemble the dowels into a star shape.
- Once the glue is completely dry, wrap the twine around the star ornament, varying the pattern as you go.
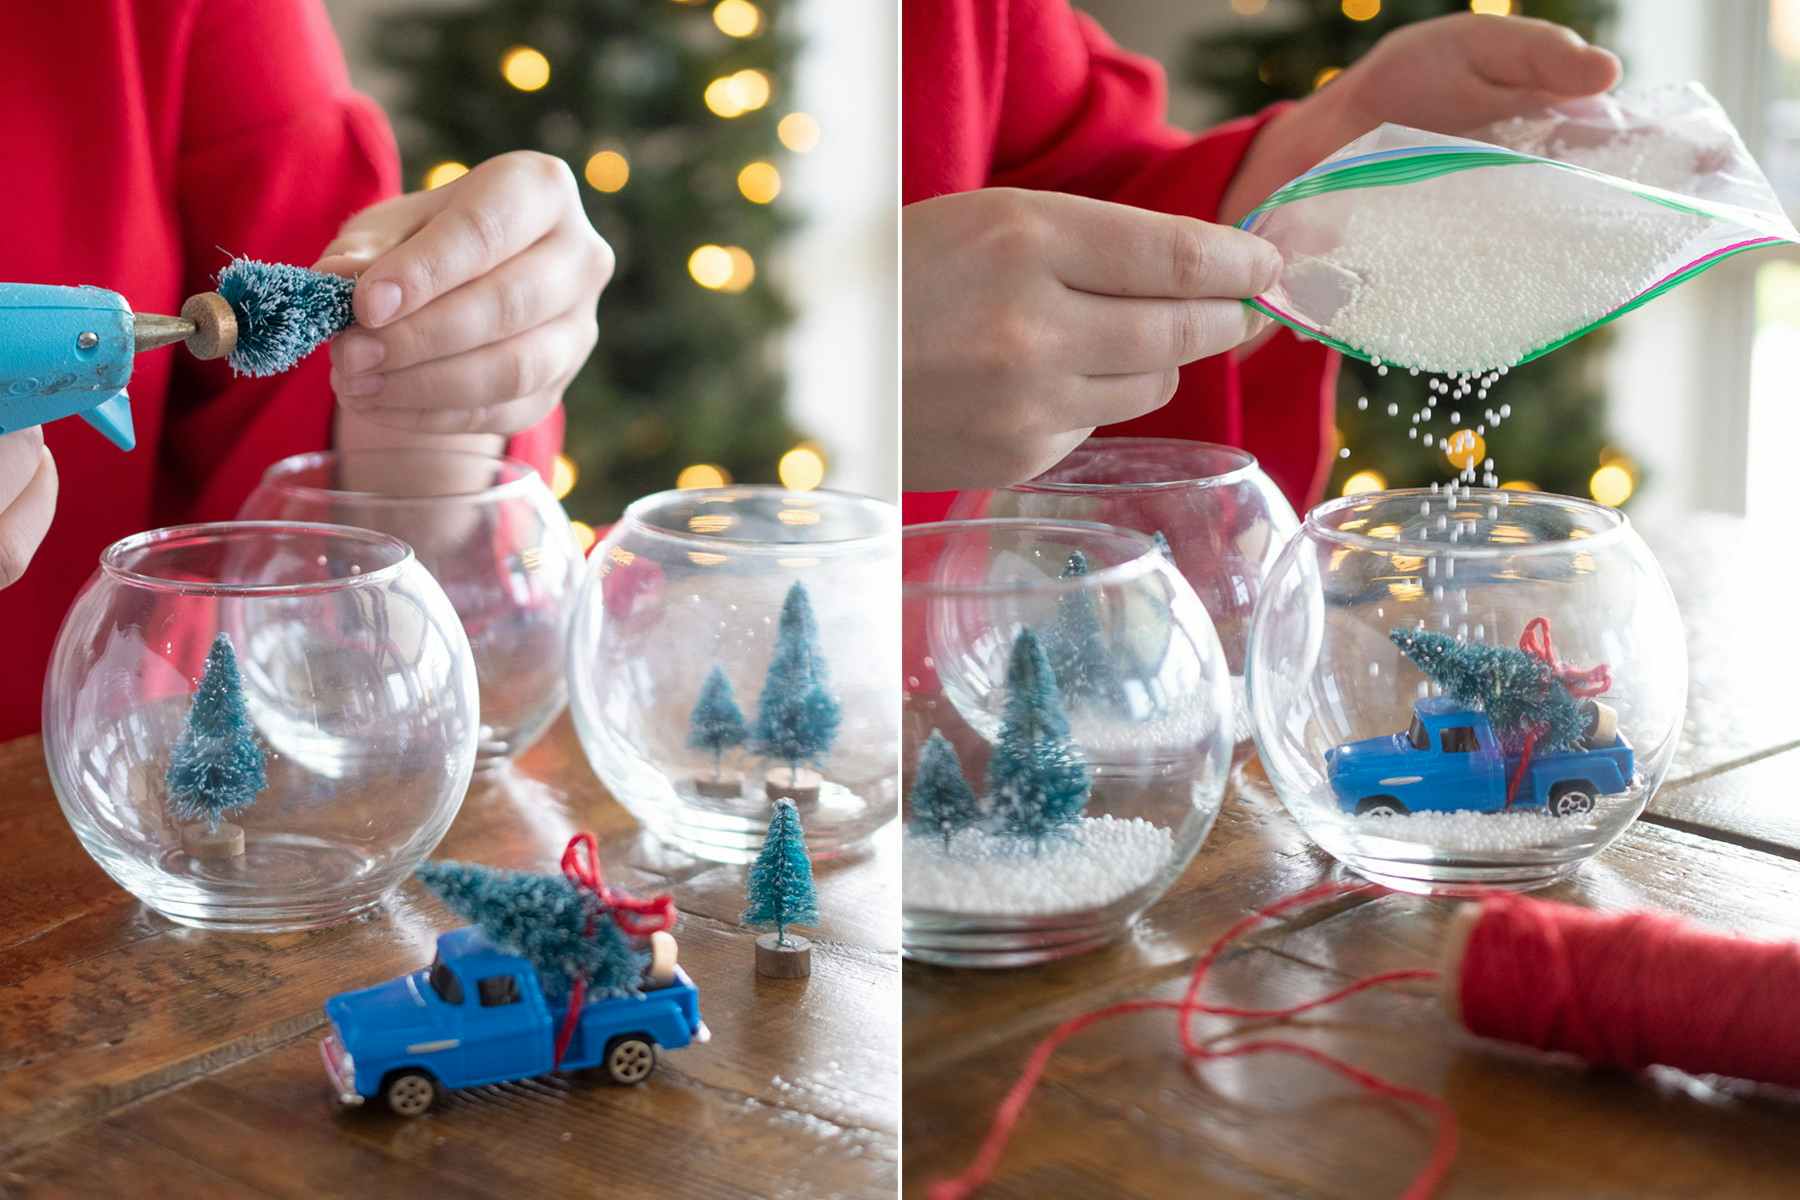
12. Build a winter terrarium globe tree farm ($7.50 for 3).
Non-plant terrariums are all the rage! Make your own winter terrarium globe tree farm by filling small Dollar Tree fish bowls with bottle brush trees and faux snow.
For something extra fun, take a kids’ toy car or truck and tie a small tree on with twine. Display it as a table centerpiece or on your fireplace mantel.
Dollar Tree supplies you’ll need:
- 3 glass bowls ($1.25 each or pick ones at home you don’t care about)
- Bottle brush trees ($1.25 for 3)
- Colored twine ($1.25, 3-pack)
- Faux snow ($1.25)
- Toy car
- Hot glue and hot glue gun
13. Transform Dollar Tree animal toys into easy Christmas ornaments (starting at $2.25).

What kid wouldn’t want a red T. rex on their Christmas tree? Use those extra toys around your house to turn them into memorable ornaments.
Dollar Tree supplies you’ll need:
- Plastic animal kids’ toys
- Drill with bits
- S-shaped Christmas ornament hooks ($1 for 15 hooks, Walmart)
- Ornament hook ($1.25, 300 hooks)
- Spray paint in desired colors (Borrow a color from a neighbor, friend, or family member)

What you’ll do:
- Use a drill to create a small hole in the back of each toy.
- Find an eye hook in Dollar Tree’s hardware section and screw it into the plastic for a simple way to hang the ornament.
- Spray paint the toys with several even coats, rotating each toy between coats.
- Add an ornament hook to the eye hook and fill your tree with wildlife!
14. Make DIY Christmas ornaments that look like vintage sleds (starting at $6.75).
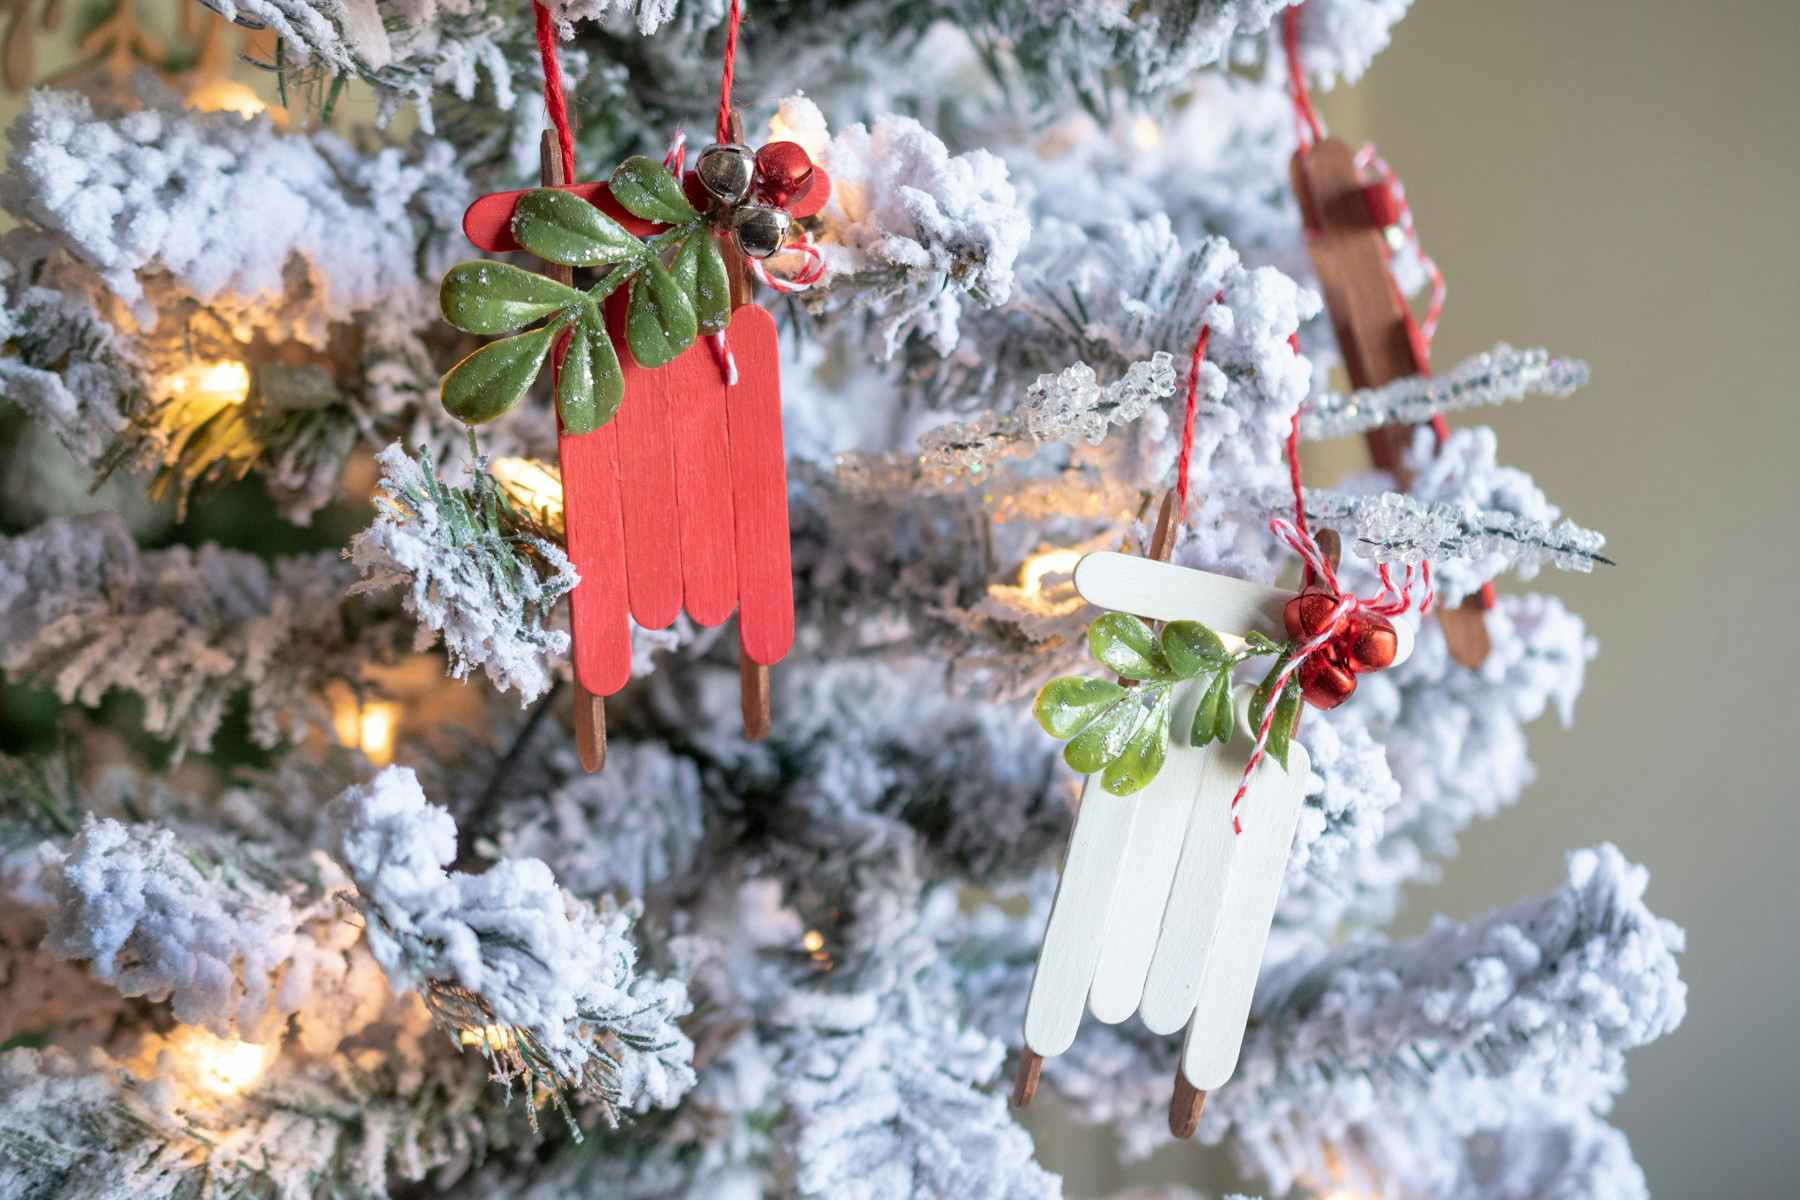
I feel like every household has a random stash or craft sticks just dying to be used for something (how about DIY Dollar Tree Christmas crafts!). The decorations can be leftover holiday items (although I included the price), but you will need the wood glue to keep the sticks together.
Dollar Tree supplies you’ll need:
- Craft sticks (5 short and 2 long for each sled)
- Foam brush or paintbrush
- Wood glue ($3, Amazon)
- Faux greenery ($1.25) (Or, find some outside)
- 2 sizes of bells in desired colors ($1.25 per 20, 32, or 50-count bags)
- Colored twine ($1.25, 3-pack)
- Paint
- Hot glue and hot glue gun
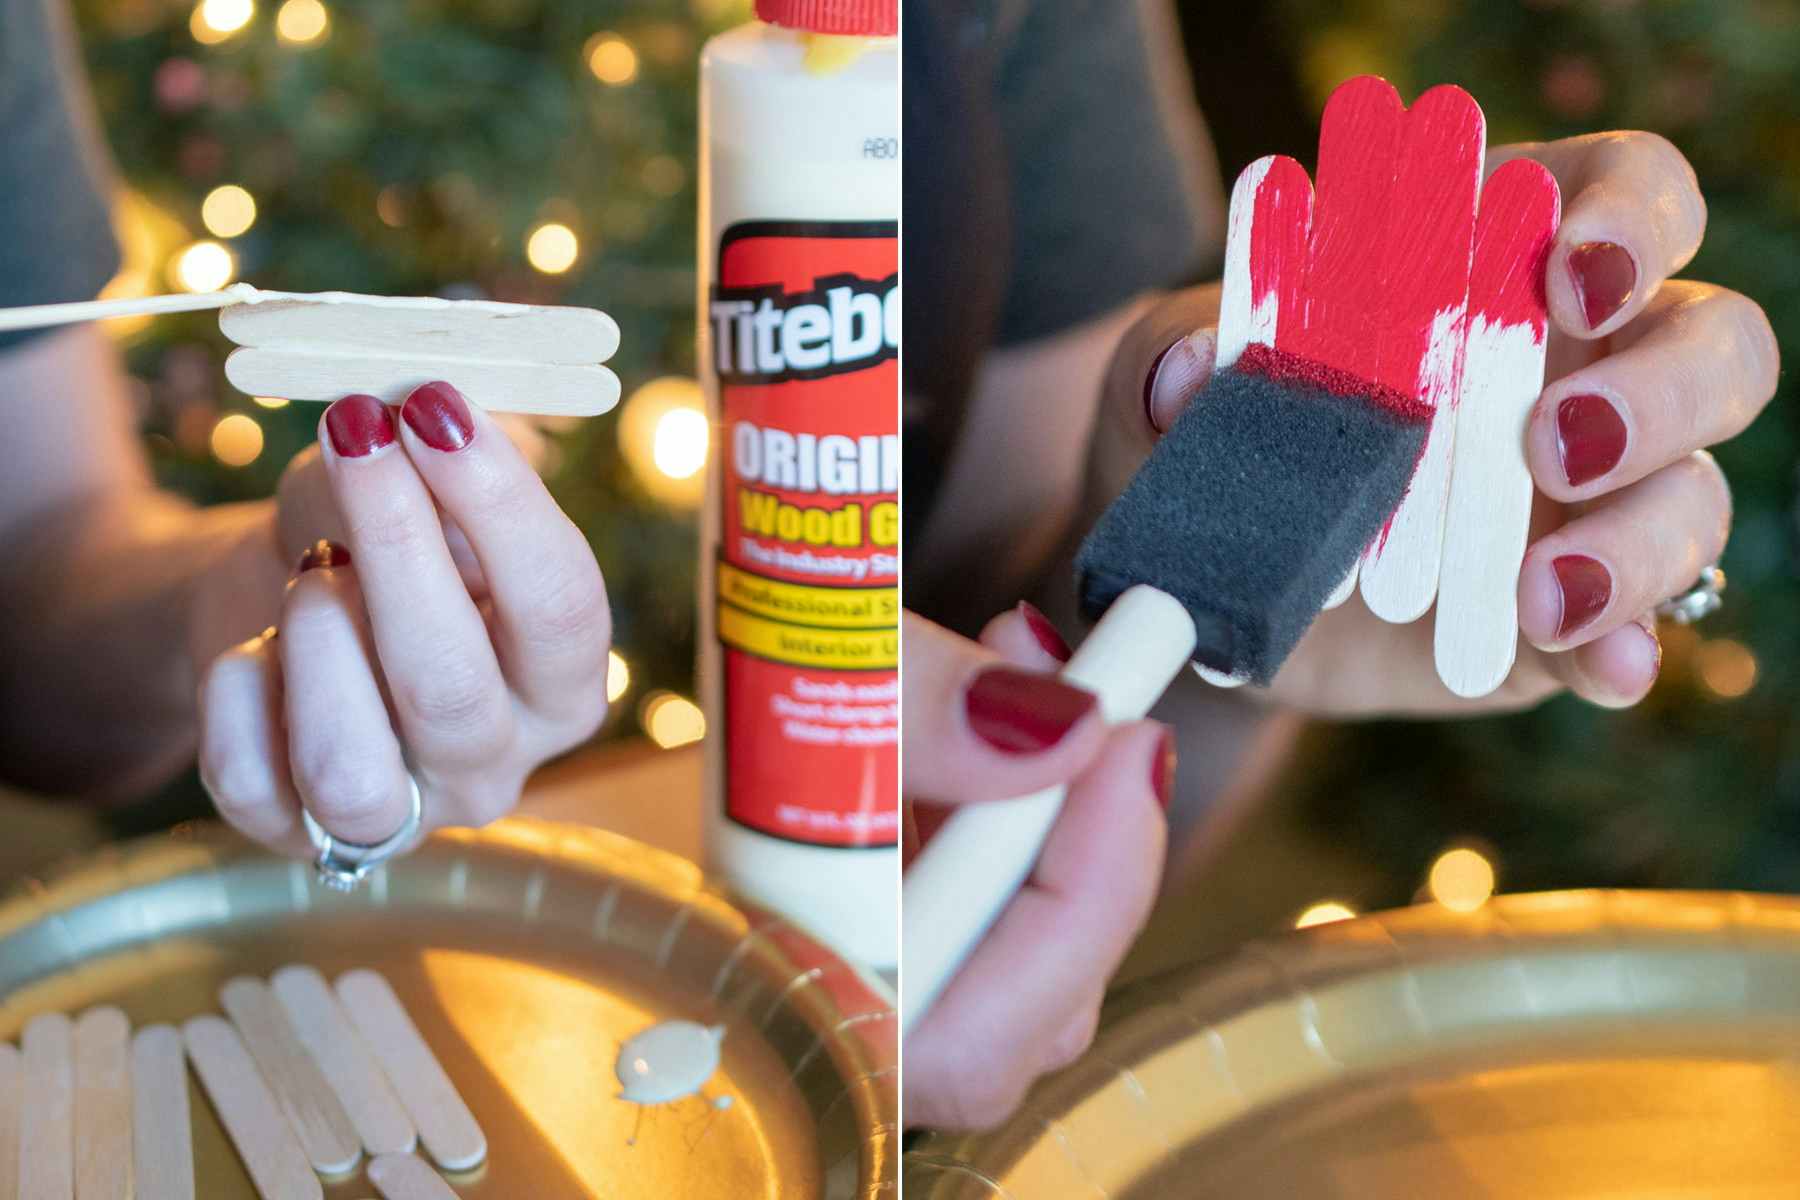
What you’ll do:
- Use wood glue to attach four of the short craft sticks together to make the seat of the sled.
- Once the glue is dry, paint or stain two long craft sticks brown for the runners.
- Next, paint all five of the short sticks red or white — including those glued together.
- Use your wood glue again in order to attach the seat and crossbar of the sled runners.
- Attach faux greenery with hot glue and string jingle bells to the top before adding a string so you can hang the ornament on your tree.
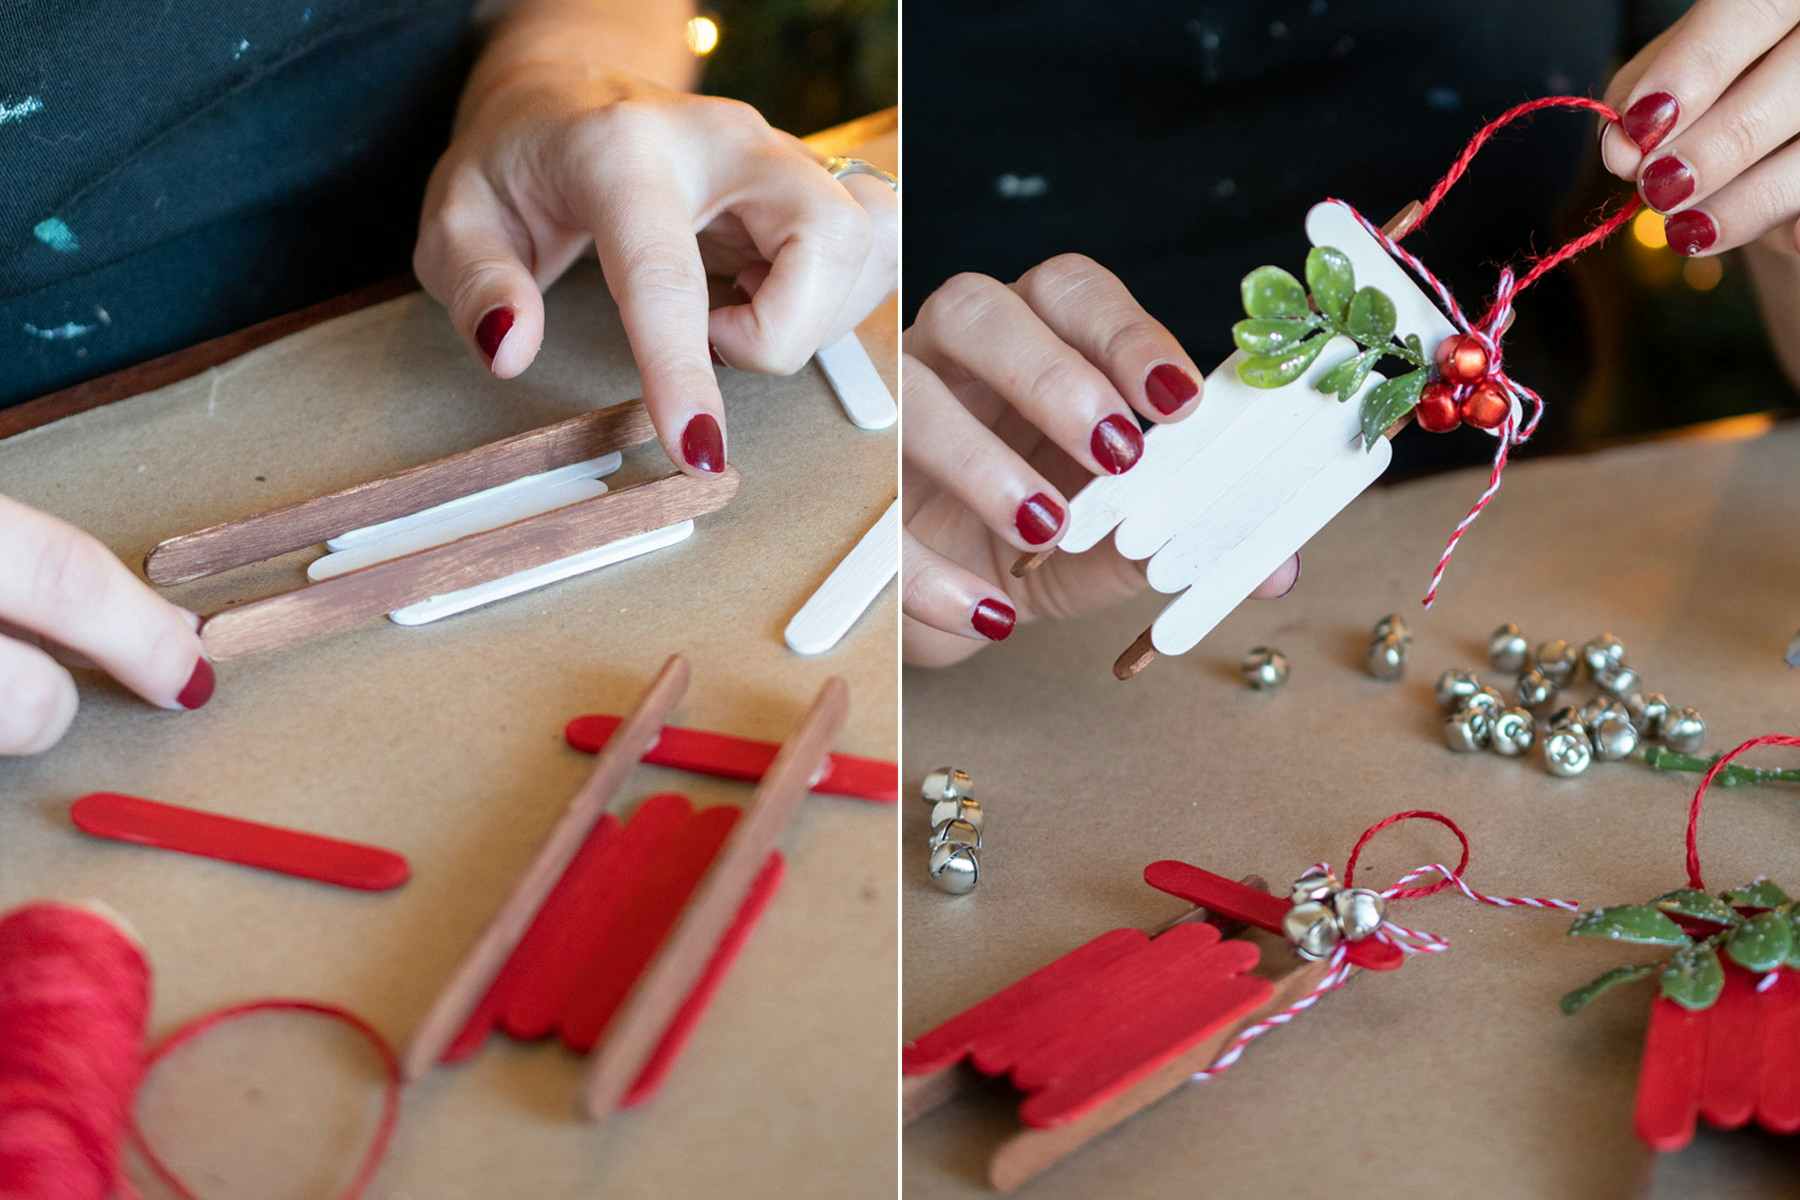
15. Make your own jingle bell noisemakers with craft sticks and ribbons (starting at $1.25).
Here’s another way to use craft sticks for DIY Dollar Tree Christmas crafts that, in this case, could make a lot of noise. And if you have leftover bells from the DIY dinner rings, use them here.
Dollar Tree supplies you’ll need:
- Craft sticks
- 2 sizes of bells in desired colors ($1.25 per 20, 32, or 50-count bags)
- Ribbon
- Paint brush
- Paint
What you’ll do:
- Paint craft sticks in Christmas colors and string bells on a ribbon.
- Tightly wrap the ribbon around the stick and tie the end securely.
Bonus: Not only are these great Dollar Tree Christmas decorations and crafts, they double as New Year’s Eve noisemakers, too.
16. Turn paper bags into decorative snowflakes (possibly free!).

These paper-bag snowflakes have a neutral holiday vibe. They use only a few supplies (that you likely have already), and are so easy to create.
Dollar Tree supplies you’ll need:
- 8 paper lunch bags
- Hot glue
- Twine
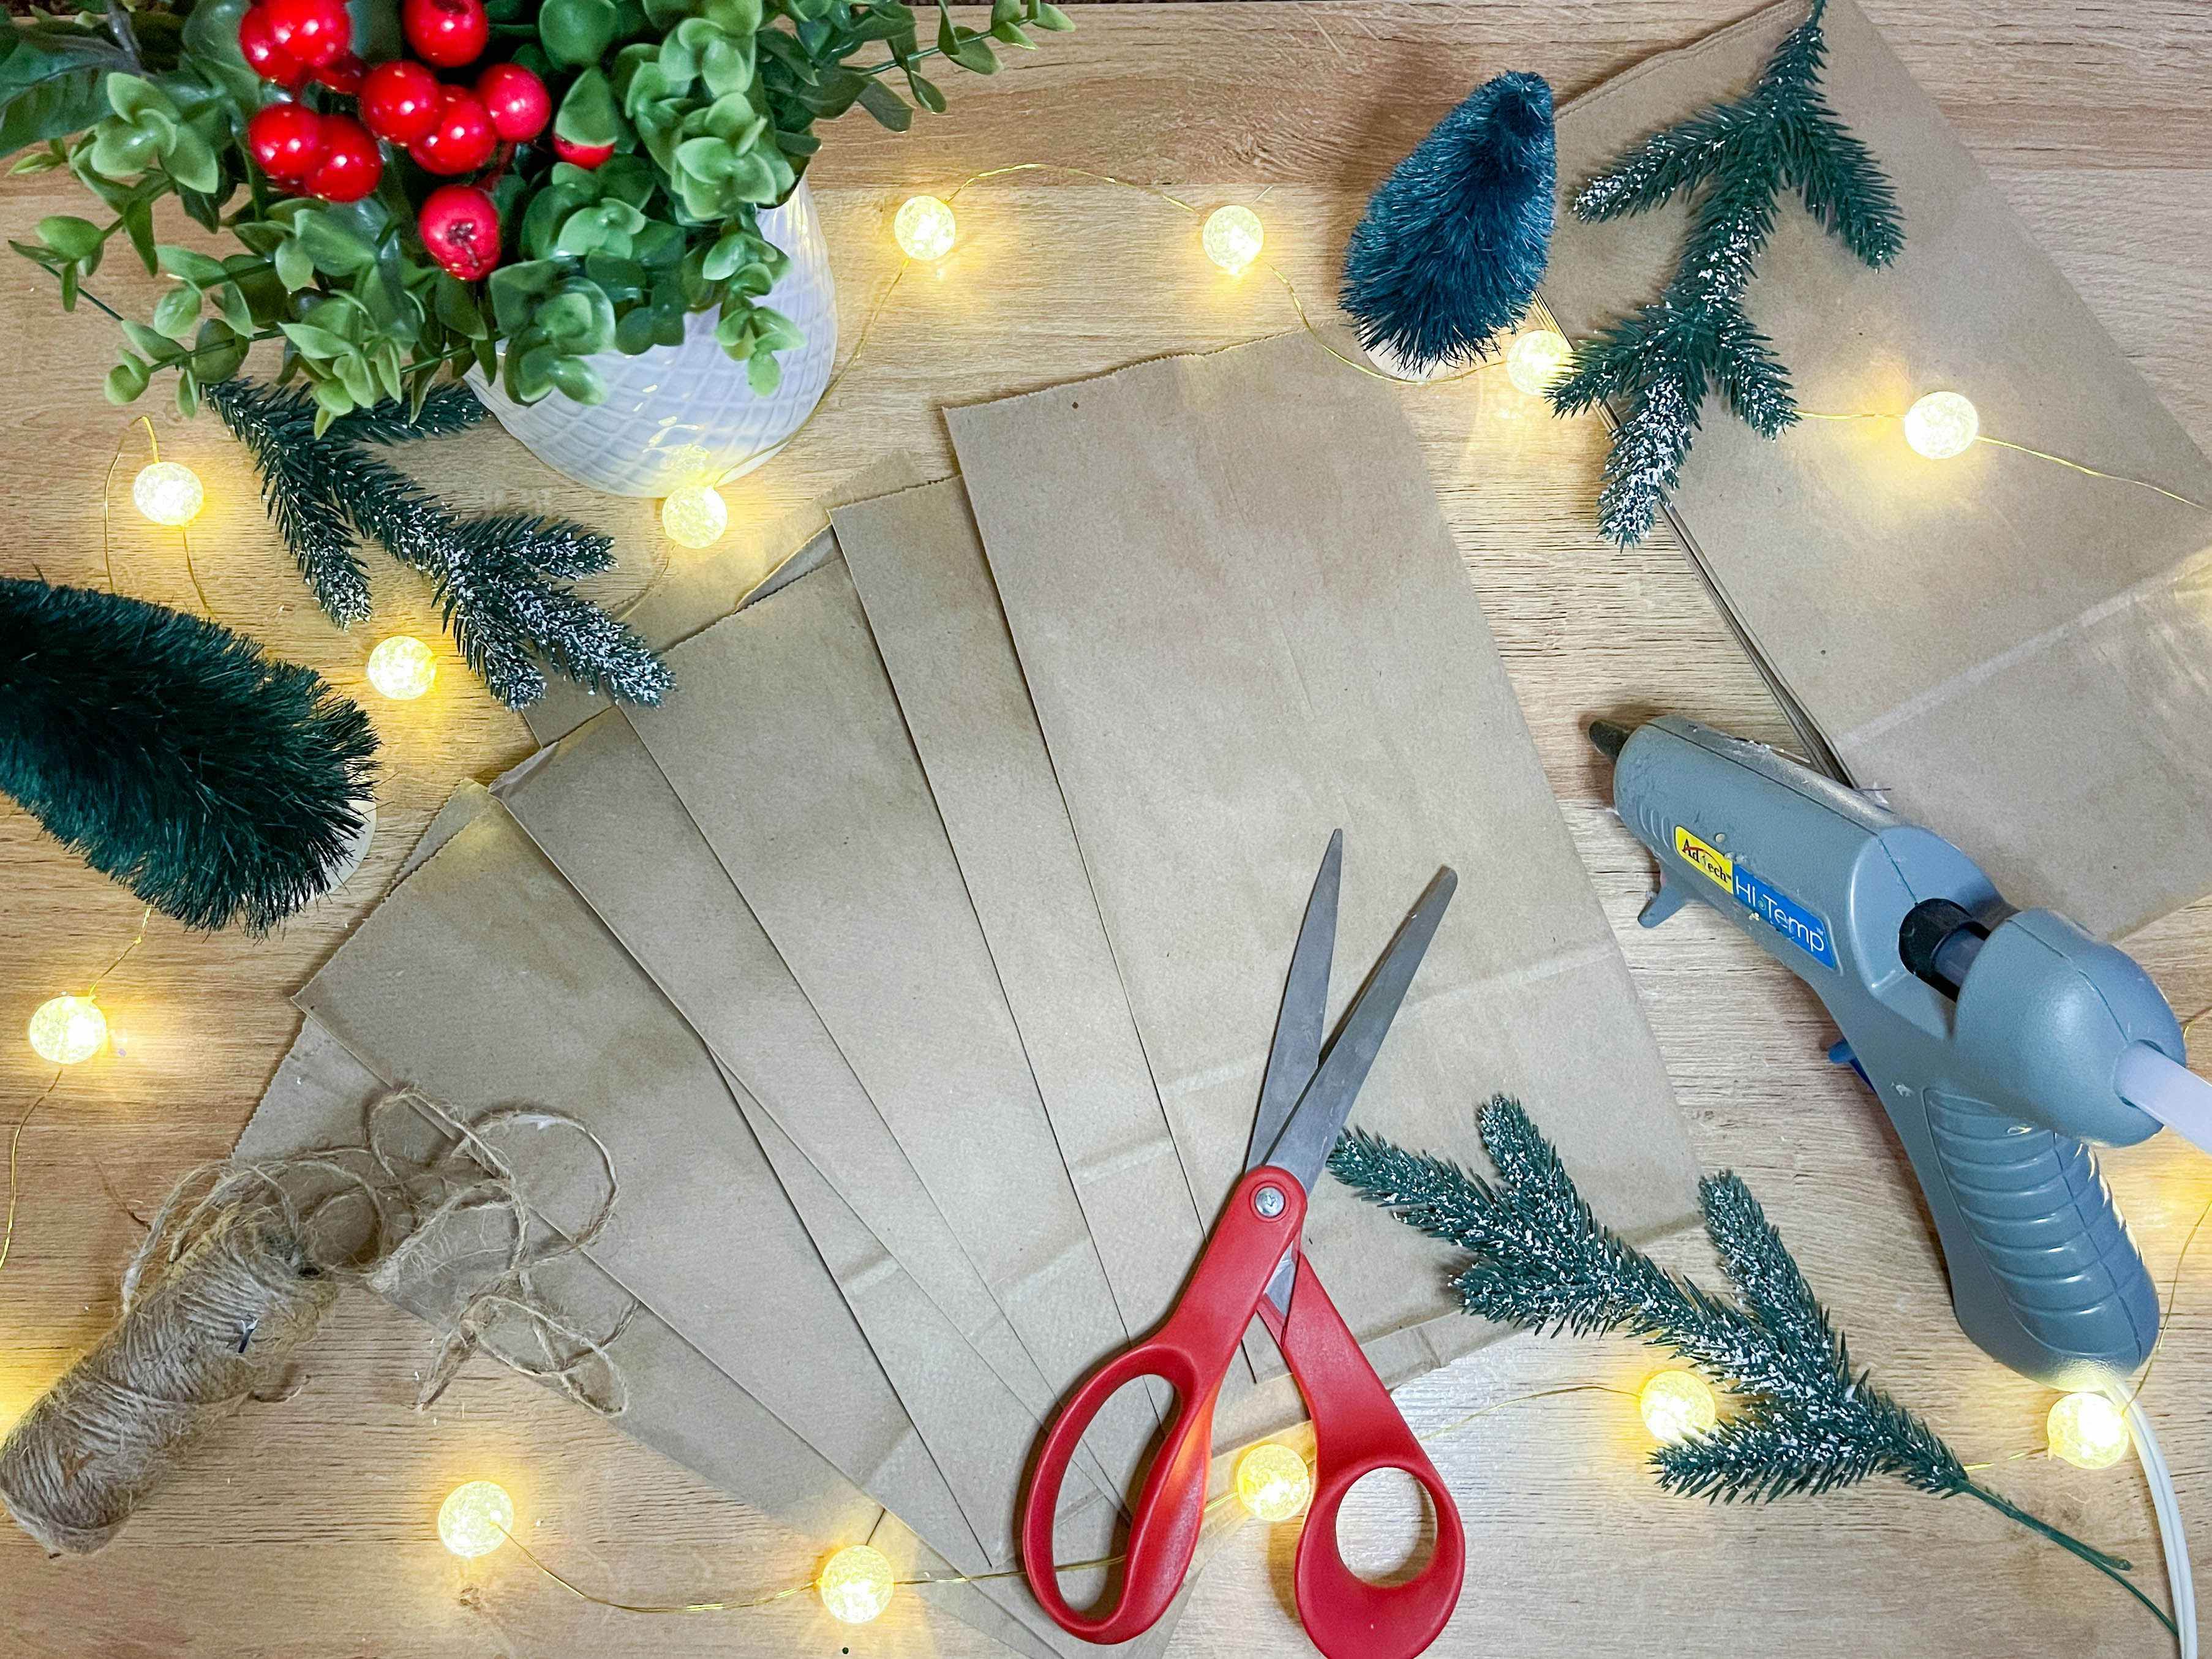
Instructions:
- On one bag, glue a T shape on the back of the bag.
- Stack a second bag on top and repeat until you’ve done eight bags.
- Take the stack of eight glued bags and cut patterns along the side and top of the stack.
- Fan the bags into a circle snowflake shape and glue the two end pieces together (each pack of bags gives you three stars).

Pattern Ideas:


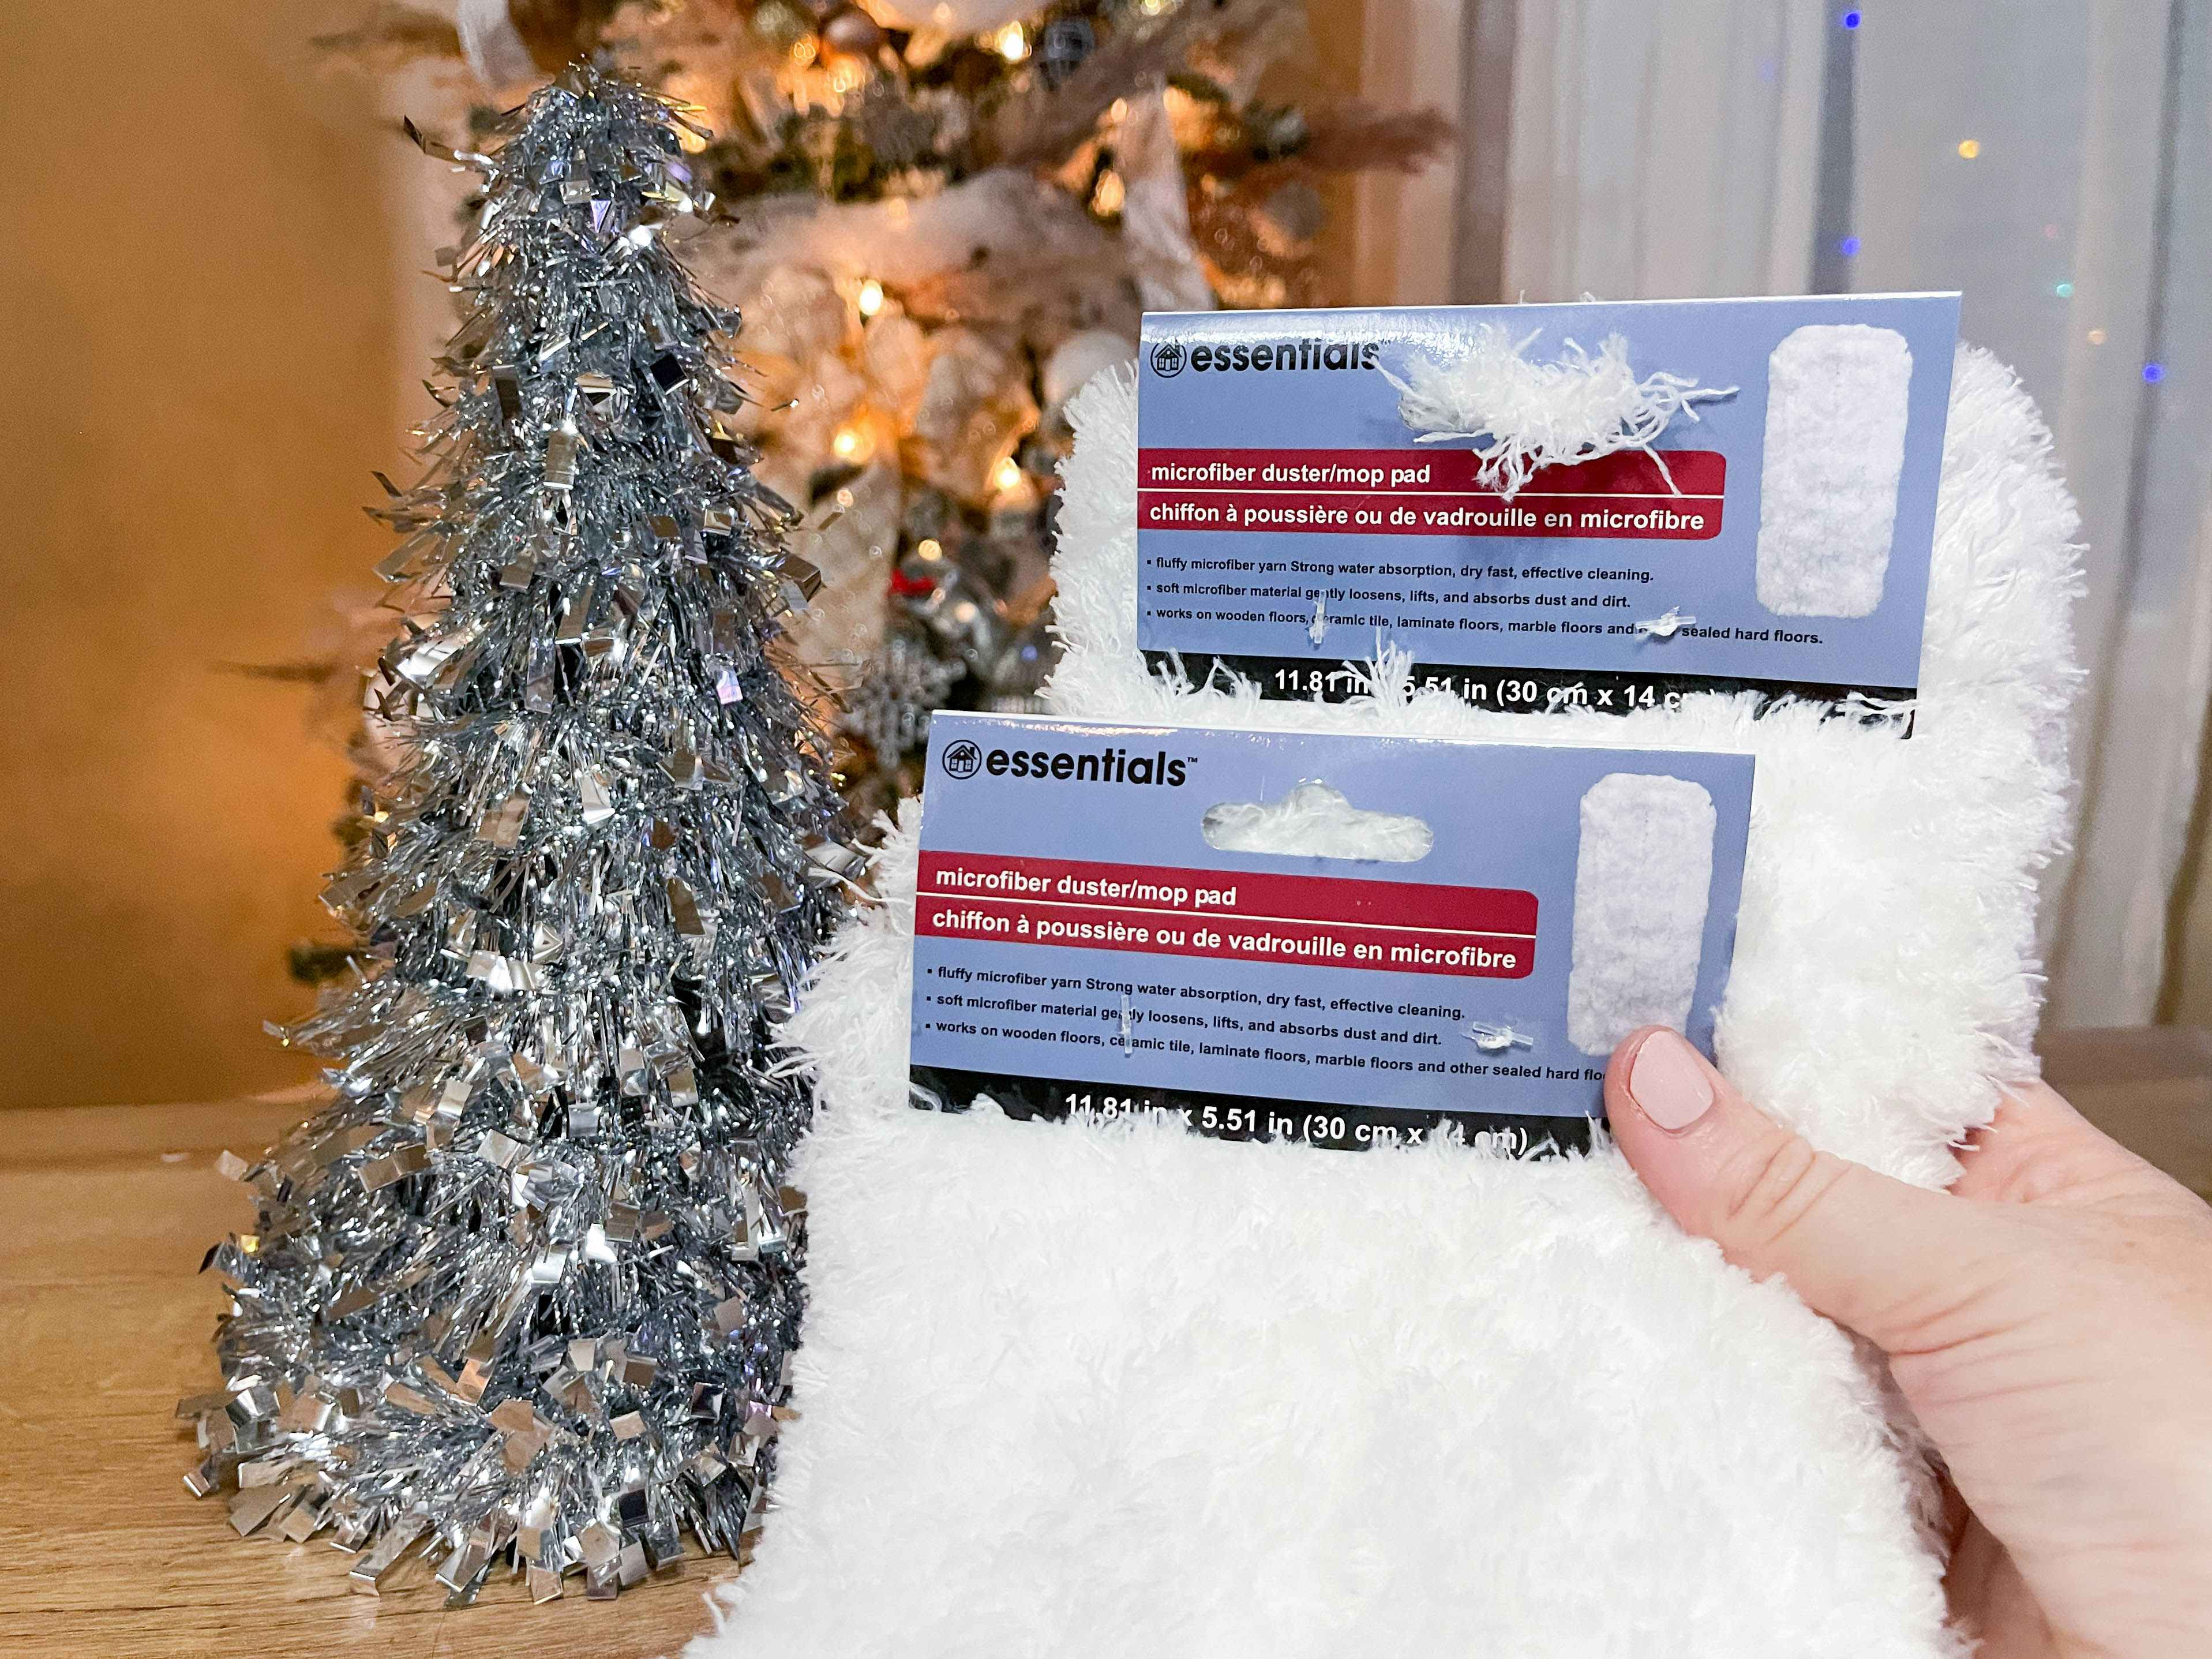
17. Create a wreath from a dust mop pad, mini trees, and a foam floral ring ($6.25).
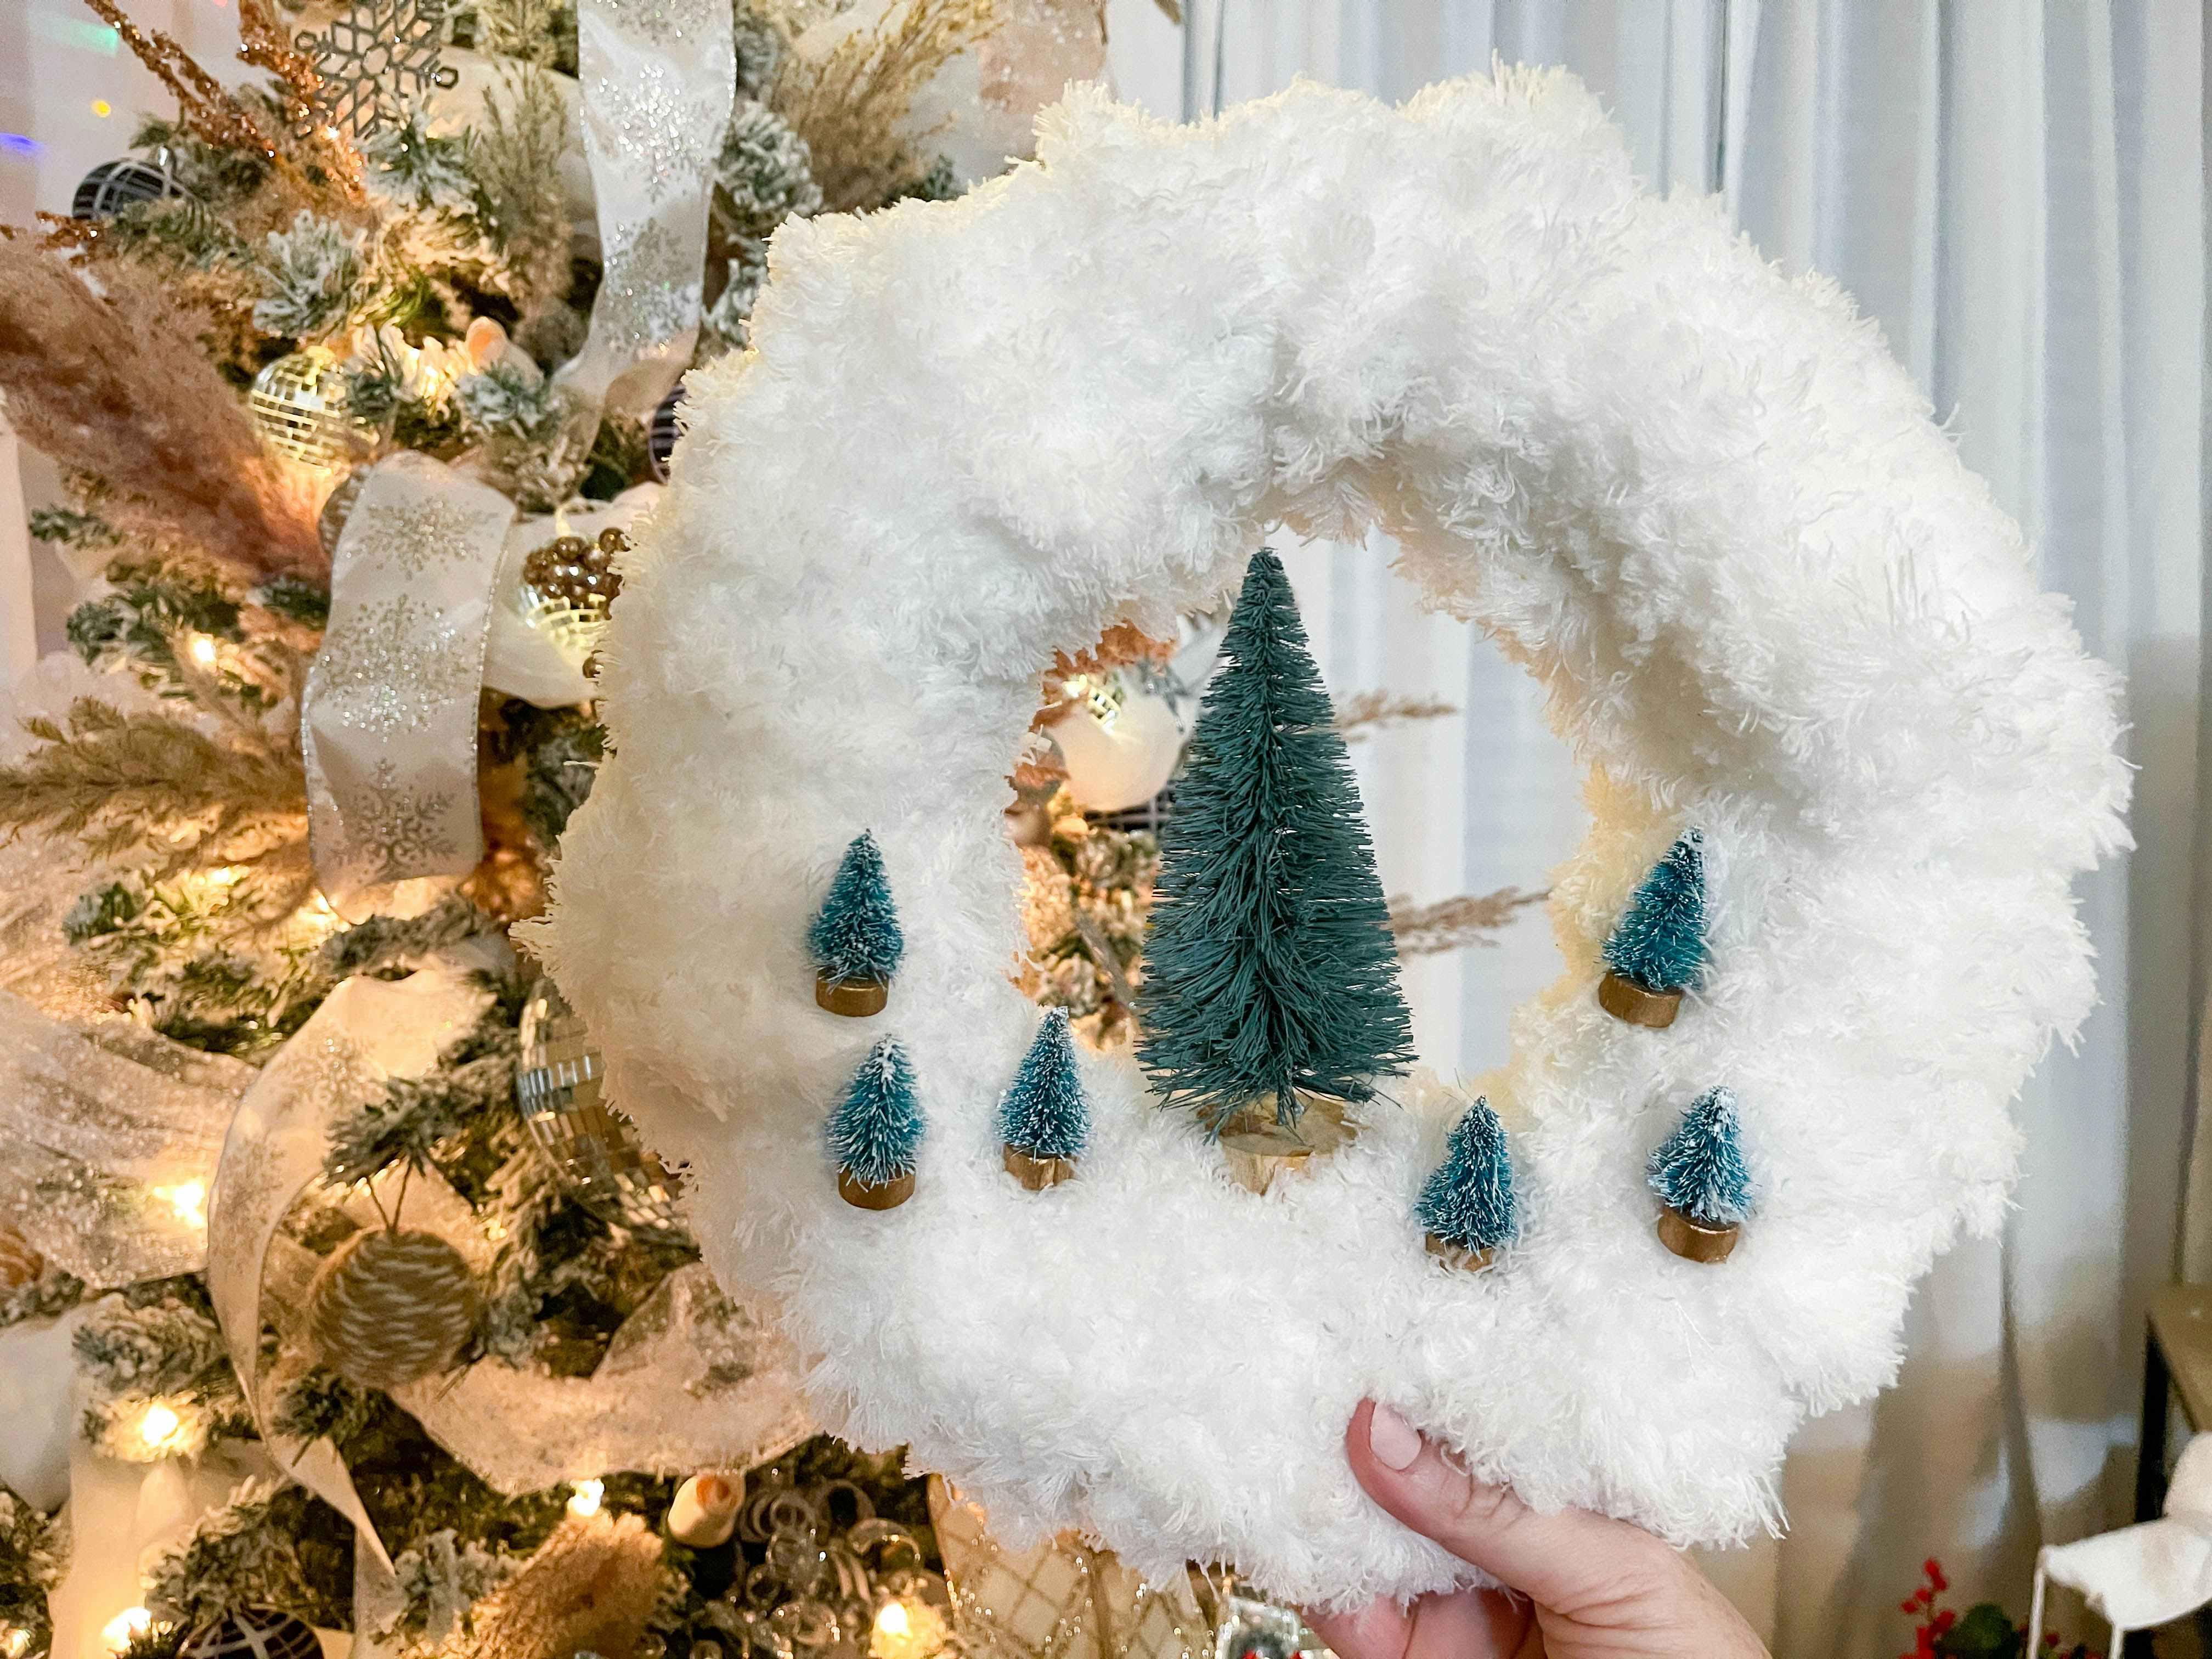
Use these fluffy microfiber mops to create a snow-covered wreath accented with mini Christmas trees. Who knew those fluffy dust mops could be useful for DIY Dollar Tree Christmas crafts.
Dollar Tree supplies you’ll need:
- 3 dusting mops ($1.25 each)
- Foam wreath form ($1.25 each)
- Bottle brush trees ($1.25 for 3)
- Medium bottle brush tree ($1.25, 6-pack)

Instructions:
- Cut the mops in half and work them around the wreath form.
- Use dots of glue to close them securely around the form.
- Glue the bottle brush trees onto the mops.
- Hang the wreath wherever you need a little extra cheer.
*Optional: Add battery-powered LED lights for a festive glow

18. Remind the kids that Santa is watching with a DIY Santa Cam ($10.75).
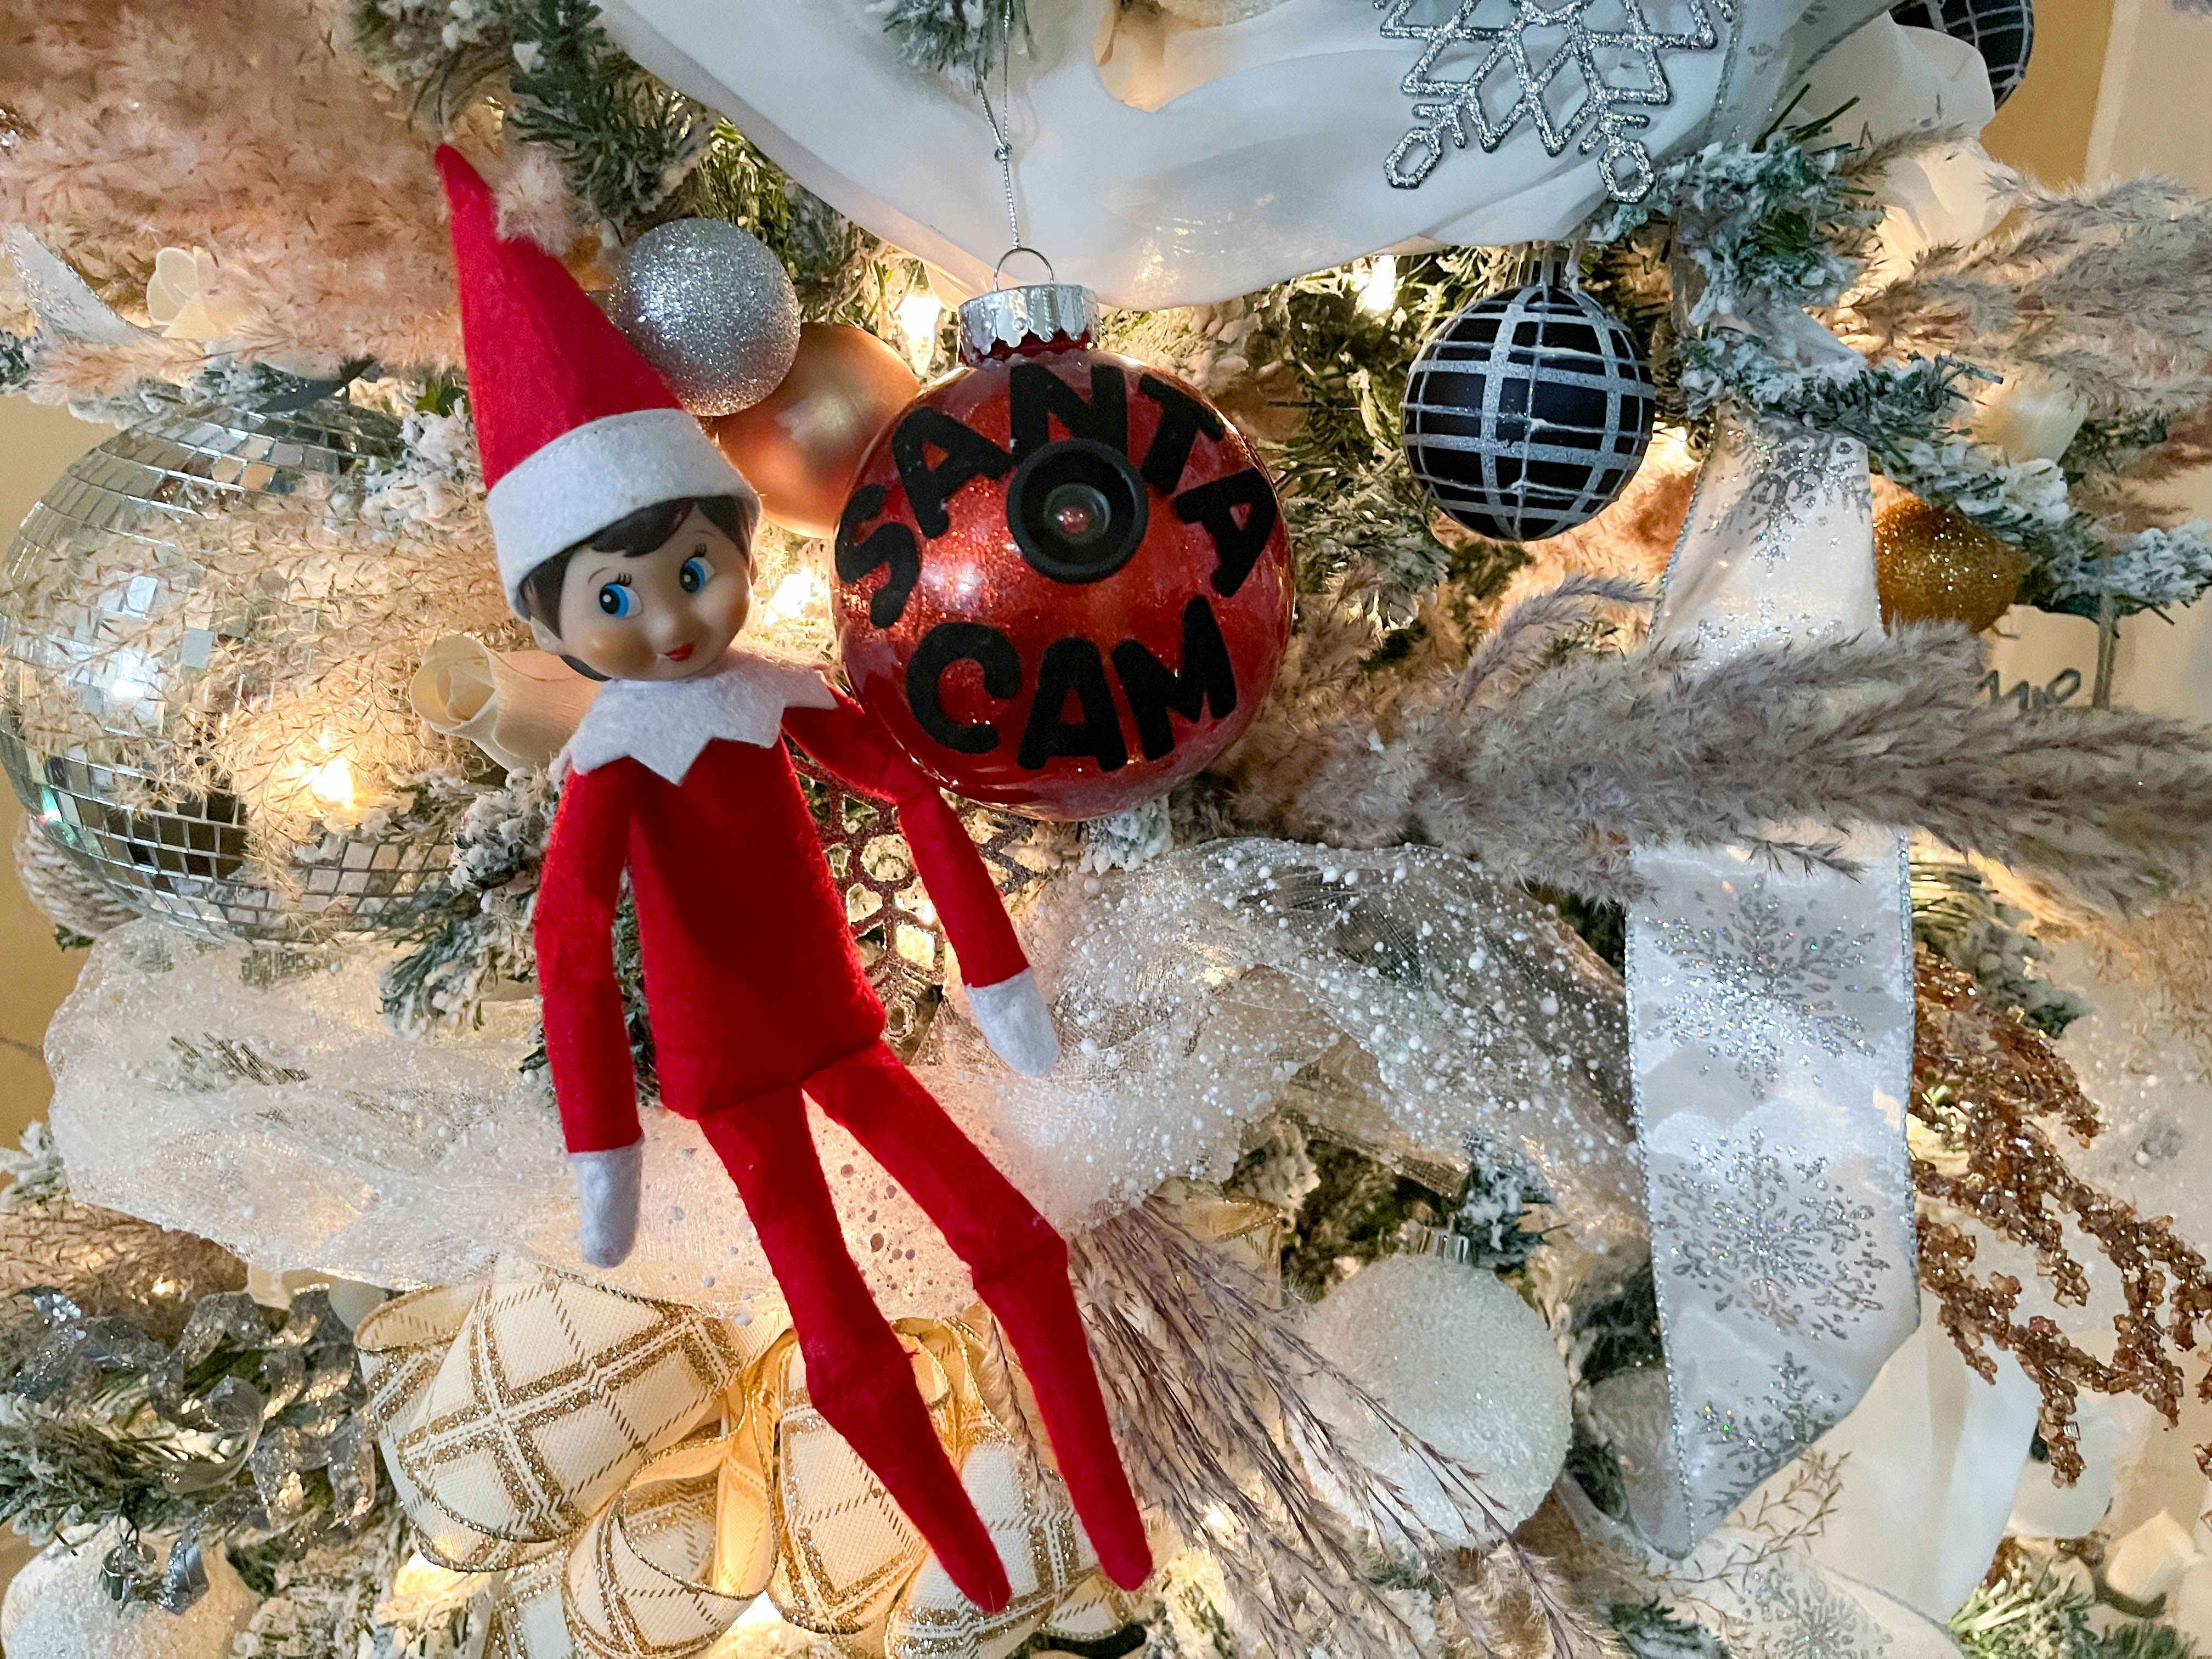
Take your Elf on the Shelf ideas a step further by making this DIY Santa cam ornament. With just a few supplies, Santa and his elves can keep a watchful eye on the kids this year!
Dollar Tree supplies you’ll need:
- Clear DIY ornament ($1.25 each)
- Felt letter stickers ($1.25, 100-pack)
- Glitter paint (or glue and red glitter) ($1.25, 3 ounce tube)
- Wide-angle smartphone lens ($7, Amazon)
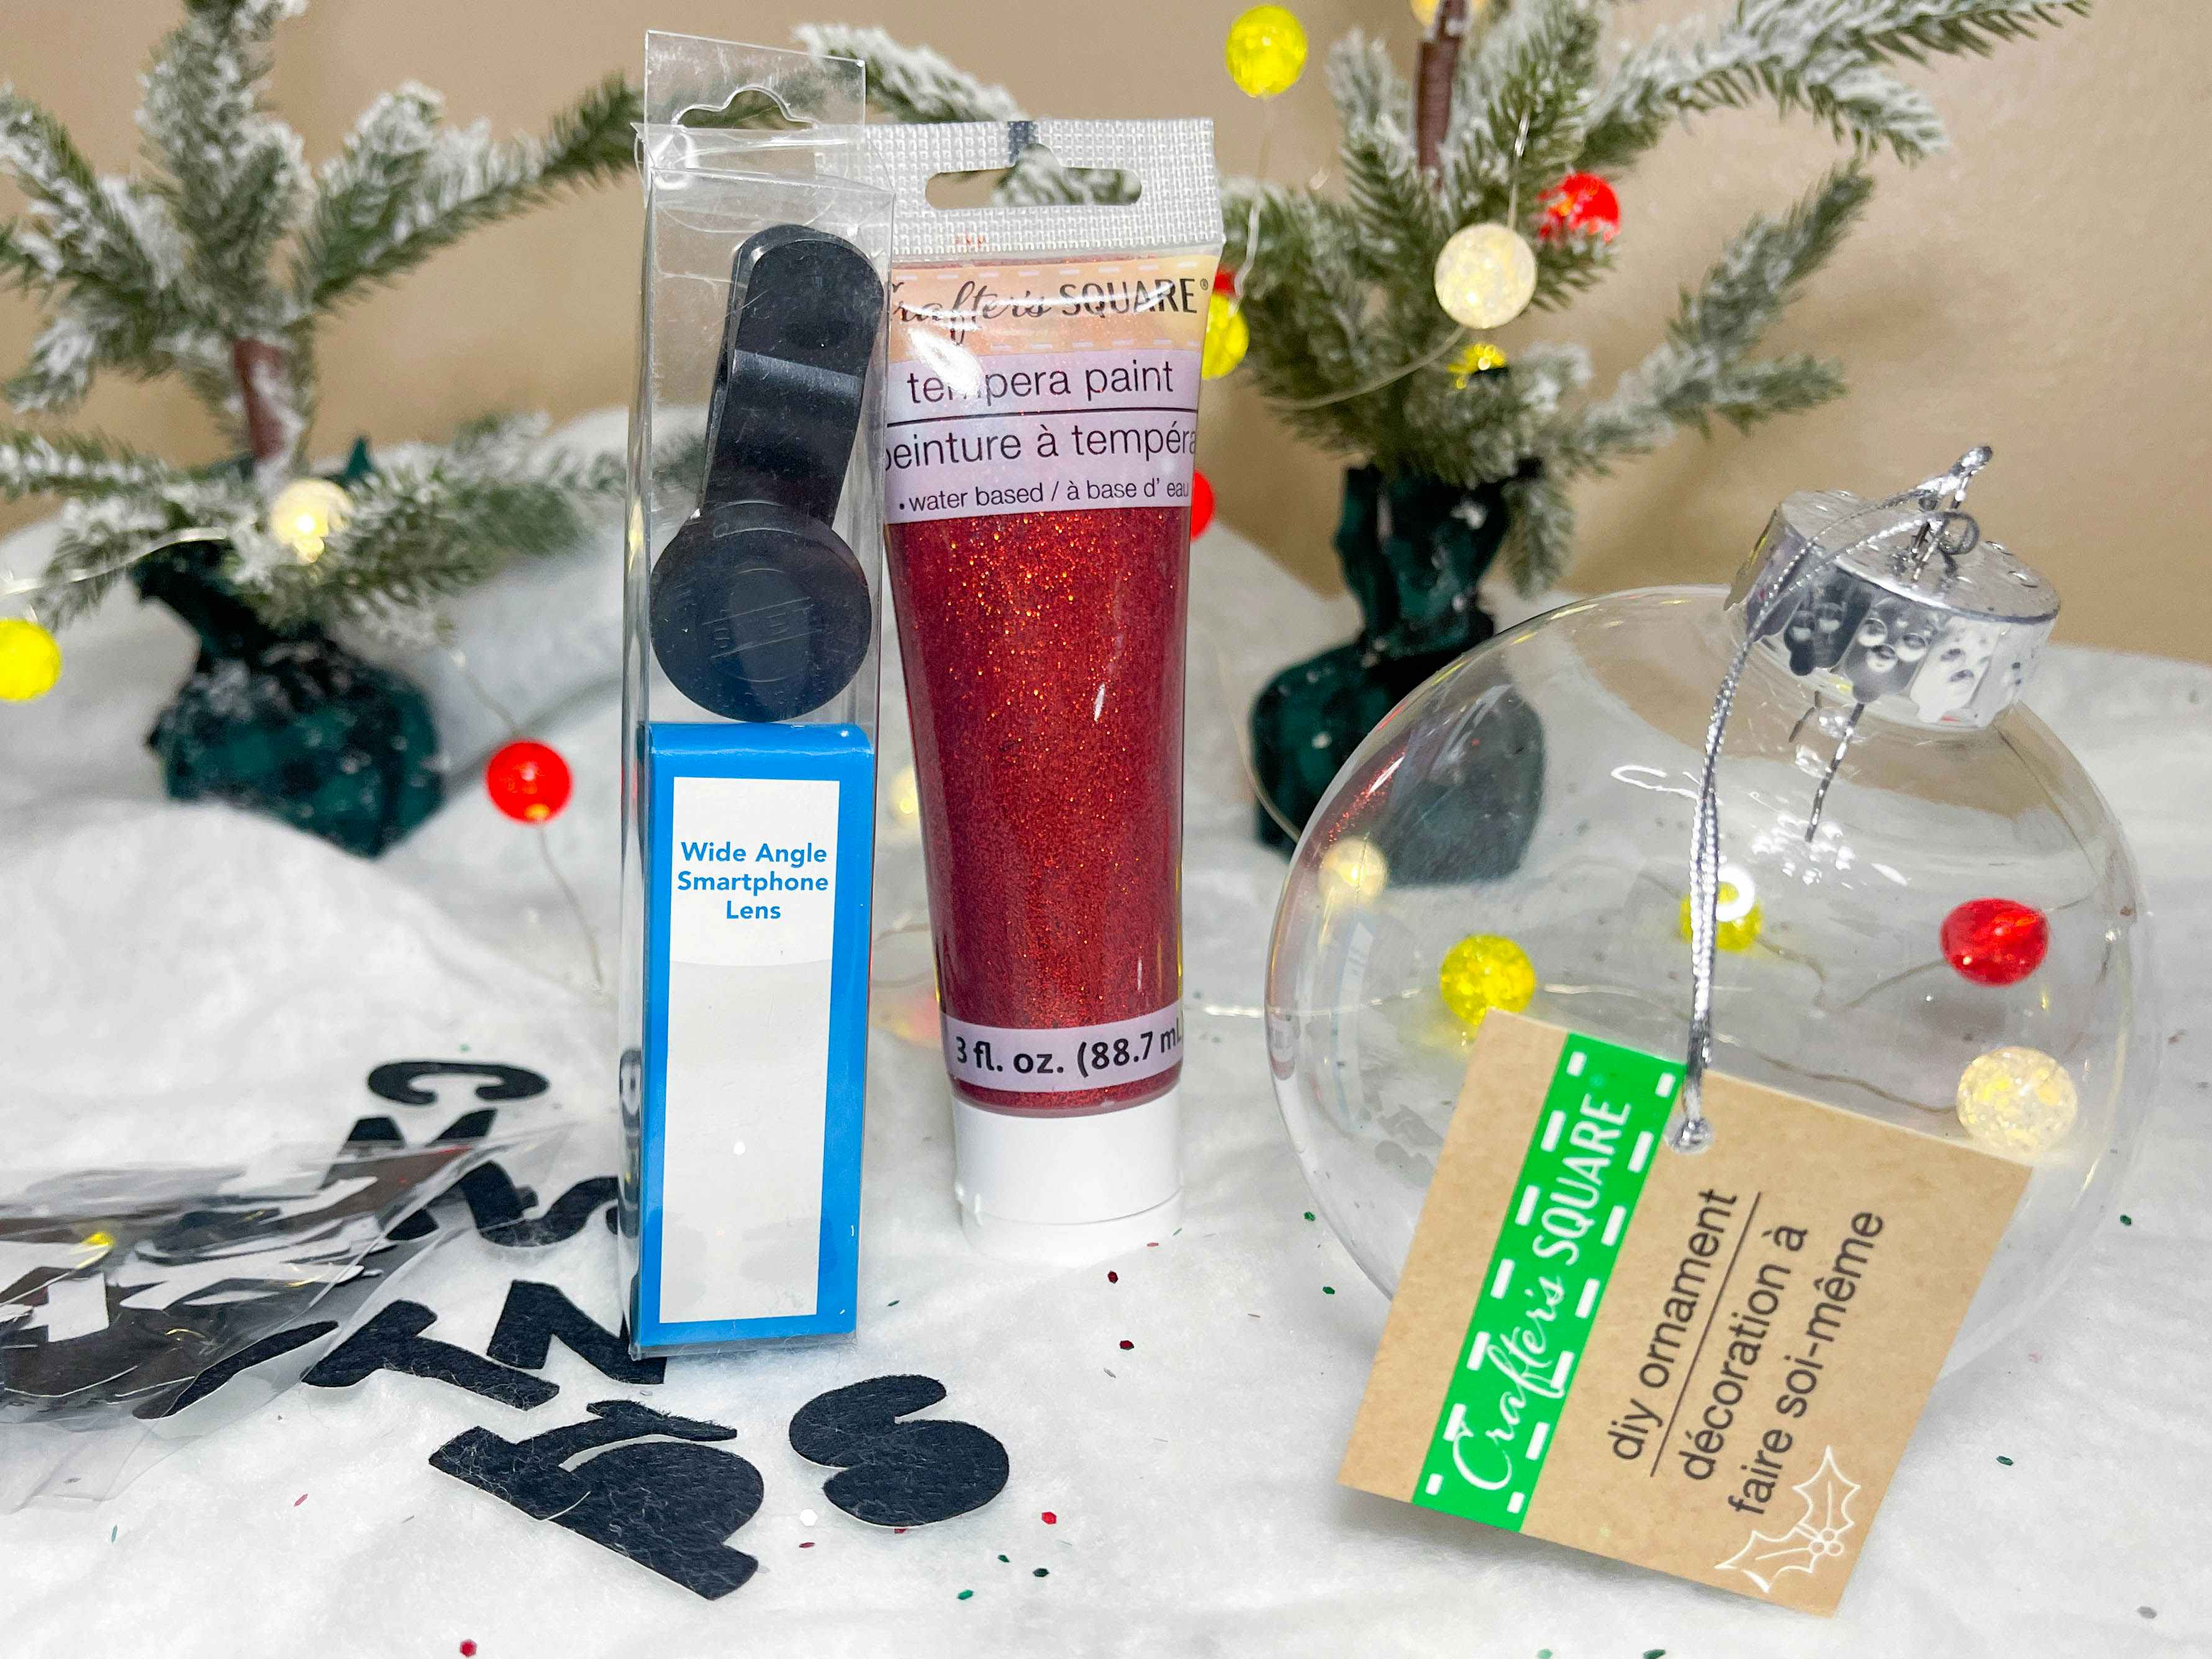
Instructions:
- Remove the ornament top and pour the glitter paint into the ornament.
- Put the cover back on and shake the ornament until the paint has coated the inside.
- Take apart the smartphone lens so you have just the circular part.
- Glue the piece of the lens to the center of the ornament so it looks like a camera.
- Add Santa Cam sticker letters around the lens.

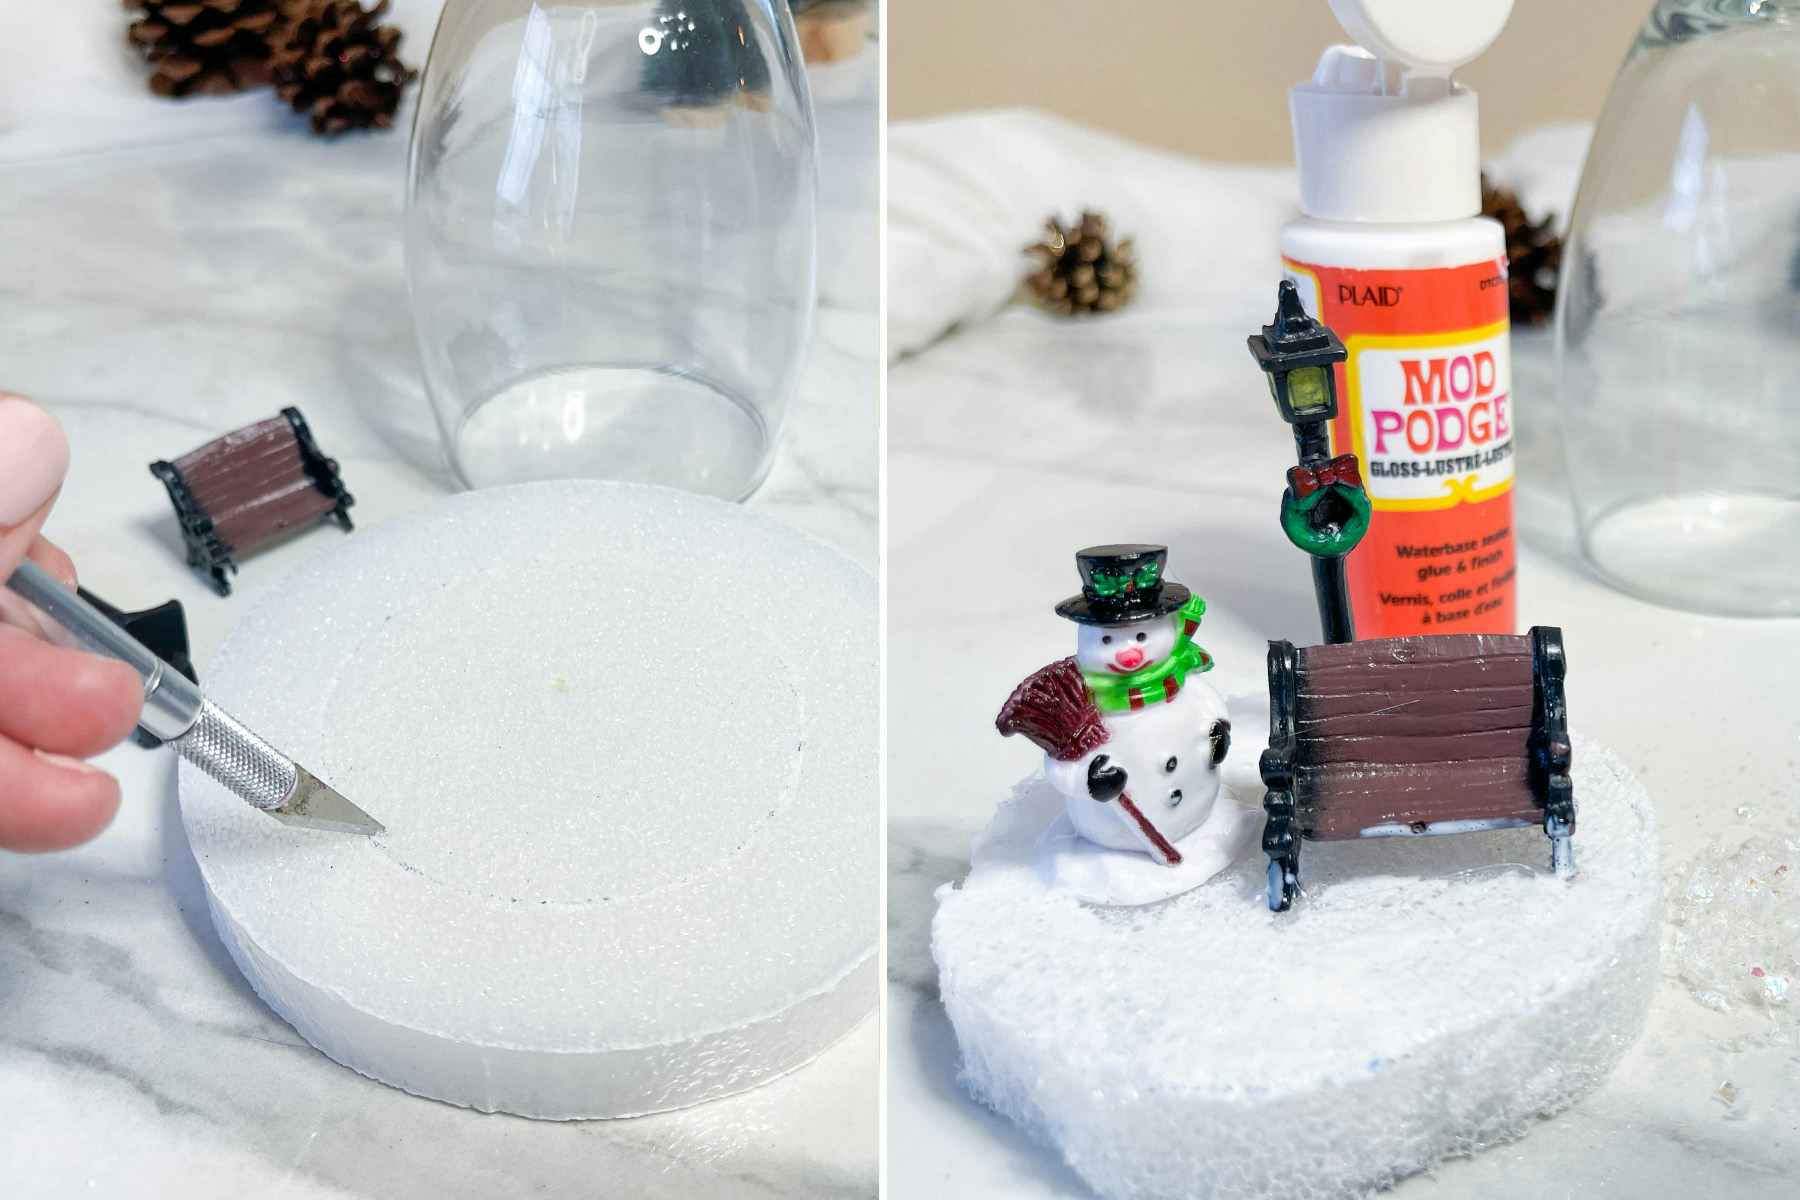
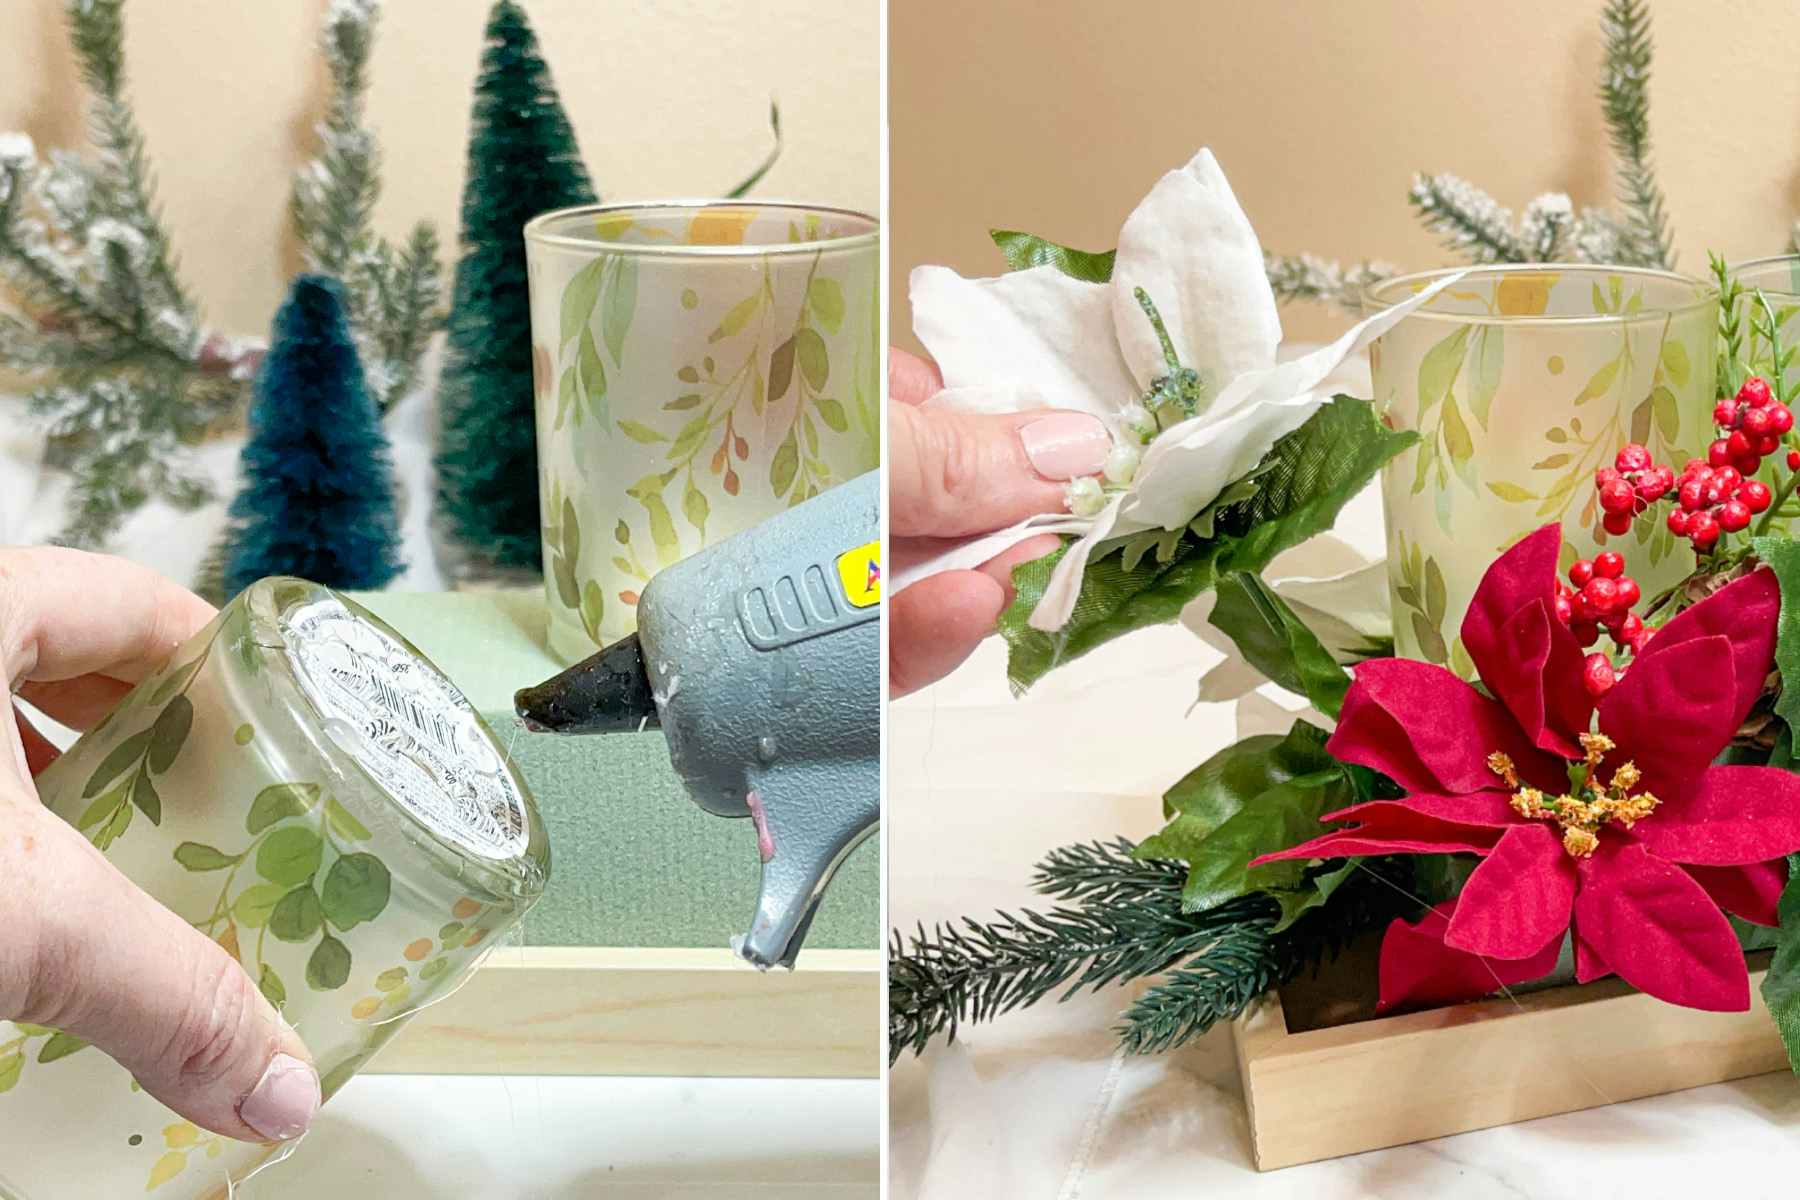
19. Turn a wine glass into a Christmas village candle holder ($4.50 for one).
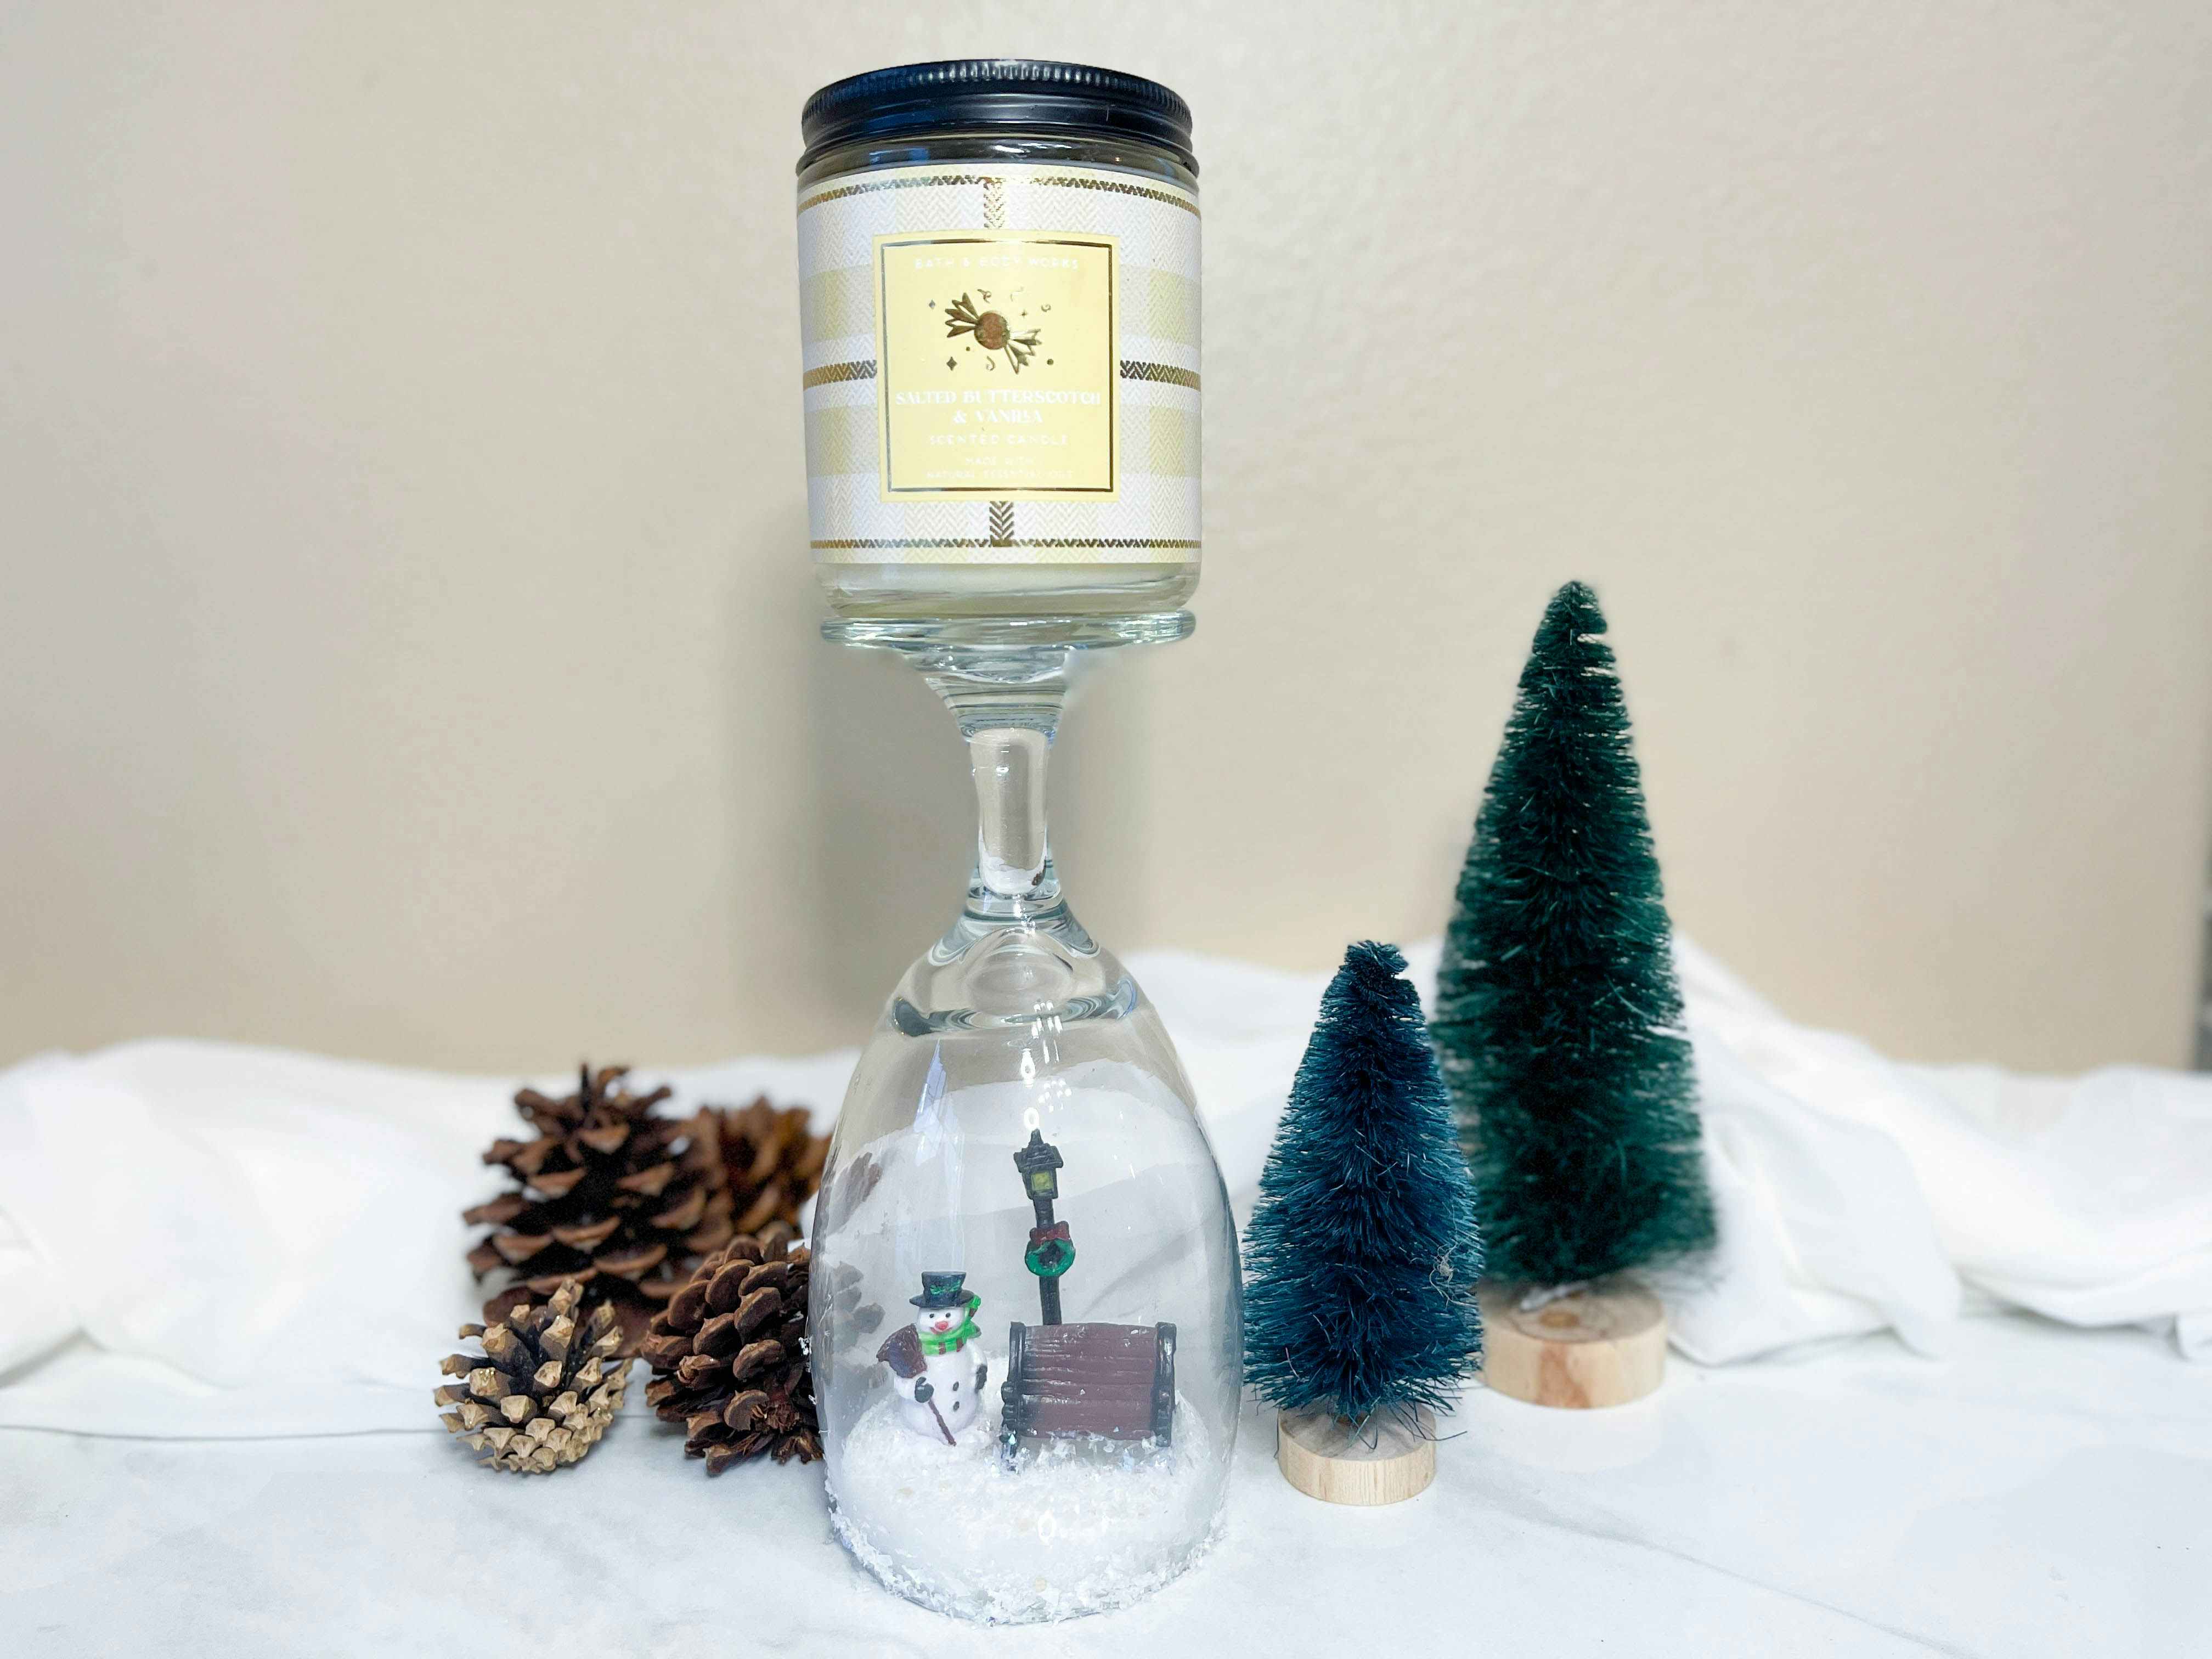
Dollar Tree Christmas crafts like this create a pretty winter scene inside a wine glass with just four items. If you have an old wine glass, save $1.25 and use your own.
Dollar Tree supplies you’ll need:
- Styrofoam disc ($2, Hobby Lobby)
- Christmas miniatures ($1.25 for 2)
- Mod Podge ($1.25)
- Wine glass (Use one that you don’t need anymore)
Instructions:
- Cut the styrofoam disc to fit just inside the rim of your wine glass.
- Use Mod Podge to adhere your Christmas miniatures to the styrofoam.
- Add a little faux snow if you want.
- Fit the disc into the wine glass and use it as a candleholder for your favorite holiday candle.
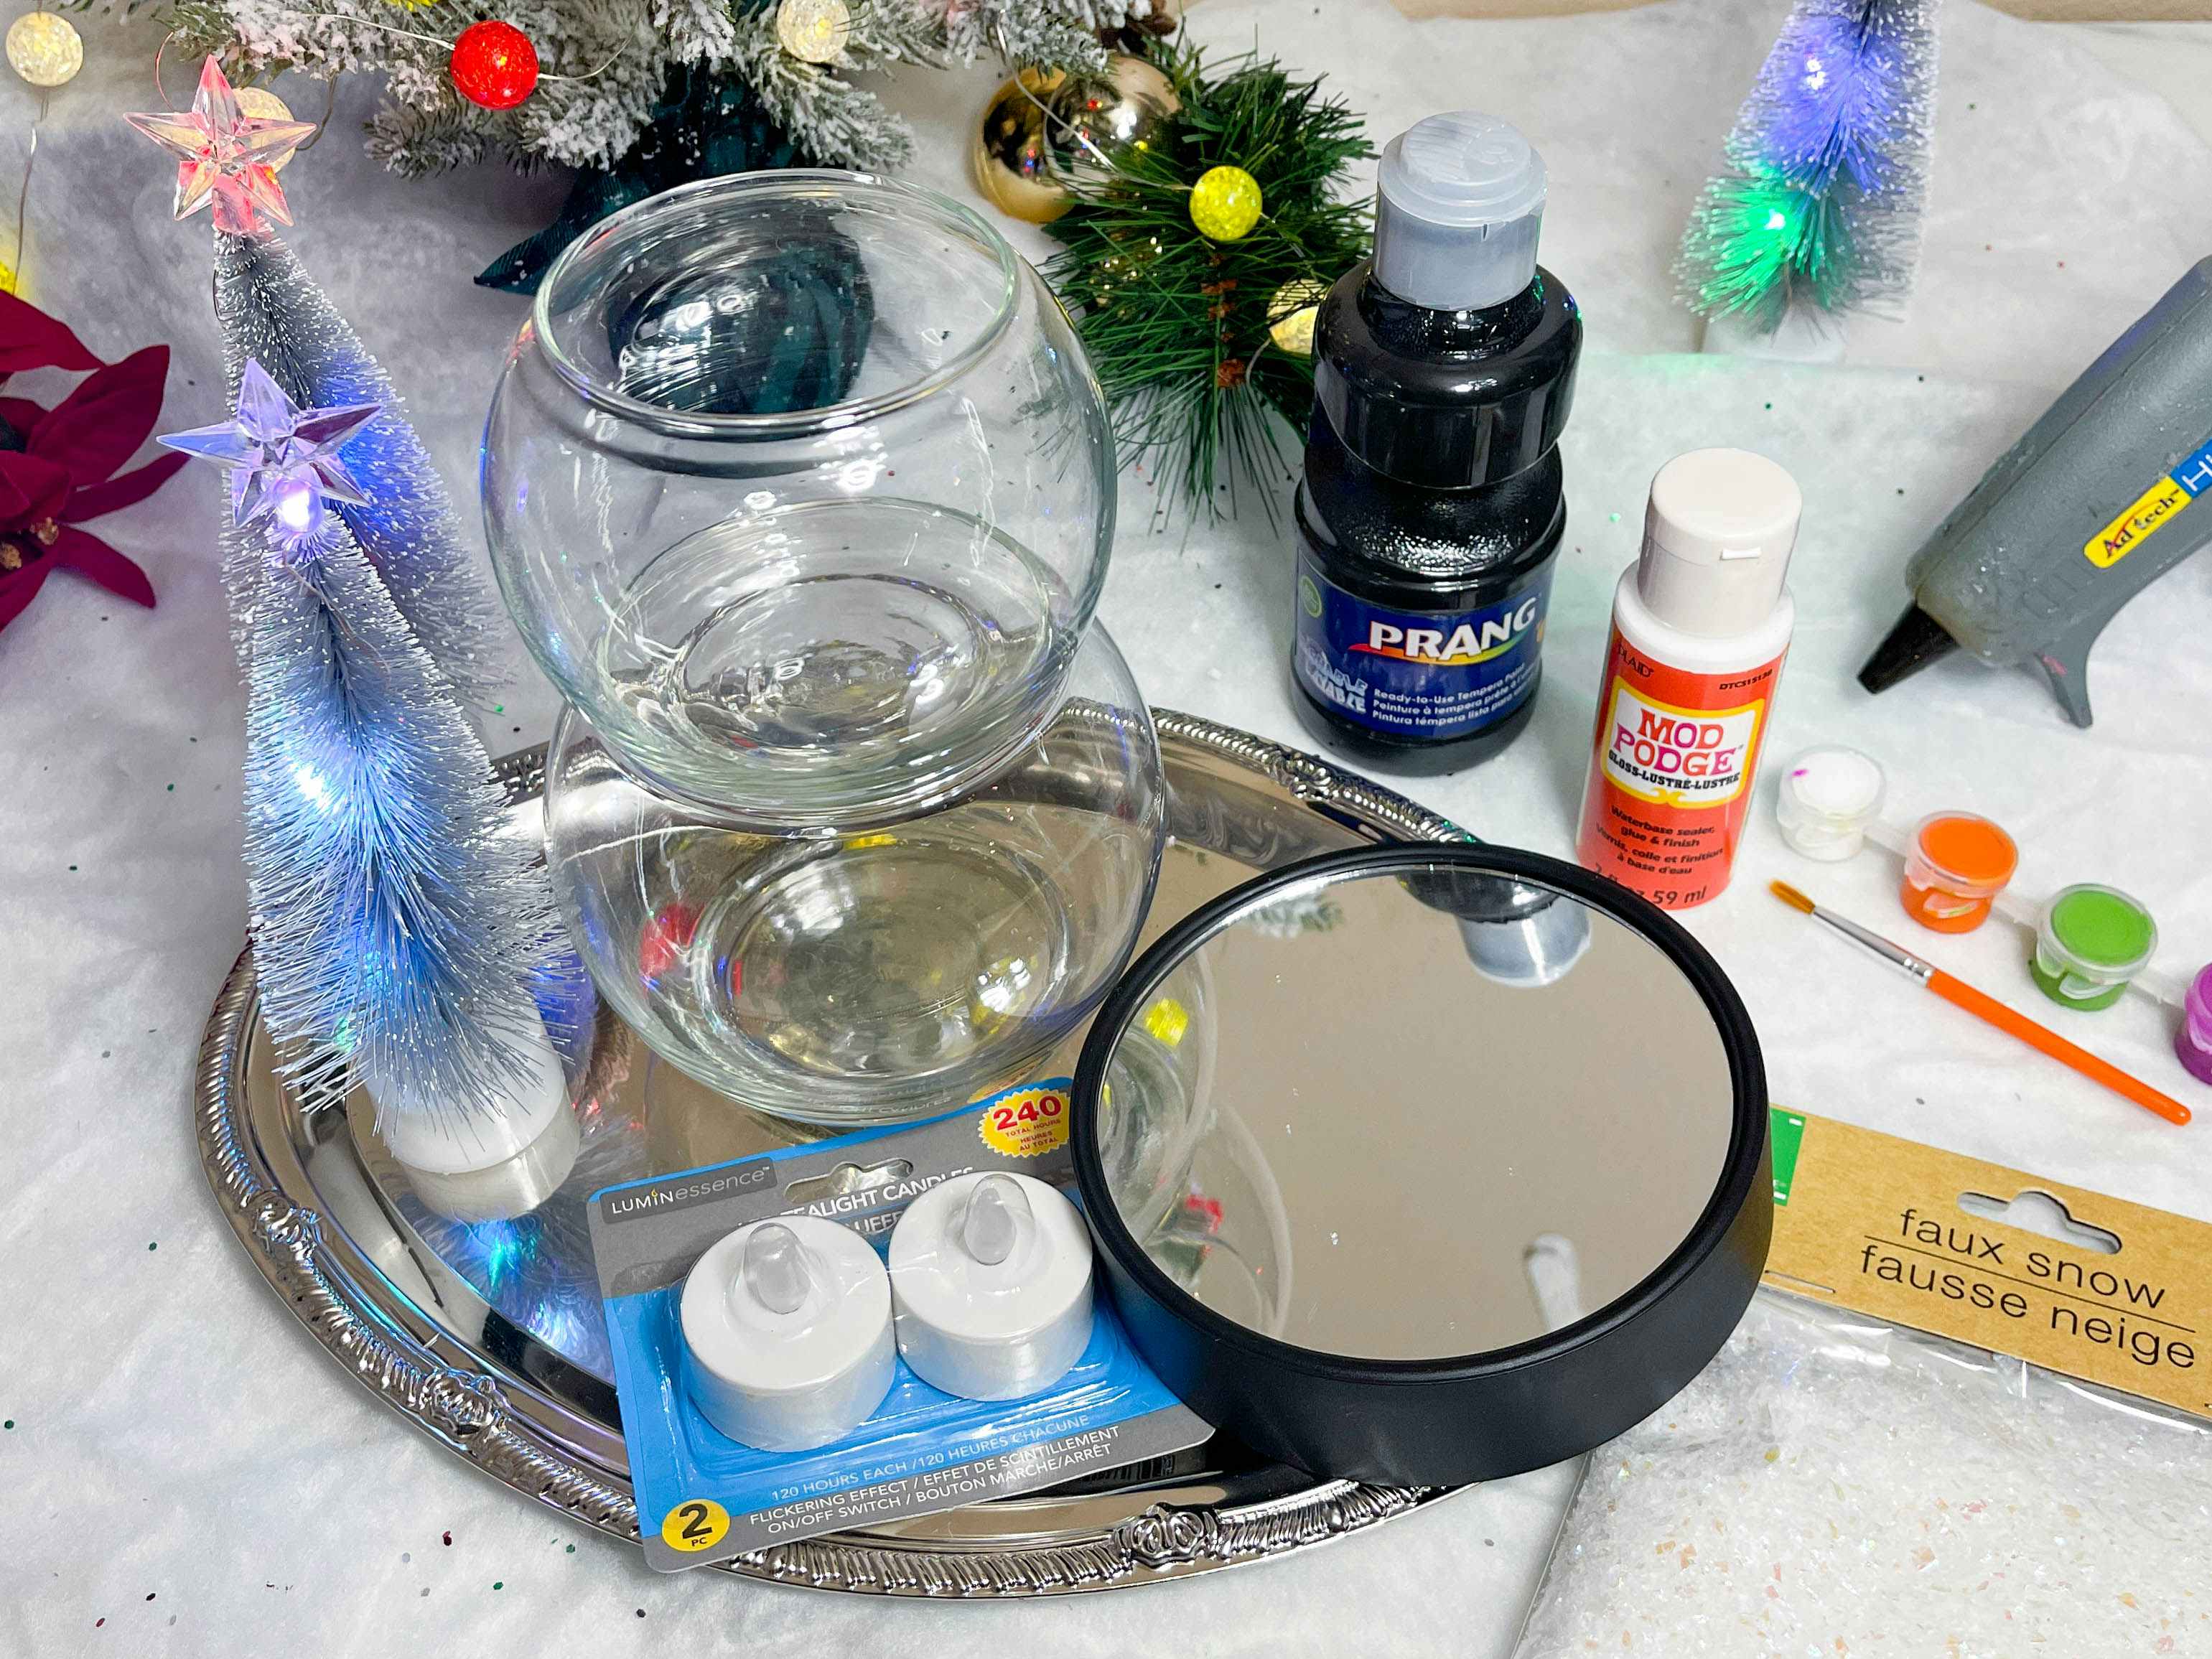
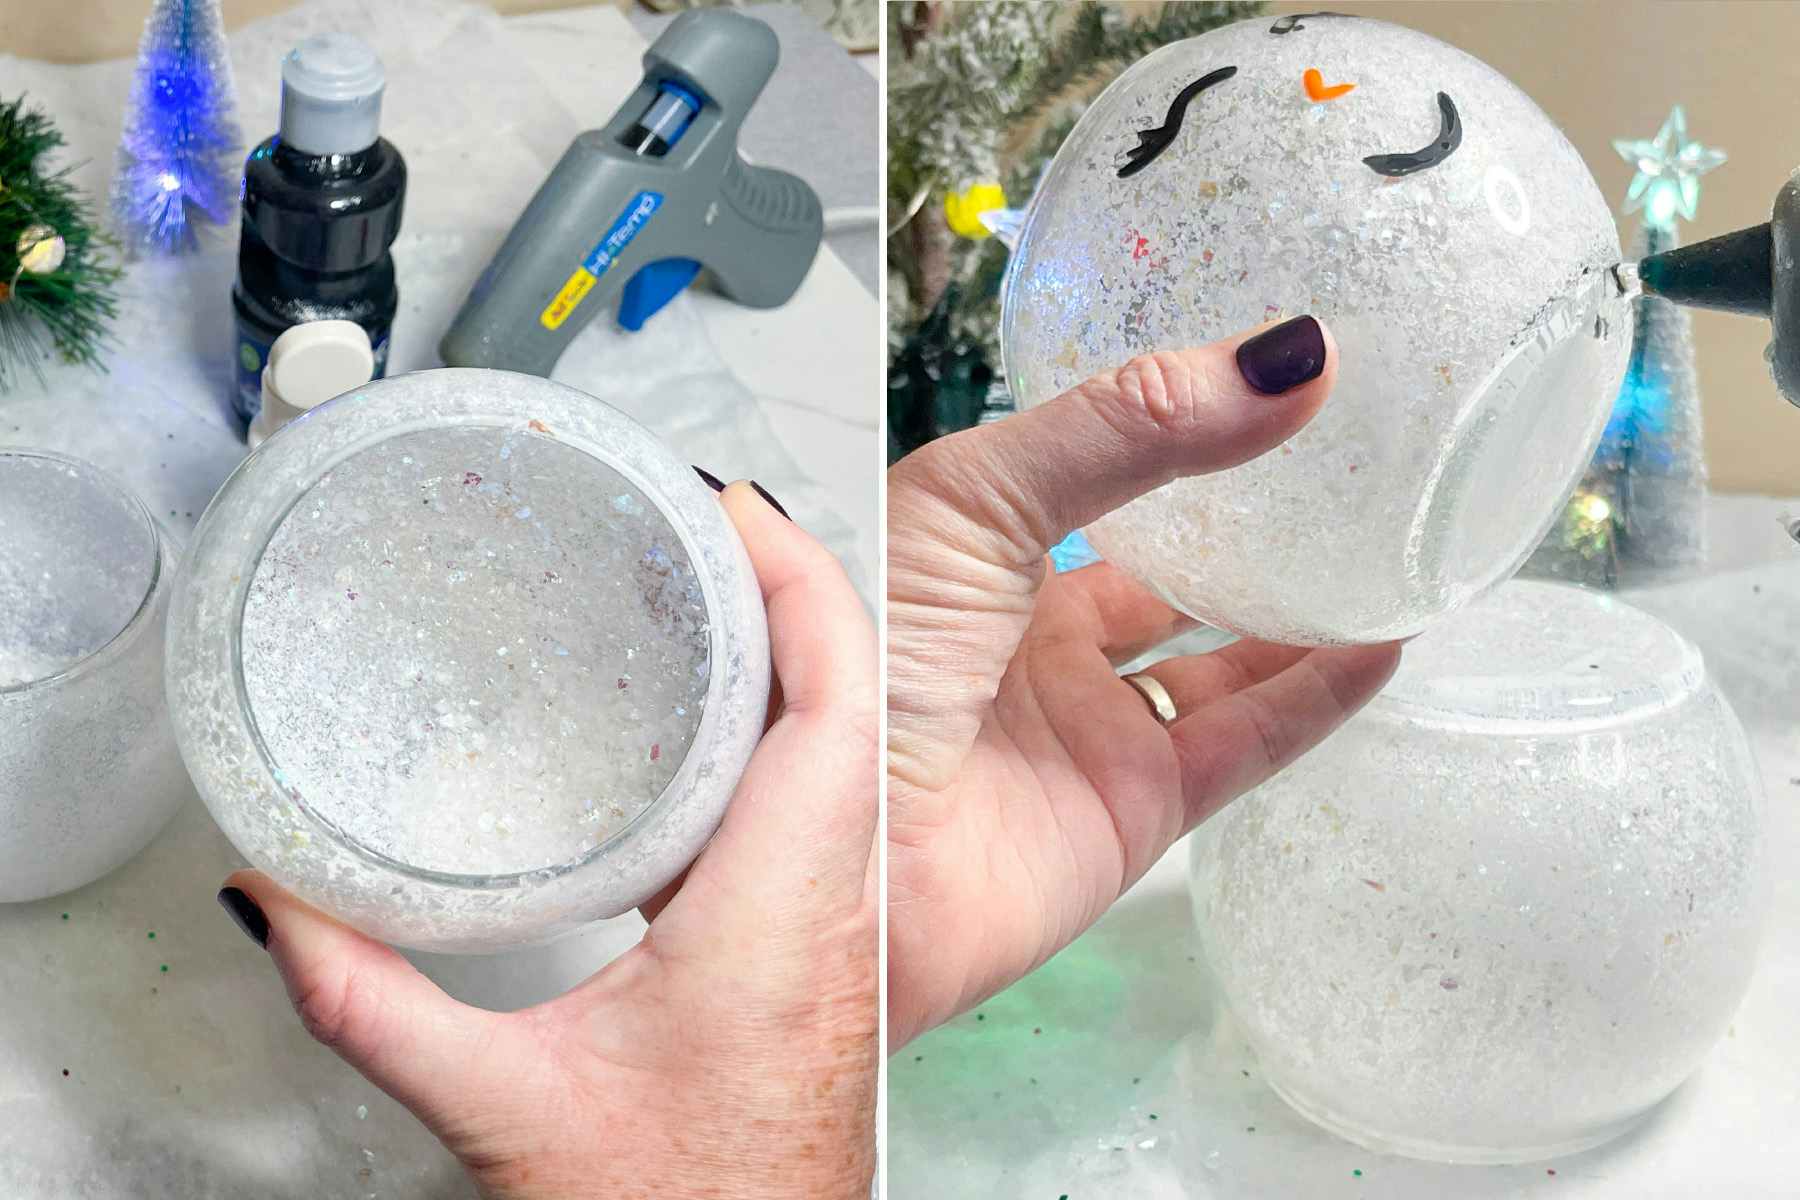
20. Make a snowman candle holder using vases, LED lights, and glitter snow ($7).

This glowing snowman candle holder uses flameless candles, so it’s a fun and safe holiday project for the whole family.
Dollar Tree supplies you’ll need:
- 2 bubble bowl vases ($1.25 each)
- 2 LED tea lights ($1.25, 3-pack)
- Mod Podge ($1.25)
- Faux glitter snow ($1.25)
- Black candle holder ($1.25 each)
- Paint
- Ribbon
*Optional: Tray and trees
Instructions:
- Paint Mod Podge inside vases and add the faux glitter snow to cover the interior.
- Paint a face on the top vase.
- Glue the two vases together to build a snowman shape.
- Add a ribbon around the middle of the vases to create a scarf.
- Place the black candle holder on top (you could also paint the top black if you could only find a mirrored candle holder).
- Use LED lights inside each vase for a cozy glow. Top with your favorite candle.
21. Design a candy cane pillow with a pool noodle ($3.25).
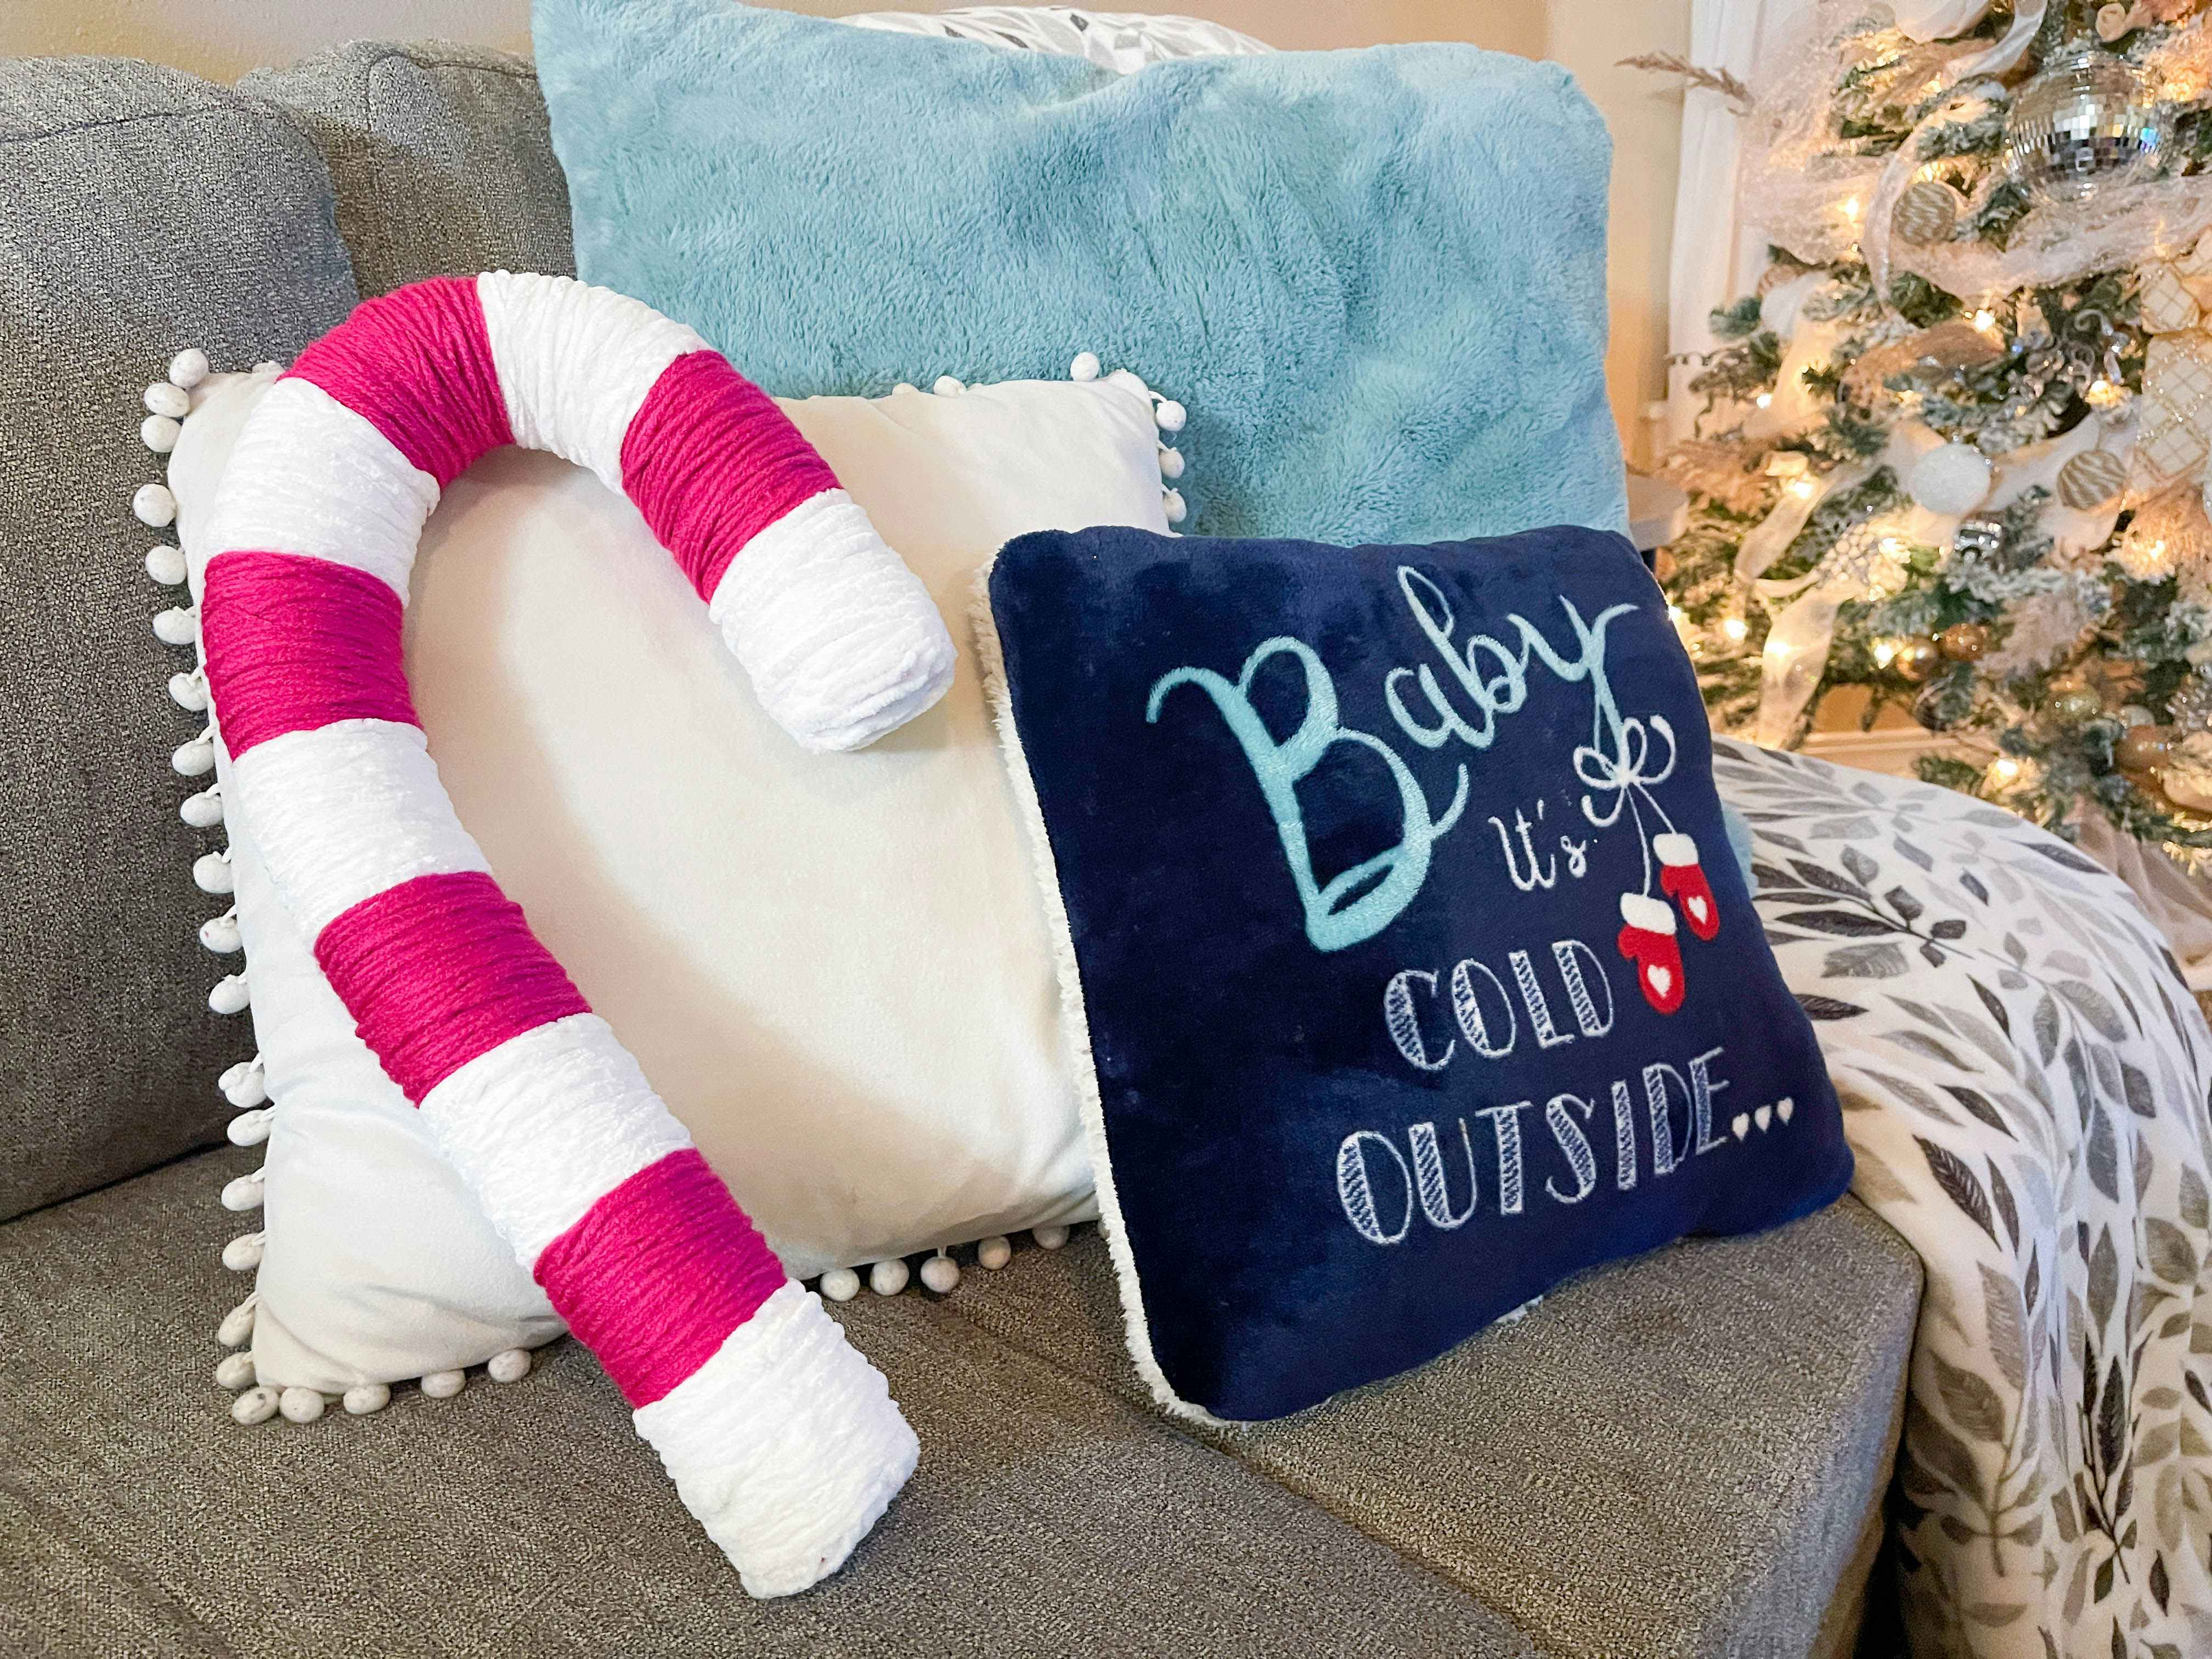
Who doesn’t love Dollar Tree Christmas crafts that save big. I’ve seen these pillows for $15 at retailers. This festive candy cane can be used almost anywhere to add a little winter cheer. Use it with pillows or as a decoration to hang on your door or windows.
Dollar Tree supplies you’ll need:
- Pool noodle ($1.25 each)
- Wire hoop ($2, Walmart)
- Red and white yarn (Check Buy Nothing group on Facebook or ask friends)
Instructions:
- Cut the pool noodle in half.
- Cut the metal hoop and shape it like a candy cane.
- Thread wire through the noodle to give the noodle a candy cane shape.
- Cover the edges of the noodle by gluing yarn to cover the entire edge side.
- Once the edge is covered, wrap the yard around the noodle, alternating the colors every few inches to give candy cane stripes.
- Glue yarn to cover the final edge.

22. Gift a DIY 3-wick Christmas candle ($5 for one candle).

Create a giftable 3-wick candle in a cute holiday cookie tin! Just melt down smaller candles to create one large candle. Plus, you can use essential oils to create your own custom holiday scent.
Dollar Tree supplies you’ll need:
- Any holiday cookie tin ($1.25 each)
- 3 tall candles in different colors ($1.25 each)
- Any embellishments like twine, ribbon, faux flowers, or berries
- *Optional: Your favorite essential oils
*Optional: Your favorite essential oils

Instructions:
- Before you get started, use this pro tip: add a bead of glue around the inside bottom of the tin to prevent any wax from leaking.
- Melt the three long candles on the stove in boiling water.
- Once melted, carefully remove the wicks.
- Add the wicks to the bottom of the tin using a dowel and clips to keep the wicks upright.
- Pour melted wax into the holiday tin.
- Add your favorite essential oils for added scent.
- Once the wax cools and hardens, you can embellish the tin with your pretty add-ons.

23. Design easy Mickey and Minnie Mouse ornaments ($0.60 each).

These adorable Mickey and Minnie Mouse ornaments are about $0.60 each ($0.17 for one medium ball, $0.16 for two mini balls, and $0.10 for one bow)! You just need a couple of different-sized ornaments, hot glue, and some bows for the Minnies.
Dollar Tree supplies you’ll need:
- Medium ball ornaments ($1.25, 7-count)
- Mini ball ornaments ($1.25, 15-count)
- Mini bows ($1.25, 12-count)
- Hot glue

Instructions:
- Use the tip of the hot glue gun to melt two perfect holes in the top sides of the ornament. This is where the ears will go.
- Remove the metal top from the mini ornament.
- Put a little glue on the mini ornament (where the metal hanger was) and place it in the hot glue hole to create a mouse ear. Repeat on the other side.
- Add a bow for Minnie Mouse or keep it without a bow for Mickey Mouse.

24. Transform microfiber dust mops into a mini snow-covered tree ($4).

Create a mini snow-covered tree to use along with any of your other holiday decor. If the tinsel trees don’t quite fit your holiday decor vibe, you can do a quick swap from tinsel to this fluffy microfiber mop for a fluffy snow texture.
Dollar Tree supplies you’ll need:
- 2 dusting mops ($1.25 each)
- Tinsel tree ($1.25 each)
Instructions:
- Take the tinsel off the tree, leaving only the frame.
- Glue the mops on the tree frame
*Optional: Add battery-powered LED lights to create a festive glow.
25. Use different sized ornaments to make a DIY ornament wreath ($5).

Almost anything can be used as a base for a wreath, and this project proves it. Use a large round splatter screen as the base for a DIY ornament wreath. To keep DIY Dollar Tree Christmas crafts cheap, see if you have any extra ornaments at home.
Since Dollar Tree has a 15-count package of mini ornaments, use all of them and pair it with 1-2 packages of medium ornaments for a total of $5.
Dollar Tree supplies you’ll need:
- Splatter screen ($1.25)
- 3 – 5 packages of mini ball ornaments ($1.25, 15-count) and medium ornaments ($1.25, 7-count)
- Ribbon

Instructions:
- Remove the screen from the splatter screen, leaving just the ring.
- Glue different-sized ball ornaments onto the screen and to each other.
- Attach ribbon if desired.

26. Design a beautiful snow globe with a glass jar, faux snow, and glycerin ($15).

Your kids will get a kick out of this DIY snow globe! Let them help choose the characters inside and let them keep it in their rooms for personalized holiday decor.
It’s worth noting that Dollar Tree does not have the E6000 craft adhesive needed for this project, but we have seen it on Amazon for $4, along with Michaels and Hobby Lobby. The price is included in the $15 final price for this craft.
Dollar Tree supplies you’ll need:
- Christmas village miniatures ($1.25, 2-pack)
- Jar with a threaded lid ($1.25)
- Glittery faux snow ($1.25)
- Candleholder ($1.25)
- Glycerin ($6, Walmart)
- E6000 craft glue ($4, Amazon)

Instructions:
- Glue the village pieces to the jar lid using the E6000 and let them dry completely.
- Add distilled water and one tablespoon of glycerin to the jar.
- Add the glittery faux snow and seal the jar tightly.
- Glue the snow globe jar to the candleholder and shake it for a snow globe effect.
27. Build a circle hoop centerpiece with just a few supplies (starting at $5 each).

These pretty centerpieces are perfect for holiday parties and gatherings. The supplies come in sets, so you can make three for the price of one. The 12-piece set of wood blocks breaks down to $3.32 ($0.83 each since four are needed for this craft). I included the price of the ring and blocks to start because you can freestyle the decorations.
Dollar Tree supplies you’ll need:
- Hoop wreath ring ($1.25 each)
- Mini wood blocks (12-pack, $10, Amazon)
- Faux greenery picks ($1.25 per bunch) (Find free ones outside!)
- Mini ball ornaments ($1.25, 15-count)
- Hot glue and hot glue gun

Instructions:
- Glue the mini blocks together to create a base to hold up the hoop.
- Glue the greenery picks to the blocks to cover the base and decorate with ornaments.
- Hang additional ball ornaments from the top.

28. Turn a Santa hat and greenery in a mini gnome wreath ($4).

This adorable gnome wreath works out to just $4! Hang it on your front door or anywhere that needs a cute dose of Christmas cheer.
Dollar Tree supplies you’ll need:
- 2 mini Christmas trees ($1.25 each)
- Santa hat ($1.25 each)
- A base for backing (could be a wood disc or metal ornament decor)
- 1 ball ornament
- Zip ties

Instructions:
- Zip-tie the two trees together and fluff them into a one-sided triangular shape (which will be the gnome’s beard).
- Zip-tie and glue the base to the trees.
- Glue the Santa hat to the top of the base
- Add the ball ornament for a nose; it should be right under the fur of the hat.

29. Create a long and low centerpiece starting with a rectangle sign base ($13).

If you need a centerpiece that sits a little lower than the circle hoop from earlier in our list, this one is perfect. Use a rectangular sign for the base and create a soft glow with votive candles.
Dollar Tree supplies you’ll need:
- Framed rectangle sign ($1.25 each)
- Dry foam block ($1.25)
- 3 votive candles ($1.25, 4-pack, $0.32 each for 3)
- Votive candle holders ($1.25 each)
- 4 – 5 packs of faux greenery ($1.25 each bunch)
- Flowers
- Holiday decor
- Hot glue

Instructions:
- Flip the sign over to use the back as the base.
- Hot glue the dry foam into the frame
- Glue the votives holders on the top of the block
- Cut the greens, berries, and flowers apart and place them to cover the foam.
- Add candles and light them for a centerpiece!
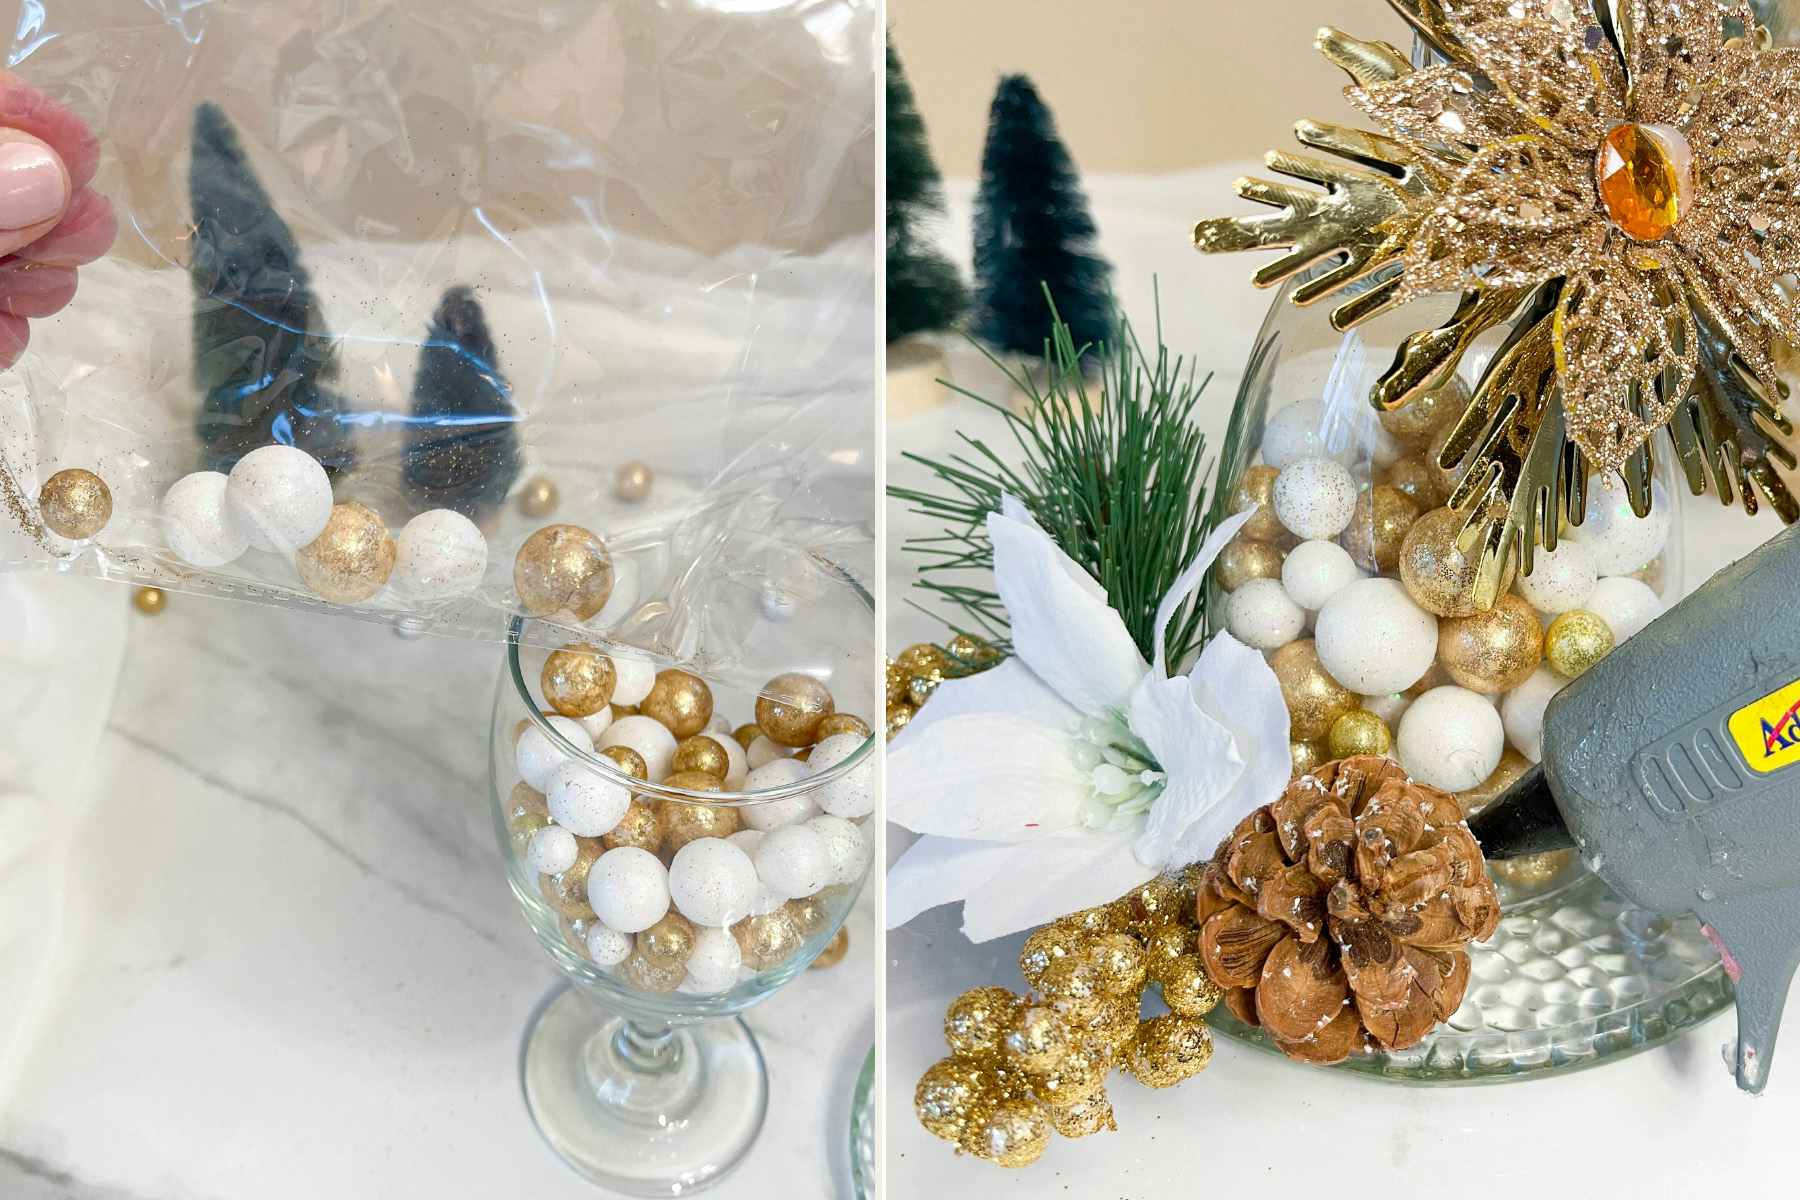
30. Design a wine glass candle holder that can be used year after year ($4).
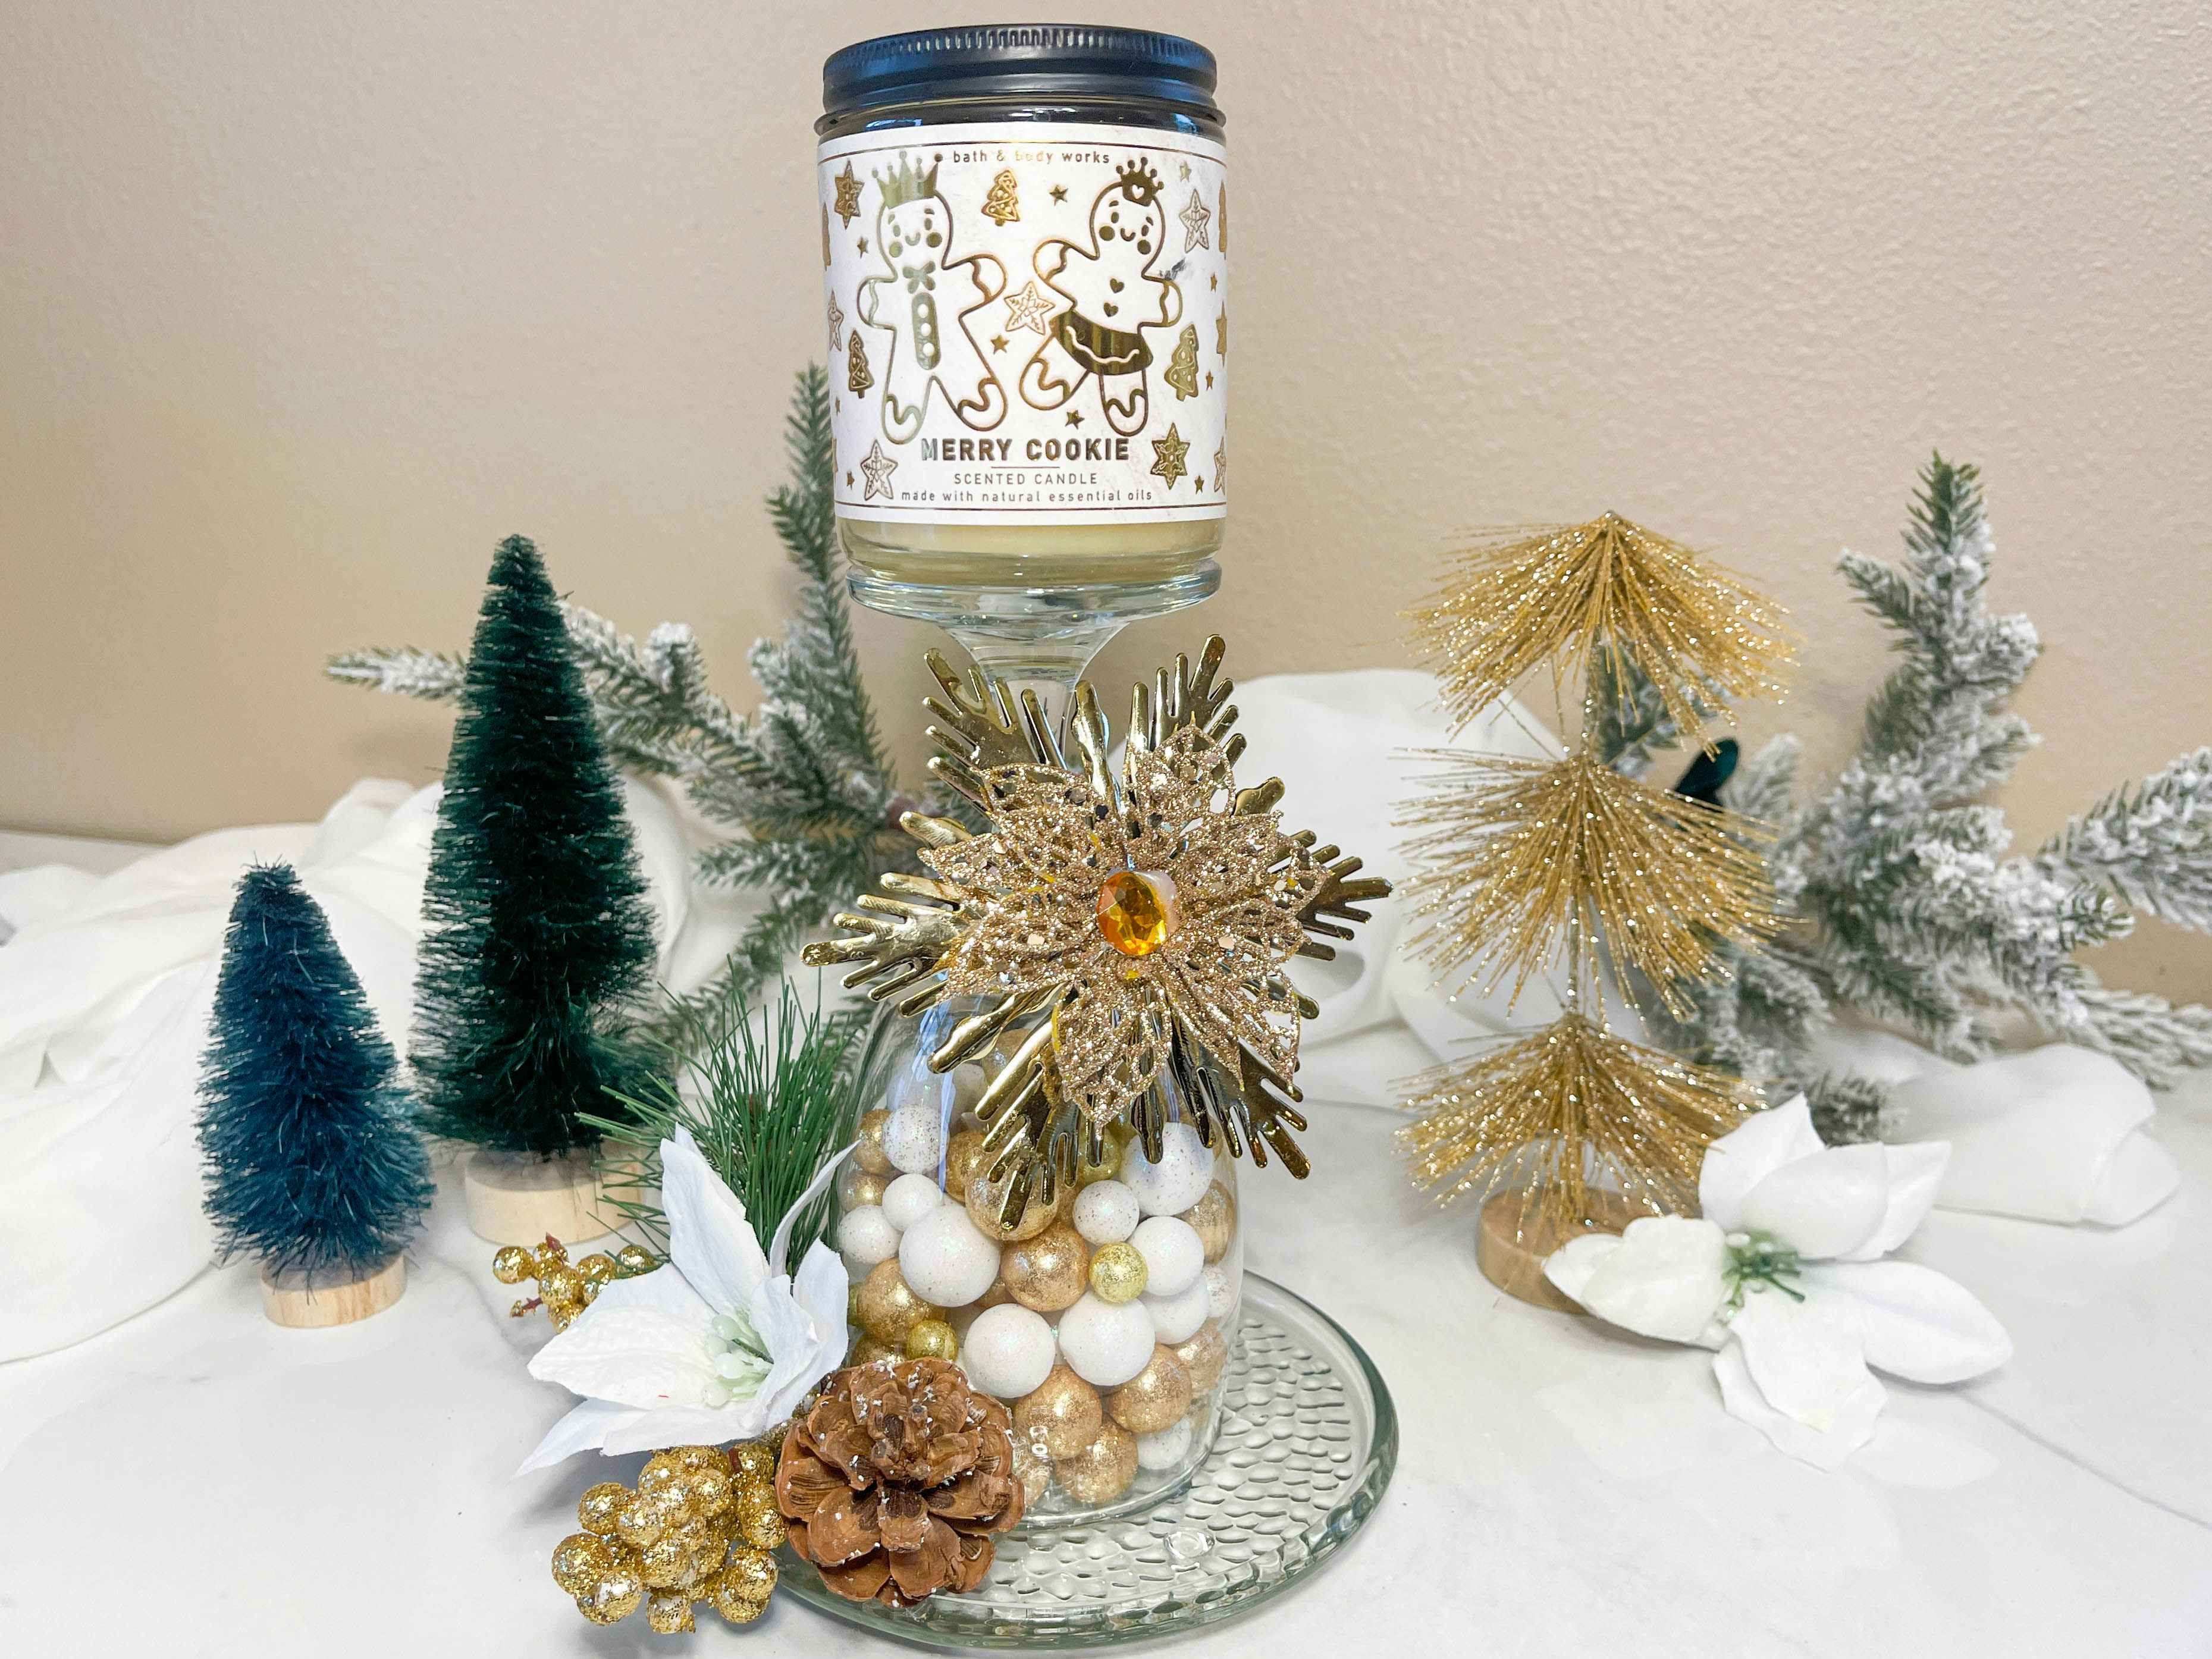
Create a festive holder for your favorite holiday candle with just a wine glass and a few pretty Christmas accessories.
Dollar Tree supplies you’ll need:
- Wine glass ($1.25)
- Round glass candleholder ($1.25)
- Ornament ball filler ($1.25, 100-count)
- Decorative ornaments of your choice
- Faux flowers
- Hot glue
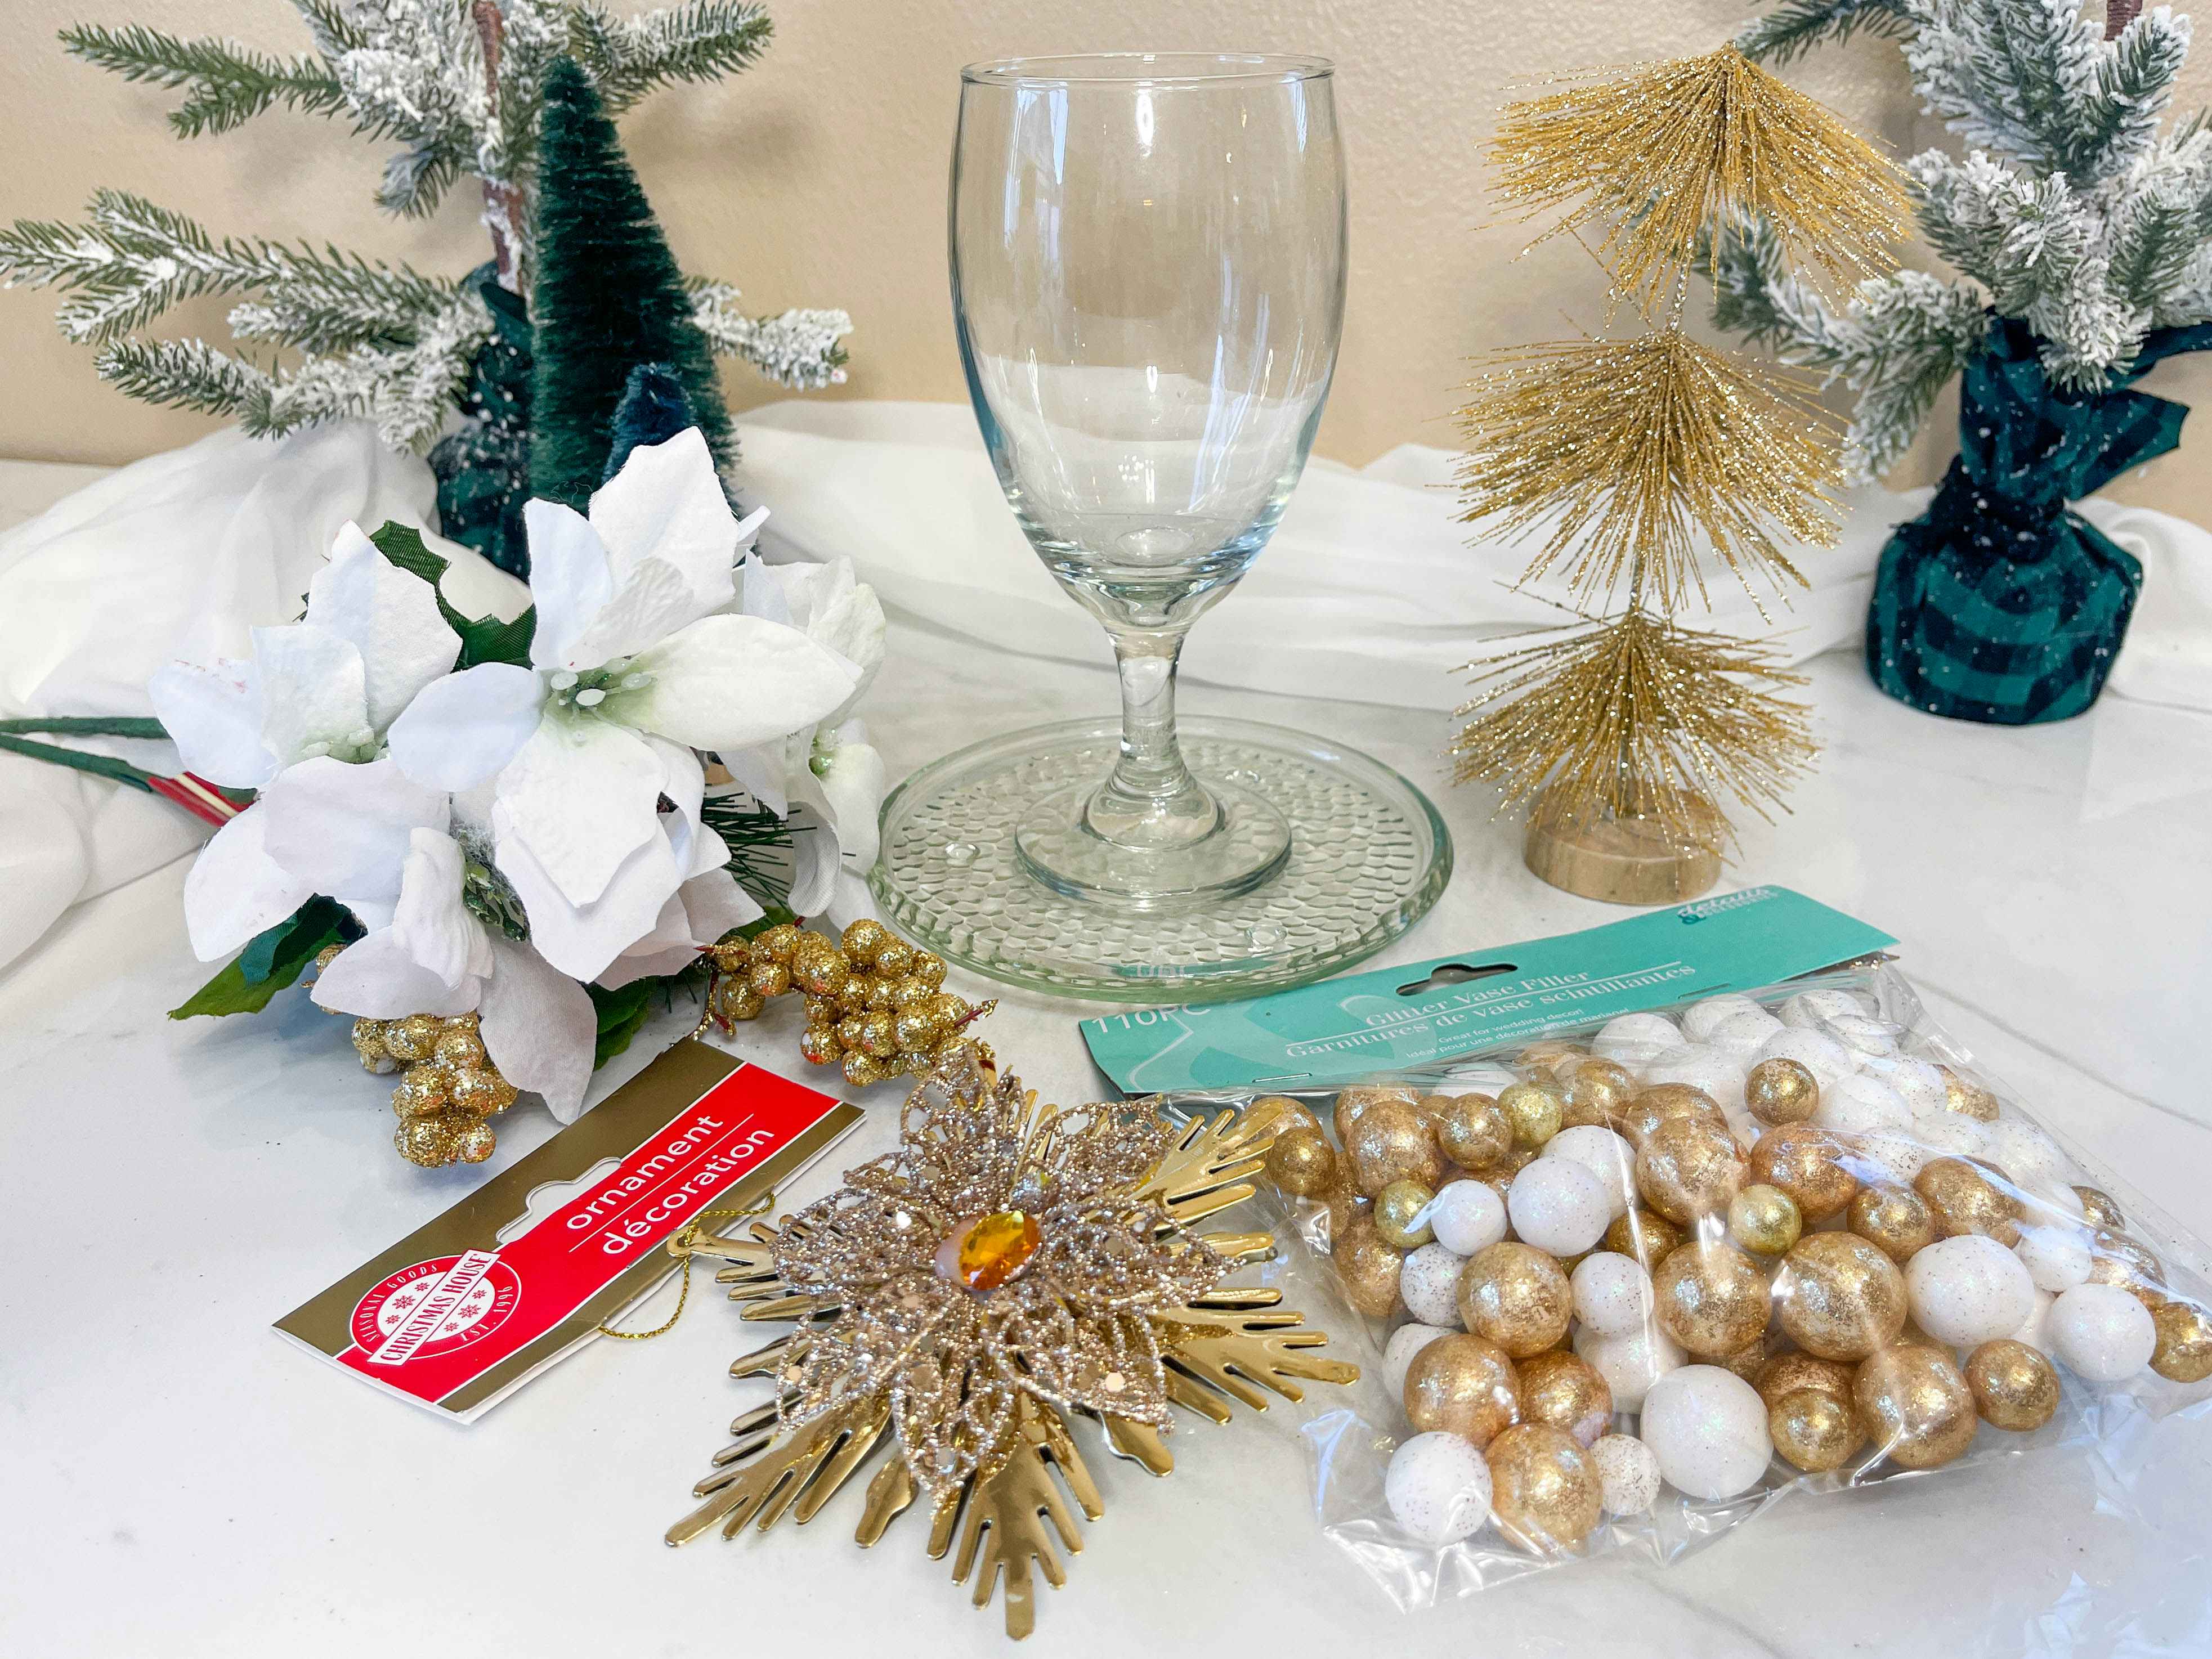
Instructions:
- Add the ball filler inside the wine glass.
- Hot glue the candleholder to the top of the wine glass.
- Add decor around the stem of the glass and the candleholder base.
- Top with your favorite candle.


Tell us what you think