
Get all the new deals and savings hacks straight to your inbox
Will be used in accordance with our Privacy Policy
Break out the glue gun and get ready to get your craft on — we’ve got ideas for some DIY Christmas ornaments. Homemade ornaments aren’t just good for the budget; they bring a great one-of-a-kind look to your Christmas tree.
Christmas ornaments can cost upwards of $15 each, but with a few craft supplies like tea lights, string, and a hot glue gun, you can make your own so you won’t blow your Christmas budget. With massive holiday sales and coupons at retailers like Dollar Tree, Michaels, and Hobby Lobby, there’s no need to spend a lot to make your space shine.
If making DIY Christmas ornaments isn’t the only item on your holiday bucket list, The Krazy Coupon Lady has everything you need on our Christmas Deals page. Whether it’s Christmas lights or Christmas decorations, we’re always on the hunt for the best deals to share. Be the first to know when sales drop by texting DEALS to 57299.
Here are easy DIY Christmas ornaments to make that are perfect homemade gifts to give to family members, friends, bus drivers, teachers, coaches, or anyone really, as a thank you this holiday season.
1. Turn flameless tea light candles into snowman ornaments.

Add a few snowy friends to your tree by transforming flameless tea lights and a few other craft supplies to make smiling snowman Christmas ornaments.
Supplies you’ll need:
- Hot glue sticks and hot glue gun
- Pipe cleaners
- Pom-pom balls
- Flameless tea light candle
- Googly eyes
- Black permanent marker
- Ribbon
- String or elastic cord
What you’ll do:
- Use hot glue to attach a pipe cleaner and pom-poms to a tea light to make tiny earmuffs.
- Add googly eyes, and then draw on your snowman’s mouth with a Sharpie.
- Wrap a piece of thin ribbon around the bottom to make a scarf.
- Attach a string for hanging your snowman ornament.
2. Create mini flower pot ornaments using felt and floral foam.

These adorable mini flower pot DIY Christmas ornaments are perfect for your tree (large or mini), around the house, or as a gift for a loved one.
Supplies you’ll need:
- Fabric or good scissors
- Floral foam (for inside the pot under the felt flowers)
- Miniature flower pot (2.5 inches x 2.5 inches)
- Felt (varying colors)
- Hot glue sticks and hot glue gun
- String or twine
- Christmas bells or Christmas berries from floral picks (optional)
- Floral wire
What you’ll do:
- Fold a piece of string or twine in half and tie a knot at the bottom. Feed the string through the hole at the bottom of the flower pot so the knot catches on the bottom and the string does not pull through. Make sure the string is long enough that once your flower pot is filled with felt flowers, it can hang on a branch of your tree.
- Cut floral foam into a 1-inch high block and place inside of the pot. Secure it and the string into place with hot glue.
- Cut felt info petal shapes and form them into flowers. Secure them with hot glue.
- Arrange your DIY felt flowers in the mini flower pot before gluing them into place.
- Attach floral wire to bells and place them among the flowers, sticking the wire down into the floral foam. Add Christmas berries from floral picks.
- When everything is where you want it, carefully add hot glue under each flower, bell, and floral pick securing all into place.
3. Let the kids know that Santa is always watching with these Santa Cam DIY Christmas ornaments.

This is the time of year when you can tell the kiddos to be good because Santa is watching. Drive home the point with a Santa Cam ornament.
Supplies you’ll need:
What you’ll do:
- Pour glitter paint into the ornament and shake it to cover all inside.
- Take apart the lens using just the circle lens part and glue it on the middle of the ornament
- Stick on the alphabet stickers to spell out “Santa Cam” around the lens.
4. Add a Nativity stencil to a wood slice for a memorable hanging ornament.

Give some spiritual significance to your Christmas tree with a Nativity scene on a wood slice. No need to paint the design yourself; a stencil does all of the work.
Supplies you’ll need:
- 9 x 12-inch wood slice (from a fallen tree) or a sanded, ready-to-hang woodslice ornament
- Black, navy blue, and white acrylic paint
- Paint brushes
- Stencil (can be cut out of cardstock using a silhouette image from online)
- Screw eye hook
- Ornament hook
- Tape
- 100- or 120-grit sandpaper (if not purchasing a store-bought wood slice ornament)
What you’ll do:
- We found a Nativity stencil on Etsy that can be used for this project, but an online printout will cost you nothing.
- If your wood slice is not already sanded, prepare it by smoothing the surface with a sheet of fine grit (100- or 120-grit) sandpaper.
- Using black, navy, and white paint, create a night sky for your silhouette. Add water to your brush to help the paint blend, creating an ombre with light colors on the inside and darker on the outside. It doesn’t have to be perfect! Allow the paint to fully dry.
- Place and tape your stencil onto your wood slice where you’d like your nativity to be. My stencil was cut out by hand with a craft knife, but this could easily be done with a Cricut and vinyl. Instead of securing it into place, use your fingers to hold it in place.
- Using a paint brush with a small amount of black paint on it, tap it down onto the stencil. Do this instead of brushing it across so the paint won’t spread under. Make sure the brush is not overly wet with paint. This will cause it to bleed as well. Add more paint as needed until your nativity silhouette is dark and stands off the background.
NOTE: Make sure not to move your stencil before you’re finished taping on the paint, as it will be hard to get it back into place.
- Repeat this process for the star.
- Insert the screw eye hook into the wood slice, and slide an ornament hook into the hook to hang.
5. Make light bulb DIY Christmas ornaments out of burned-out light bulbs.
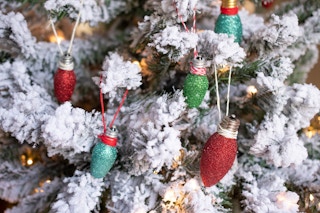
Never let another burned-out Christmas light bulb go to waste. Reuse them or find them for cheap at Dollar Tree, then turn them into festive Christmas ornaments.
Supplies you’ll need:
- C7 or C9 light bulbs
- Mod Podge
- Paint brush
- Glitter (in all your favorite colors)
- Spray adhesive glue
- String
- Hot glue sticks and hot glue gun

What you’ll do:
- Use a paintbrush to apply an even layer of Mod Podge to the exterior of your bulb.
- Pour glitter over the glue, making sure the entire bulb is covered. Allow it to dry for 30 minutes.
- To avoid a huge glittery mess (you know the kind I’m talking about) carefully spray each bulb with a spray adhesive. This will prevent all of the glitter from coming off when the bulbs are touched.
- Once it’s completely dry, attach a string to the neck of the light bulb Christmas ornament and hang it on your tree!
6. Use your leftover wine corks to make a reindeer ornament.

If you don’t have any wine corks, ask a friend. You can even buy wine corks from Hobby Lobby for about $5.
Supplies you’ll need:
- 3 wooden corks
- Googly eyes
- Screw eye hook
- String
- Twine
- Felt
- Red bead
What you’ll do:
- Cut one cork in half to make front and back legs, and then again down the center of each so there are four legs. You’ll need one halved cork for the head and a full cork for the body.
- For the feet, hot glue the corks to the “body.” Then hot glue the body to the other halved cork for the “head.”
- Glue the googly eyes to the head along with a red bead for the nose.
- For the reindeer’s eyes, cut small triangles out of felt. Add antlers by gluing twine.
- Screw in the eye hook to the body and knot a string for hanging.
If you need to stock up on some bubbly, use wine coupons to replace your stash.
7. Transform a regular Christmas ball ornament into a Santa ornament.

We can’t talk about holiday ornaments without a reference to Santa Claus. Include St. Nick in your decor with a DIY Christmas ornament that will make Mrs. Claus jealous.
Supplies you’ll need:
- Large red Christmas ball ornament
- Black and gold glitter paper or felt
- Craft knife
- Ruler
- Hot glue sticks and hot glue gun

What you’ll do:
- Use a craft knife and ruler to cut a strip of black glitter paper 1.5-inch thick to make your belt.
- Create a buckle by cutting a square out of thick gold glitter paper. Carefully cut out the center of the buckle, making sure the belt fills it completely.
- Assemble the belt with hot glue and attach it to your ball ornament.
8. Glue soda pop can tabs onto a ball ornament for a unique DIY design.

Don’t trash those soda cans just yet — you’ll need the tabs to make a DIY Christmas ornament. If the kids are helping out, Walmart sells plastic soda pop tabs, making it easier to assemble without getting cut.
Supplies you’ll need:
- Large clear ornament ball
- Soda can tabs
- Hot glue sticks and hot glue gun
What you’ll do:
- Starting at the bottom of the ornament, hot glue each tab in a shingle style (one under the other) until the entire ornament is filled in a vertical pattern.
- Attach a hook and voila!
9. Design a glittery unicorn ornament from scratch.
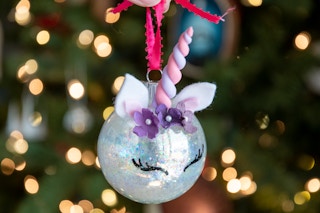
In my house, unicorns are still a hot item, so get the kids involved to make this super easy DIY Christmas ornament.
Supplies you’ll need:
- Large clear ornament ball
- Pink and purple oven-bake polymer clay
- Glitter
- Mop & Glo Multi-Surface Floor Cleaner
- White and pink felt
- Small silk flowers
- Black Sharpie oil-based paint marker
- Ribbon
- Hot glue sticks and hot glue gun
What you’ll do:
- Add a small amount of Mop & Glo multi-surface cleaner into your clear ornament ball. If you don’t have Mop & Glo, you can use any floor wax.
- Put your finger over the top and rotate the ball so the inside is coated. Pour the excess into a disposable cup.
- Using a funnel or piece of paper formed into one, pour glitter into the ornament ball. Rotate the ball to coat the inside. Add as much glitter as you want. Put the ornament top back on.
- With a black Sharpie oil-based pen, draw eyes with fluttery eyelashes (or use an eyelash template).
- Roll out the pink and purple oven and bake polymer clay into two long pieces, narrowing at one end. Twist them together to make the unicorn’s horn. Use a knife to cut the horn to length, creating a flat edge to glue to the ornament. Bake the clay following the package instructions.
- Cut white and pink felt into ear shapes and use hot glue to attach them along with the horn and small silk flowers to the top of the ornament.
- Use a decorative ribbon to hang it on your tree.
Related: Funny Grinch Holiday Decorations That Don’t Stink, Stank, or Stunk
10. Make a star ornament Christmas craft out of wooden dowels and twine.

You’ll only need two supplies to make this DIY Christmas ornament happen — string and wooden dowels. Play around with the string color or spray paint the dowels to create a customized look.
Supplies you’ll need:
- Wooden dowels
- String or twine
- Hot glue sticks and hot glue gun

What you’ll do:
- Use hot glue to assemble the dowels into a star shape.
- Once the glue is completely dry, wrap the twine around the star ornament, varying the pattern as you go.
11. Create an owl ornament from a toilet paper roll.

Everything you need to make this DIY Christmas ornament can likely be found in your house. It’s a genius way to upcycle a toilet paper roll and make an inexpensive ornament.
Supplies you’ll need:
- Toilet paper roll
- Acrylic paint (color of your choice)
- Black permanent marker or black Sharpie oil-based paint marker
- String or twine
- Tape or hot glue sticks and glue gun
What you’ll do:
- Paint the toilet paper roll and let dry for 20 – 30 minutes.
- With a Sharpie or black acrylic paint, create an owl like the one shown.
- Insert the string, fold in the top of the toilet paper roll, and glue it closed.
Use Scotch tape coupons to save while you’re crafting during the holidays.
12. Paint a light bulb to look like a holiday penguin ornament.

We’re pretty impressed with ourselves over this adorable DIY Christmas ornament. It’s simple and doesn’t require a lot of supplies.
Supplies you’ll need:
- Light bulb
- Acrylic paint (black, white)
- Felt (varying colors)
- Black permanent marker
- Hot glue sticks and hot glue gun
What you’ll do:
- Paint the entire light bulb black, then apply white paint to the front to resemble the belly.
- Attach the felt cutouts with hot glue to create the nose, feet, and arms.
- Use the marker to make two small circles for the eyes.
- Finish the look with a miniature green hat made out of felt.
13. Transform Dollar Tree animal toys into easy Christmas ornaments.

What kid wouldn’t want a red T-rex on their Christmas tree? The best part is that each animal is only $1.25 (not including the hook and screw).
Supplies you’ll need:
- Plastic animal kids’ toys
- Screw eye hook
- Ornament hooks
- Drill with bits (the bit needs to be smaller than the screw eye hook)
- Spray paint in desired colors

What you’ll do:
- Use a drill to create a small hole in the back of each toy.
- Screw the hook into the plastic for a simple way to hang the ornament.
- Spray paint the toys with several even coats, rotating each toy between coats.
- Add an ornament hook to the eye hook and fill your tree with wildlife!
14. Sew a simple pattern to make a custom felt bear DIY Christmas ornament.

Make your Christmas tree beary good-looking with this fun and simple ornament idea.
Supplies you’ll need:
- Brown felt (two shades)
- Bear face template (If you’d rather not draw a simple one by hand like the one above, search online for a free bear face silhouette.)
- Thread and needles
- Ribbon
- Silver beads for eyes
- Cotton balls
- Scissors
What you’ll do:
- Following a template, create identical bear-shaped heads by cutting two layers of dark brown felt together. Cut a second piece of lighter felt for the bear’s face.
- On one of the two layers of dark brown felt for the bear’s head, attach beads for eyes and the light brown felt for the details on its face. Stitch these details by hand or with the help of a sewing machine.
- Layer the two dark brown felt pieces together, stitching around the outside. Attach your ribbon into the top by stiching it in at this step. Leave an opening and insert the cotton ball stuffing.
- When it’s stuffed as much as you’d like, stitch the opening closed.
15. Make DIY Christmas ornaments that look like vintage sleds.

Craft sticks and some artificial greenery make DIY Christmas ornaments like this one a breeze. Just glue, paint, and hang.
Supplies you’ll need:
- Craft sticks — 5 short (4.5-inch sticks) and 2 long (jumbo 5-inch sticks) for each sled
- Wood glue
- Faux greenery
- Christmas bells
- Twine
- Acrylic paint
- Foam brush
- Hot glue sticks and hot glue gun

What you’ll do:
- Use wood glue to attach four of the short craft sticks together to make the seat of the sled.
- Once the glue is dry, paint or stain two long craft sticks brown for the runners.
- Next, paint all five of the short sticks red or white — including those glued together.
- Use your wood glue again in order to attach the seat and crossbar of the sled runners.
- Attach faux greenery with hot glue, and string jingle bells to the top before adding a string so you can hang the ornament on your tree.

16. Use Model Magic clay to make a pink pig ornament.

Ok, so a hanging pink pig isn’t your typical DIY Christmas ornament, but it sure turns out well. This is a true craft by using clay and a few other inexpensive tools.
Supplies you’ll need:
- Model Magic Air Dry Clay
- One small paper clip
- Ornament hook
- Pink & black acrylic paint
- Freezer paper or wax paper
What you’ll do:
- Begin by rolling three balls, one large and two small for the body and feet of the pig. Do this on freezer paper or wax paper to prevent the model magic from sticking to your work surface.
- In the larger ball, push a small paper clip into the center so a little part is sticking out. This is where the ornament hook will hang. Smooth out the ball again making it perfectly round.
- Flatten one side of two small balls and stick them to the round ball of the pig’s body, making its feet.
- Roll one smaller ball to make the pig’s snout. On your wax paper, flatten it and use a pin or the end of a paper clip to mark two dots for the nose. Stick the flattened round snout to the body of the pig.
- Finish the pig’s body with two arms made from sausage-shaped model magic flattened to each side of the body, ears made from triangle shapes folded in half, and make sure to add a curly tail.
- Before you let the model magic fully dry, use a pin or the end of a paper clip to mark the eyes.
- Allow the model magic to fully dry, then paint! After the pig is fully painted, use the end of the paper clip and a dot of black paint to fill in the eyes or add the dot with a fine point sharpie pen.
17. Use a wood slice to create a bear ornament.

Here’s an alternative version to the Nativity scene but using a bear stencil.
Supplies you’ll need:
- 9 x 12-inch wood slice (from a fallen tree) or a sanded, ready-to-hang woodslice ornament
- Bear stencil
- Black acrylic paint
- Stencil paint brush
- Screw eye hook
- Ornament hook
- Tape
- 100- or 120-grit sandpaper (if not purchasing a store bought wood slice ornament)
What you’ll do:
- If your wood slice is not already sanded, prepare it by smoothing the surface with a sheet of fine grit (100- or 120-grit) sandpaper.
- Align and tape your stencil on the wood slice.
- Carefully fill in the bear stencil with black paint. Make sure the brush is not overly wet with paint. This will cause it to bleed as well.
- Let the paint dry for 20 – 30 minutes.
- Insert the screw eye hook into the wood slice, and slide an ornament hook into the hook to hang.
18. Repurpose a round peg clothespin and turn it into a nutcracker ornament.
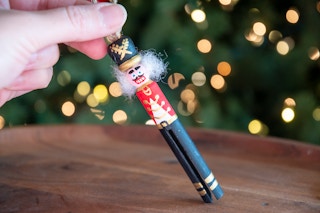
A clothespin is the perfect size to create a custom Nutcracker DIY Christmas ornament. These also make excellent stocking stuffers.
Supplies you’ll need:
- Round peg clothespin
- Wood Candle cups
- Acrylic paint (various colors)
- Fine tip paintbrush
- Cotton balls
- Hot glue sticks and hot glue gun
- Twine for hanging the ornament
What you’ll do:
- With a steady hand (and with a photo nearby), paint the bottom half (the pants) black, followed by gold horizontal lines.
- Use red paint for the jacket and let it dry. Continue to adorn the body with gold accents and create a face.
- Hot glue a stretched-out cotton ball and affix to the sides of the head.
- For the hat, paint a small wooden candle cup black with gold lines and dots for the details.
- Fold a piece of twine through the bottom of the wooden candle cup, knotting it so it stays in place. Hot glue the candle up to the top of the head.
19. Make a keepsake ornament showing the length of your child with a ribbon.

Holiday time is all about memories, and the years fly by super fast. This DIY Christmas ornament is great for grandparents, but it’s also a unique way for parents to recall how big their kids are getting over the years.
Supplies you’ll need:
- Free height printable
- Large clear ornament ball
- Green, red, and white cord
- Black permanent marker

What you’ll do:
- Measure your child’s height with ribbon and place it in a clear ornament.
Create several for family and grandparents using this free printable.
20. Turn a Christmas tin into a gift card holder decoration that can hang on your tree.

Who doesn’t love to get a gift card as a present? If you’re planning to give some away to those in your household, ditch the old-fashioned envelope and make the display special.
Supplies you’ll need:
- Small Christmas gift box or tin
- Ribbon
- Ornament hook
- Tissue paper
- Gift card or small gift
- Hot glue sticks and hot glue gun

What you’ll do:
- Tie a ribbon around the outside of your tin and secure it in place with hot glue.
- Place a gift card inside the holder (honestly, you could opt for candy or a piece of fancy jewelry, too).
- Add an ornament hook, and on Christmas Eve when Santa comes, hang it on your tree as an alternative to a boring envelope, which is usually how gift cards are presented.
Check out these gift card deals while you’re here.
Download the KCL app to add and redeem coupons in store


For iOS and Android users.
Get all the new deals and savings hacks straight to your inbox
Will be used in accordance with our Privacy Policy