
Get all the new deals and savings hacks straight to your inbox
Will be used in accordance with our Privacy Policy
If you’re looking for an easy DIY gift for your teacher, your parents or maybe your hubby — look no further.
All 18 of our DIY gifts are $5 or less. Which one will you make first?
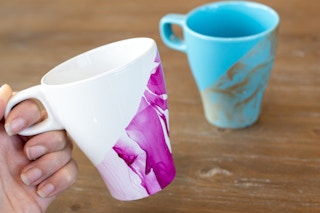
1. Make faux marble coffee mugs with old nail polish.

You’ll need white mugs (IKEA has them for $0.99, or thrift stores are a great place to find them), nail polish (DO NOT use quick dry nail polish), a disposable container, a toothpick and a paper towel or parchment paper.

Fill your disposable container with warm water, add a few drops of nail polish (I already had some old stuff lying around), and swirl the mixture with a toothpick.
Dip and swirl your mug in the mixture to pick up the paint, then set it on a paper towel or parchment paper to dry.
Tips: Pour the polish (from the bottle not the brush) close to the surface of the water. If dropped from too high, it will sink to the bottom and not dissipate. Your mug is no longer dishwasher safe nor is it microwave safe. And if possible, don’t put the polish on an area where it may touch your lips or beverage.
2. Transform plain wooden spoons into ombre kitchen utensils.

You’ll need wooden spoons, paint and paint brushes.
Start by mixing different shades of your paint. For example, mix one part blue to three parts white, one part blue to one part white, and blue with no added white (do this for every color you intend on using).
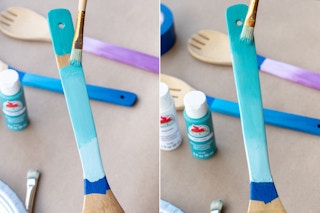
Tape off the neck of your spoon with painter’s tape. Apply each shade of blue into three separate sections onto the spoon, making sure that the medium shade is sandwiched between the lightest and darkest shades.
Add a bit of water to your paint brush, and while the paint is still wet blend the paint together to create a smooth gradient of color.
I like to use the spoons as kitchen decor, but if you want to use them, you’ll need to cure the paint and then apply a food-safe wood conditioner.
Place the spoons in a cold oven, then heat it up to 350°F. When the oven reaches 350°F, bake the spoons for 25 minutes. Turn the oven off and let the spoons cool (while still in the oven). Wait three days before applying the wood conditioner.
3. Create a custom tumbler with spray paint.

I saw something similar to this on Etsy, but for $30. No thank you.
Instead, I grabbed a Mason jar from the dollar store, a can of spray paint, Mod Podge (optional but can be found at the dollar store), glitter (optional but can be found at the dollar store), lids and vinyl.

First, tape off the areas you don’t want spray painted, spray the mug and let dry overnight. Mix the Mod Podge with the glitter and apply it with a paint brush to the same area.
Remove the painter’s tape then apply vinyl letters. Make sure you don’t stick any transfer paper or vinyl to the painted area unless you intend on it staying there.
Tip: Hand wash the tumbler to prevent the vinyl or paint from coming off.
4. Use freezer paper and fabric paint to make a personalized tote bag.
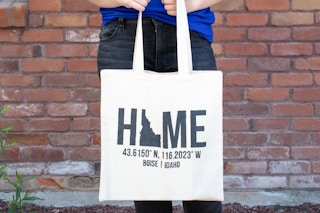
To make this custom tote bag, you’ll need a canvas tote, 12 x 12 sheet of freezer paper, fabric paint, an X-Acto knife, a pencil and a ruler or a Cricut machine (or bribe a friend to let you borrow theirs).
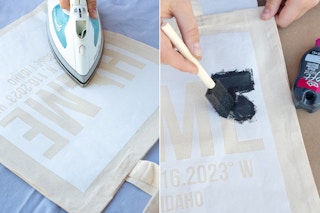
Create a stencil by cutting your design out of freezer paper using an X-Acto knife (or make it simple by cutting it with a Cricut machine). Then use an iron to adhere the shiny side of the freezer paper to the canvas bag.
Once it’s fully adhered, apply your fabric paint over the stencil. To avoid bleeding, apply small amounts at a time.
Once dry, remove your freezer paper and you’re done!
5. Use nail polish to make marbled coasters.

Use the same method as with the marbled mug (tip #1), but take it a step further by making a matching coasters set.
You’ll need ceramic tiles, nail polish, cork roll, hot glue and an X-Acto knife.

Use the same procedure as in Tip #1, dipping the tiles to pick up the paint and then set them on a paper towel or parchment paper to dry.
Once the marbled tiles have dried, cut a square of cork and use a hot glue to attached the cork to the back of the tiles. Trim if needed.
6. Turn scrap wood into candle holders.

You’ll need to find a 4×4 scrap piece of wood (I ended up finding mine for free, thanks to Craigslist), a 1-½” spade bit and tea light candles.
Cut your 4x4s down to the desired size, and use a pencil to mark the center of the block.
With the drill and a 1-½” spade bit, slowly begin to drill. Increase the speed and pressure to create a hole. Remove the sawdust and drop in your tea light candle!
Note: Make sure to wear protective eye glasses.
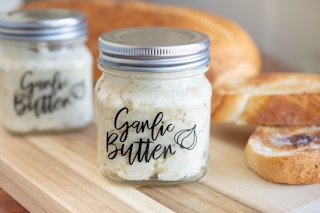
7. Roast garlic for homemade garlic butter.
You’ll need to grab garlic, butter, salt and pepper, olive oil, parchment paper, aluminum foil and a jar with a lid.
Preheat your oven to 375 degrees. Then cut the tops off each head of garlic, drizzle with olive oil and generously season with salt and pepper.

Wrap the garlic in parchment paper and aluminum foil then bake in the oven for 30 minutes.
Remove the cloves from the oven and let them cool until they’re cool enough to touch. Gently squeeze the cloves out of their skin. Add more salt and pepper, then mash them with fork.
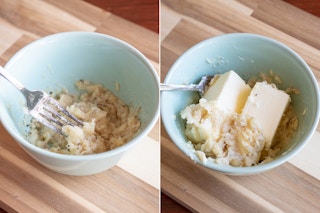
Add two sticks of softened unsalted butter and fold in the garlic. Transfer to a jar and give this easy DIY gift to your favorite foodie!
RELATED: 18 Things You Can Do with Old Mason Jars
8. Mix grapefruit, sugar and coconut oil for a DIY sugar scrub.

You’ll need 2½ cups granulated sugar, 1/4 cup coconut oil (almond oil will also work) and 10-15 drops of lemon or grapefruit essential oil.
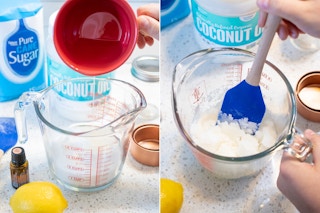
Put the sugar in a large bowl and set aside. Measure out 1/4 cup of coconut oil and melt it in the microwave to a liquid consistency.
Pour the oil into the bowl holding the sugar and mix. Add your essential oil drops. If sugar scrub is still too “wet,” add up to 1/4 cup more sugar until your desired consistency is reached.
Zest the lemon peel into the mixture. Then scoop the scrub into mini Mason jars for gifting.
Take a look at more ways to use essential oils.
9. Create a pom-pom bookmark with yarn and a fork.
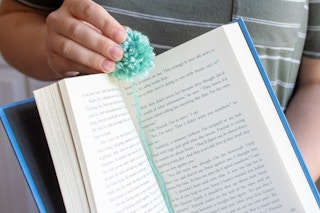
You’ll need yarn and a wooden fork. First, make the pom pom ball by wrapping yarn around a large wooden fork. Tie it together tightly by pulling a short piece of yarn through one of the fork slots.

Remove the yarn from the fork and begin trimming the yarn into a ball shape.
Attach another long piece of yarn and you’re done!
10. Transform a terra-cotta pot into a teacher’s candy dish.

This makes an adorable teacher gift! You’ll need a 4″ terra-cotta pot and saucer, red paint, green felt, pencils, hot glue, a brush for paint and some kind of treat for inside (we used Hershey’s kisses).

Paint your pot and saucer red. While that’s drying, cut the eraser end off your pencil.
Cut your felt into a leaf shape. Add a small dot of hot glue to the center at one end of each “leaf” and pinch to make it more three dimensional.
Use glue to attach the pencil and leaves to the saucer then fill with candy!
11. Make a decorative sign out of printer ink and scrap wood.

To make this wooden home decor sign, you’ll need scrap or pallet wood, wax or freezer paper, a printer with ink, a spray bottle and something (like a wooden spoon, credit card, or the handle of your scissors) to rub the ink transfer with.
First, cut a piece of wax or freezer paper to the size of your printer paper (I used freezer but prefer wax because it’s easier to see through).
Tape down all the edges to your printer paper making sure that it won’t catch or shift as it goes through your printer. Then feed your paper into your printer so the ink will print onto the “wax” surface.
Next, prepare your wood by lightly spraying it with water. This will help your ink appear darker on your board. Be careful to not add too much water — if the surface is too wet, the ink will spread and bleed.

Now work quickly. Print your image or text onto your wax or freezer paper, and once it’s printed, carefully remove it from the printer paper so you can see your design to line it up on your wood.
Adhere it face-down to your wood with tape and carefully (but firmly) use an object (a wooden spoon, credit card, or the handle of your scissors) to rub the wax paper and transfer the ink.
Check your work my lifting the paper, keeping one side still taped down. If it’s not dark enough, place the wax paper back down and continue to rub the surface.
Note: If you have text you’re wanting to transfer, remember to reverse it so it reads correctly once applied to the wood.
12. Use oven-bake clay and stamps to make garden markers.
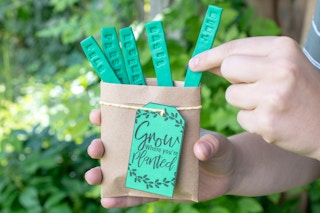
You’ll need polymer oven-bake clay, letter stamps, a rolling pin and a craft knife.
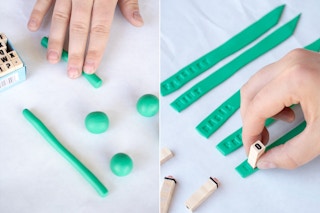
Make your garden markers uniform by first rolling your polymer clay into even sized balls. Then roll those ball into a “rope.” Flatten the “ropes” with a rolling pin.
Use a knife to cut the ends at an angle, and smooth out any imperfection with your finger.
Use letter stamps to imprint your garden markers. Transfer your markers onto a parchment paper-lined baking sheet, and follow the baking instructions on the package.
13. Drill holes into a log for a homemade crayon holder.

Measure how deep you want your crayons to sit, then mark your drill bit with tape.
Begin drilling into your log, stopping when you reach the tape. Blow out sawdust and fill with crayons.
RELATED: 15 Inexpensive Gift Ideas from Target’s Dollar Spot
14. Fill a jar with small gifts from the dollar store or Target’s Dollar Spot.
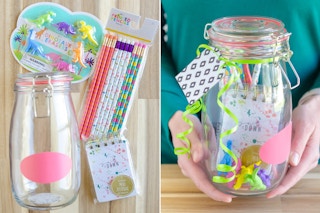
Grab a jar and fill it with pencils, erasers and a notepad or thank you cards. Or, use that jar and fill it with kids’ toys for a fun and inexpensive birthday gift.
There are even more inexpensive gift ideas from Target’s Dollar Spot gift ideas.
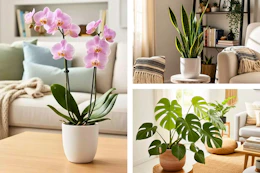
15. Convert a Mason jar into a mini herb garden.

Fill the bottom of your jar with rocks or gravel to allow for drainage. Add potting soil and your favorite herb plant to the jar. Water and enjoy!

Check out even more things you can do with old Mason jars.
16. Or, spray paint a Mason jar for a DIY succulent garden.

Spray paint any size Mason jar, then use sandpaper to give it a distressed look. Add rocks or gravel to the bottom of your jar for drainage, and plant succulents (or use fake ones).
Add a gift tag saying, “Thank you for helping me grow,” and give to your favorite teacher as an end-of-the-year gift.
17. Decorate an old wine bottle and transform it into a plant waterer.

You’ll need a wine bottle with a screw cap, a nail, hammer and stickers (optional).
Use a nail and hammer to poke 1-4 holes into the cap of a wine bottle. Keep in mind that the more holes you have and the wider the holes, the faster the flow of water will be. Fill the bottle with water and replace the cap.

Quickly insert the filled bottle into your plant’s soil. You may need to press soil around the bottle to keep it upright.
Water will drip slowly out of the bottle’s cap for easy watering.
There are even more ingenious wine bottle DIYs that are easier than you think.
18. Turn a wine bottle into an olive oil or vinegar dispenser.

You’ll need two wine bottles, vinyl labels, olive oil, vinegar and stainless steel bottle pourers.
After cleaning your bottle inside and out, apply vinyl or another label to the front.
Use a funnel and pour olive oil and vinegar into their designated bottles. These can also be great for dish soap!
Pop in your bottle pourers.
TIP: To save on transfer paper, did you know you can use blue painter’s tape to apply vinyl to surfaces?!
UP NEXT: Check out more of KCL’s home hacks

SaveSave
SaveSave
SaveSave
Download the KCL app to add and redeem coupons in store


For iOS and Android users.
Get all the new deals and savings hacks straight to your inbox
Will be used in accordance with our Privacy Policy