
Get all the new deals and savings hacks straight to your inbox
Will be used in accordance with our Privacy Policy
Wine bottle pendant lights can run you upwards of $225! And a set of wine bottle glasses will cost you about $30 if you buy them already made.
Don’t do that. We love reusing stuff and DIY projects at KCL. Wine bottle crafts are right up our alley. Don’t buy recycled wine bottle products when you can easily make them yourself for less. Plus, it’s WAY easier than you think. Check it out:
Download The Krazy Coupon Lady app for more money-saving DIY projects, tips, deals, and coupons.
Compare prices of finished wine bottle products.
- Wine Bottle Trinket Dish, $8, Etsy (free shipping)
- Hanging Lantern Wine Bottle, $21.25+, Etsy (free shipping on orders of $35+)
- Wine Bottle Planter – Self Watering Vase, $17, Etsy (free shipping on orders of $35+)
- Veuve Clicquot Candle, $24, Etsy ($7.02 shipping)
- Wine Bottle Glasses, Set of 4, Etsy, $24.99 ($17 shipping)
- Cinf Ceramic Egg Cup, Set of 4, $15.99, Amazon
- Wine Bottle Tiki Torch, $15, Etsy ($7.02 shipping)
- Wine to Watered- A Wine Bottle Adapter, Etsy, $9 ($5.55 shipping) With Bottle, Etsy $30 (free shipping)
- Wine Bottle Pendant Light fixture, $19.99, Etsy ($46 for shipping)
- Zulay (17oz) Olive Oil Dispenser Bottle, $19.99, Amazon
- Wine Bottle Wind Chime, $22.10, Etsy ($6.99 shipping)
Subtotal: $197.31
Min Shipping: $89.58
Total: $286.89
Calculate cost of materials.
We assume you have basic supplies that some of these projects require like towels, pans, scissors, hammer, nails, and a screwdriver. For that reason, we didn’t include them in our materials list.
- 12 Wine bottles, $84, TotalWine.com (store pickup)
- Wine bottle cutter, $24, Amazon
- Sandpaper 60 grit $11.78/25 sheets, Amazon
- Sandpaper 120 grit, $19.99/25 sheets, Amazon
- 18-gauge wire 50-ft, $4.22, Home Depot
- Tealight candleholder set of 4, $1.25, Dollar Tree
- Tealight candles, set of 6, $1.25, Dollar Tree
- Chain, 20-ft, $0.77/ft, Home Depot
- 32mm Split Rings 20ct, $3.99, Michaels
- Window screen 39″ x 59″, $10.99, Amazon
- Miracle-Gro Cactus, Palm & Citrus Potting Soil 8-qt, $5.99, Meijer
- Candle Wax, 1lb, $9.99, Amazon
- Candle wicks with sustainer tabs, 100 piece, $7.99, Amazon
- Candy thermometer, $5.44, Walmart
- Wooden chopsticks 12 pack, $2.44, Walmart
- Crayons, 128 count, $4.70, Amazon
- Essential oils 20 pack, $19.99, Amazon
- Fragrance oils 10 pack, $19.99, Amazon
- Tiki torch fuel 128oz, $15.97, Home Depot
- Tiki torch kit 4 piece, $15.99, Amazon
- Oil/vinegar bottle dispenser set of 2, $5.99, Amazon
- Threaded seal tape 520-in, $1.98, Home Depot
- Decorative marbles 14-oz, $1.25 Dollar Tree
- Electrical tape 60-ft, $0.80, Walmart
- Electrical cord 50-ft, $21.99, Amazon
- Light socket 8 pack, $17.49, Amazon
- Strain relief, 3 sets, $7.38, Home Depot
- 3/8 flat washer 3 pack, $1.38, Home Depot
- 2-prong electrical plug, $3.29, Amazon
- Wire stripper/cutter, $7.99, Amazon
- Wooden shapes/beads, $8.48, Michaels
- Screw eye 8 pack, $1.38, Home Depot
- Acrylic paint, $0.99, Michaels
- Paint brush 4 pack, $1.99, Michaels
Subtotal: $367.74
Shipping/in-store shopping: free
Total: $367.74
Difference: $80.85
How to cut material costs
Now, before you assume DIY costs way more than just buying your wine products finished, because we went over by $80+ versus premade items, think about this. A lot of the stuff on our list are one-time buys like the bottle cutter, wire stripper/cutter, and candy thermometer, that you can use over and over again.
Then, we went with bulk prices for many of the items. For example, the electrical cord comes in 50ft on Amazon, but we only used about 13ft in one of our projects below. If you just bought enough for that specific project you would’ve cut around $15 out of the total. Even paying a few cents more per foot could save you money off bulk pricing if you’re not going to use it all.
When it comes to wine bottles, you don’t always have to buy them. If you have family or friends that enjoy their vino, ask if you can have their empties. You can also look for free (or nearly free) bottles on sites like Craigslist (as low as $1.33 a bottle) and Facebook Marketplace (free).
To help you save on your materials check out our coupons and deals:
- Amazon coupons and deals
- Dollar Tree coupons and deals
- Home Depot coupons and deals
- Meijer coupons and deals
- Michaels coupons and deals
- Walmart coupons and deals
Grab some wine deals
If you’re going to DIY your wine bottle crafts you should make sure you get a deal on the bottles! Plus, we’ve got lots of wine coupons to help you save as well.
TotalWine.com
- Tiny Umbrellas Moscato 750ml, $8.99 on sale 3 for $21
- Coltbridge Vineyards Cabernet Sauvignon, 2020, 750ml $9.99
- Tiny Umbrellas Chardonnay 750ml, $8.99 on sale 3 for $21
- Recas Castle Cabernet Sauvignon 750ml, $7.99
- Tiny Umbrellas Cabernet Sauvignon 750ml, $8.99 on sale 3 for $21
FirstLeaf Wine Club
You can also join a wine club to ensure you have wine bottles around on the regular.
How to remove wine bottle labels

Here’s what you’ll need:
- Dish soap
- Baking soda
- Dish scraper
- Steel scouring pad
Directions:
Allow the bottles/labels to soak for at least 10 minutes. The longer they soak, the less scrubbing you’ll have to do. Then, using your fingers, a table knife or dish scraper, peel/scrape off the label.
To loosen up any remaining glue, place the bottle back in the hot water for a couple more minutes. While submerged, use a stainless steel scouring pad to scrub the bottle clean.
How to cut wine bottles

Here’s what you’ll need:
- Bottle cutter
- 2 large pots — one with ice cold water, another with boiling water
- Hand towel
- Metal tongs
Cutting Tips:
Bottle cutters may cost you about $20+, but you can create some pretty awesome stuff with all the glass you cut (think gifts for the holidays or birthdays!). Reading the directions that come with your bottle cutter is a great place to start, but here are some tips to get you to pro-level faster.
- Pass the cutter around your bottle only once and keep your cut light — a deep cut is harder to separate and leads to broken bottles.
- Keep a vacuum nearby so you can clean off any tiny shards of glass that may fall when scoring your bottles.
Glass-Separating Tips:
Once you’ve cut a bottle, you’ll have to dunk it in boiling water for about 5 seconds then dip the hot bottle in ice-cold water carefully. You should be able to see the score line “run” as it’s called. Continue this process until the bottle separates.
- Make sure your pots of hot and cold water are large enough to cover the cut line evenly.
- Don’t rest your bottle on the bottom of the pot of boiling water. Once the water begins to boil, turn it down to simmer — the vibration from the pot has the potential to break your bottle.

11 Wine Bottle DIYs
1. Turn the bottom of a wine bottle into a jewelry dish.

- Bottom of cut wine bottle
- 60 grit and 120 grit sandpaper
Directions:
Don’t waste the bottom of the wine bottle you just cut. Turn it into a simple jewelry dish by sanding the edges.

2. Make hanging hurricane lamps.

Here’s what you’ll need:
- Wine bottle with the bottom cut off
- Candleholder and tea light
- Chain
- 18 gauge wire
- Key ring or split rings
- Pliers
- 60 grit and 120 grit sandpaper
Directions:
1. Sand and polish the edges of a cut wine bottle with 60 grit and 120 grit sandpaper.
2. Using pliers, mold the wire tightly around a candleholder. On either side of the candleholder, create loops with the wire for the chain to attach to.
3. Attach two pieces of chain (of the same length) to the loops. Gauge the length needed based off the size of your bottle. Attach the opposite ends to a key ring.
4. Attach a longer length of chain to the same key ring pulling the free end through the bottom of your bottle and up the neck.
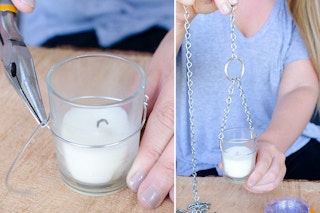
To hang, attach a second key ring to the end of the chain, and hang it from a hook. The second key ring will also prevent the chain and candleholder from falling back through the neck of the bottle.
3. Never kill another plant by making a self-watering planter.

Here’s what you’ll need:
- Both halves of a cut wine bottle
- Window screen
- 12-inch cotton rope
- Scissors
- 60 and 120 grit sandpaper
- Potting soil
- Succulents, herbs or other small plants

Directions:
1. After cutting your wine bottle, smooth out the sharp edges with 60 grit sandpaper, then buff the edges with 120 grit sandpaper.
2. To prevent soil from falling down the neck of the bottle, cut a piece of window screen large enough to fill the top half of your bottle. Then, snip a small hole just large enough for the cotton rope to slide through in the center of the window screen.

3. Thread the cotton rope through the hole and down the neck of the bottle making sure a couple inches of rope remain where you’ll plant your succulents or herbs.
4. Fill the top half of your bottle with soil and your plant of choice before trimming off the excess window screen that will be poking out the top.
5. Fill the bottom half of your bottle with water and enjoy!
Refill the bottom of the bottle as needed. These are great for succulents or an indoor herb garden.
4. Turn your favorite wine bottle into a candle.

Here’s what you’ll need:
- Bottom half of a cut wine bottle
- Candle wax
- Candle wick with metal sustainer tabs
- Candy thermometer
- Wooden chopsticks
- Scissors
- Glue or glue tabs
- Glass measuring cup
- A pan
- Crayons
- Essential oils or candle scents
- 60 and 120 grit sandpaper
Directions:
1. Sand and polish the edges of a cut wine bottle.
2. Melt wax shavings by putting them in a glass measuring cup, then placing the cup in a pan with 2 inches of boiling water. Heat the wax to 175 degrees.

3. As the wax melts, use a drop of glue or a glue dot to adhere the wick tab to the bottom of the bottle. Keep the wick tight, and center while pouring the wax by wrapping the end of the wick around a set of chopsticks and resting them across the bottle.
4. When the wax is fully melted, add a small piece of crayon for color — the more you add, the deeper the color.

5. Remove the melted wax from the heat, and allow it to cool slightly before adding adding essential oils or a scent of your choice. (Adding the scent while still on the stove can cause it to evaporate out of the wax.)
6. Once the wax has reached approximately 155 degrees, you’re ready to pour.
7. Leave the candle to cool at room temperature for 24 hours.
8. Cut your wick to ¼ inch and enjoy!

Related: Find the best wine deals near you.
5. Turn wine bottles into drinking glasses.

Here’s what you’ll need:
- Bottoms from cut wine bottles
- 60 and 120 grit sandpaper
Directions:
After cutting off the tops of wine bottles, sand down the edges until they’re extra smooth. Then clean them up and you’re done!

6. Up-cycle the bottom of an indented wine bottle by turning it into an egg cup.

Here’s what you’ll need:
- Bottom of cut wine bottle
- 60 and 120 grit sandpaper
Directions:
Simply smooth out the cut edges, turn it upside down, and you have a perfect egg cup!
7. Make tiki torches.

Here’s what you’ll need:
Directions:
1. Fill the bottom of a clean wine bottle with decorative marbles or rocks.
2. Wrap thread seal tape around the brass mounts that come with your wine bottle tiki torch kit to create a snug fit between the mount and the mouth of the bottle.
3. Fill your bottle with tiki torch fuel, insert your wick, and light!

8. Use a wine bottle to water plants while you’re away.

What you’ll need:
- Wine bottle with a screw cap
- Nail
- Hammer
- Stickers to dress up your bottle (optional)
Directions:
1. Use a nail and hammer to poke 1 – 4 holes into the cap of a wine bottle. Keep in mind that the more holes you have and the wider the holes, the faster the flow of water.
2. Fill the bottle with water and replace the cap.
3. Quickly insert the filled bottle into your plant’s soil. You may need to press soil around the bottle to keep it upright.

Water will drip slowly out of the bottle’s cap for easy watering.
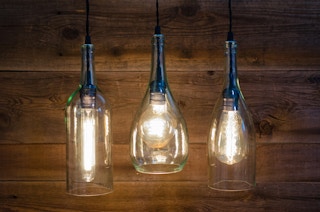
9. Make your own hanging pendant lamps.

Here’s what you’ll need:
- Wine bottle with the bottom cut off.
- About 13 feet of electrical cord
- Pendant lamp socket
- 2 sets of strain reliefs
- 3/8 inch washer
- Electrical tape
- 2-prong electrical plug
- Lightbulb
- Screwdriver
- Wire stripper/cutter
- Scissors
- 60 and 120 grit Sandpaper

Directions:
1. After cutting the bottoms off your wine bottles, sand and polish the edges.
2. Use wire strippers to strip the cover from the ends of the electrical wire.
3. If you purchased electrical cord wrap in fabric, use electrical tape to wrap the frayed threads, keeping them away from the exposed wires.

4. Before attaching the pendant light socket to the cord, string the following items onto the cord in this order:
a) top part of a strain relief
b) washer
c) bottom part of strain relief
d) Then, string the cord down the bottle neck
e) top part of a strain relief
f) bottom part of strain relief
g) top cover of the the pendant lamp socket

5. To wire the pendant lamp socket, attach the WHITE (neutral) wire to the SILVER screw and BLACK (hot or live) wire to the COPPER. Do NOT let your white and black exposed wires intertwine. Tighten the screws and make sure that the wires are secured in place.

6. Attach the top cover of the pendant lamp socket (part g.) onto the socket itself. Then, tighten the strain relief into place (parts e. and f.). The strain reliefs are ESSENTIAL — they’ll secure your wire and ensure your cord won’t rip from the socket with the weight of the bottle.
7. After inserting a bulb, pull your cord up, allowing the neck of the bottle to rest on the socket.
8. To prevent the socket and bulb from dropping back down through the bottle, tighten the top and bottom parts of the second strain relief (part a. and c.) on either side of the washer (part b.). Pull everything tight.

9. Wire the 2-prong electrical plug to the cord by first repeating steps 2 and 3. Attach the WHITE (neutral) wire to the SILVER screw and BLACK (hot or live) wire to the COPPER by hooking them around each screw and tightening them into place. Again, Do NOT let your white and black exposed wires intertwine. Replace the cover for your plug.

Hang and enjoy!
10. Turn a wine bottle into an olive oil or vinegar dispenser.

Here’s what you’ll need:
- Wine bottle
- Vinyl label (optional)
- Olive oil, vinegar, etc.
- Stainless steel bottle pourers
Directions:
- After cleaning your bottle inside and out, apply vinyl or another label to the front. (Optional)
- Use a funnel and pour olive oil and vinegar into their designated bottles. These can also be great for dish soap!
- Pop in your bottle pourers and you’re DONE!

TIP: To save on transfer paper, did you know you can use blue painter’s tape to apply vinyl to surfaces?!
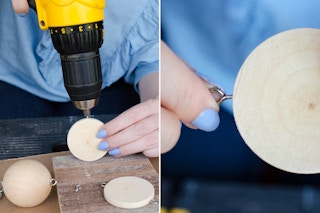
11. Make a DIY wind chime.

Here’s what you’ll need:
- Wine bottle with the bottom cut off
- Chain
- Key ring or split rings
- Wood craft shapes and beads
- 1/2-inch screw-eye hooks
- Pliers
- Drill and drill bit set
- Acrylic paint
- Paint brush
- 18 gauge wire
- 60 and 120 grit sandpaper

Directions:
1. Use a drill bit to pre-drill holes on either side of the wood shapes for the 1/2 in screw-eye hooks.
2. By hand, screw in the eye hooks.
3. Using acrylic paint, paint the wood shapes and beads.
4. Attach wood shapes and beads with wire and chain to the key ring. Remember, you’ll want items to clink against the inside of the bottle — and something hanging out the bottom that can be caught by the wind.
5. Attach a longer length of chain to the same key ring, pulling the free end through the bottom of your bottle and up the neck.
6. To hang, attach a second key ring to the end of the chain and hang it from a hook.

Download the KCL app to add and redeem coupons in store


For iOS and Android users.
Get all the new deals and savings hacks straight to your inbox
Will be used in accordance with our Privacy Policy