Kellye Fox | 

19 Inexpensive and Delightfully Easy DIY Halloween Decorations

The Krazy Coupon Lady is an independent service supported by advertising. Most of the offers appearing on our site are from companies from which we receive compensation. We may receive a small payment from an affiliate if you click a link to purchase a product. Sometimes a post is sponsored by the maker of the product, and we receive a fee for the post. Learn More.

Fun fact: you don’t need to spend a fortune to turn your house into a haunted masterpiece. DIY Halloween decorations are just as good — often even better — than the store-bought version.

With random items around the house like paint, glue, crayons, and toilet paper tubes, you’ll impress your guests with your DIY skills. Plus, it’s a good way for kids to get involved and help make your space a spooky sight.

Find great deals for all the supplies by checking out our Halloween deals page and coupons from these stores:

Check out these creepy and cute DIY Halloween decorations:


1. Turn a handprint into a Frankenstein.

Two photos side by side: a small boy showing out his hand with green paint on his palm and black paint on his 4 fingers excluding his thumb. A card that looks like Frankenstein's monster made from a painted hand print and googly eyes

Paint the palm of your kiddo’s hand with green acrylic paint and the fingers black, excluding the thumb. Moving quickly so the paint doesn’t dry, help your child press their hand to a piece of cardstock with their fingers close together.

Allow the paint to fully dry, then use a small paintbrush to draw on bolts and a stitched mouth, and finish it off with googly eyes.


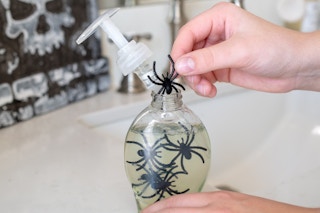
2. Fill a soap dispenser with creepy crawlies.

A person adding plastic spiders to a clear bottle of hand soap.

Soap dispensers make for some cheap Halloween decorations since you’ve probably already got them in your house anyway. Grab a bag of fake spiders or bugs and add them to complete your DIY Halloween decorations.


3. Glue magnets to the backs of plastic spiders.

Two photos side by side: a person using hot glue to adhere a small magnet to the back of a plastic spider. A line of plastic spiders along a refrigerator door.

Use either hot glue or super glue for these simple DIY Halloween decorations. You can also buy some magnets with foam adhesive from Michaels for under $4. Now your refrigerator is ready for Halloween.


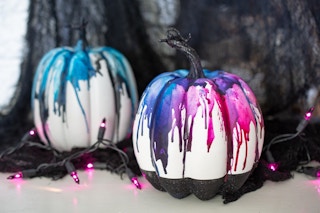
4. Decorate a pumpkin with melted crayons.

A person holding an artificial pumpkin with melted crayons dripping from the top to the bottom.

Lay some paper down before starting these DIY Halloween decorations — they get really messy!

Remove the paper labels around several crayons and cut the crayons in half. Attach each crayon with a dab of clear tacky glue, then allow the glue to fully dry. Point a blow-dryer set to the highest heat at the crayons and watch the colors run. For more vibrant colors, repeat this process multiple times.

Two photos side-by-side; a person and hearing a crayon to the top of an artificial pumpkin. A person using a blow dryer to melt the colorful crayons onto an artificial pumpkin.

Note: As you apply the heat and the wax begins to melt, your crayons will fall off the top of your pumpkin. Simply tack them back onto the top with the now melted crayon.

Check out all the free Crayola coupons to score some for cheap.


5. Make monster bread tags with Sharpies and googly eyes.

Bread clips decorated like Halloween monsters next to varying colors of sharpie pens and a person attaching one bread clip to a loaf of bread

Take a few bread tags and decorate them using fine point Sharpies. You may want to plan ahead of time or ask your friends and family to help collect them.

Use your new tags to bind together pesky computer cords, or even attach some of those magnets to the back. Try using them as decorations on your candy table. Cheap Halloween decorations are the best.


6. Turn doughnuts into vampires with dollar store fangs and Reese’s Pieces.

Donuts with vampire teeth in the center and candy Reeses pieces for the eyes

Fold over the plastic vampire fangs and insert them into the center hole of the doughnut. Add Reese’s Pieces or M&M’s with a dot of edible decorating gel to make spooky eyes.

A person using black icing to add dots to the center of Reese's pieces candies attached to a donut. Plastic vampire teeth are inserted into the center of the donut.

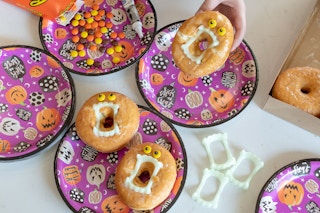
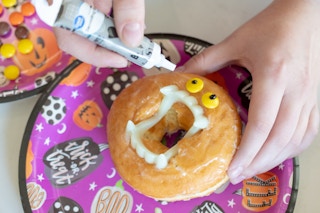
Before you buy Reese’s Pieces, you need to read up on these scary good ways to save on Halloween candy!


7. Transform sheets of black cardstock into a colony of bats.

A woman attaching black paper bats to a wall inside a home

Find a bat shape you like online or draw one by hand. Make these Halloween house decorations by folding black cardstock in half and using your stencil to cut out your bats.

Unfold your bats and attach them to your wall using a piece of double-sided tape.

Two photos side-by-side; a person cutting out paper bats from black construction paper. A person attaching the black construction paper bats to a wall

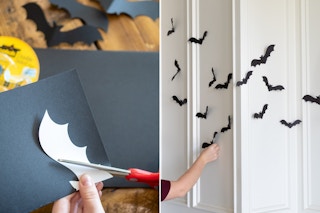
Bats are kind of obvious Halloween decoration ideas, but adding the DIY spin makes them fun for everyone in the family!


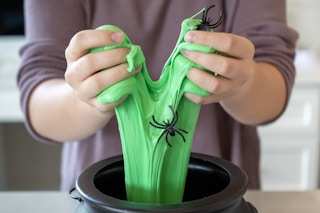
8. Make Halloween puffy slime with shaving cream and glue.

A person pulling green slime filled with plastic spiders out of a black plastic cauldron.

What You’ll Need:

Two photos side-by-side; a person filling a measuring cup and bowl full of shaving cream. A person dumping Elmers white glue into a bowl filled with a green slime mixture

What to Do:

    1. Add 3 – 4 heaping cups of shaving cream to your bowl.
    2. Mix in food coloring! We used a combination of green and yellow.
    3. Next, pour in 1/2 cup of Elmer’s School Glue and mix.
    4. Add 1/2 teaspoon baking soda and mix.
    5. Add 1 tablespoon saline solution to the mixture and mix again!
    6. Once the ingredients are thoroughly combined, you can pull it out with your hands!
    7. Add in creepy spiders or plastic eyeballs.
Two photos side-by-side; a person adding baking soda to a green slime mixture. A bottle of equate saline solution next to the bowl of green slime.

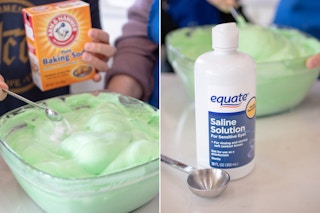
Before removing the slime from the bowl, squirt a few drops of saline solution into your hands. This’ll help prevent the slime from sticking to you as you knead it. The slime will become less sticky as you knead it. (Caution! Too much saline = a rubbery texture)

You can also choose to use Borax to make slime. Check out these new (and impressive) ways to use Borax around the house.


9. Make peanut butter and jelly spider sandwiches.

Sandwiches cut in circles with pretzel sticks and m&m's on them to make them look like spiders.

Maybe they aren’t your traditional Halloween house decorations, but they make a sweet addition to a party table!

Use a biscuit cutter or a drinking glass to cut bread into circles. Smear on peanut butter and jelly. Then insert eight pretzel sticks for creepy legs, and use a dab of peanut butter to attach two red M&M’s for the eyes.

If you’re trying to limit your sweets, check out these Halloween candy alternatives.


10. Transform toilet paper tubes into a monster mobile.

Toilet paper roll made into monsters to create a paper monster mobile.

Save your toilet paper tubes for these fun DIY Halloween decorations!

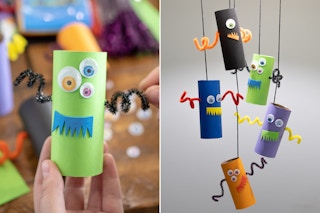
Use tape to attach colored paper to the outside of your toilet paper tube. Poke a hole on either side and thread through a colored pipe cleaner, twisting it to create arms. Cut a monster mouth out of a foam sheet or colored paper and attach it, along with googly eyes. Tie a string to the inside of each monster and hang.

Psst … we have lots of other creepy ways to decorate your home for Halloween!


11. Draw jack-o’-lantern faces onto oranges.

A person drawing a face on an cutie orange.

Let me tell you, these look super cute piled in a bowl during the Halloween season. And since you probably already keep them around this time of year, they make cheap Halloween decorations. Use a black marker to create your desired funny or scary face.


12. Make pumpkin stamps with a sliced apple.

Two photos side by side; A person painting orange paint onto the front of an apple cut in half. A child holding a white card with a pumpkin jack-o'-lantern painted on the front.

Here’s a decorating idea that little kids would enjoy. Cut an apple in half and use orange paint to stamp your “pumpkin” onto plain paper. Once the paint dries, you can make it a jack-o’-lantern with a black marker. Hang your cute (or scary!) DIY Halloween decorations all over once they’re completely dry.


13. Transform pudding cups into bat treats.

Chocolate pudding cups decorated to look like little bats with with googly eyes, construction paper bat wings, and yellow foam triangles for fangs.

These double as a sweet treat as well as cheap Halloween decorations. Trace and cut out construction paper bats, then tape them to the backs of pudding cups. Use googly eyes and paper “fangs” to finish off the look.

Add these to a bowl for your sweets table, or place in treat bags for party guests. Make sure to use Jell-O coupons to buy your pudding!


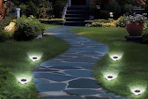
14. Turn outdoor steps into a creepy glow-in-the-dark scene.

A staircase decorated with glow in the dark tape.

This is a Halloween house decoration best kept for outdoors. Use plastic gloves to open green glow sticks and pour over the edge of concrete steps. As an alternative, you can attach glow-in-the dark tape or treads to your steps.

If you’re into outdoor DIY Halloween decorations, check out the top Halloween front porch decoration ideas!


15. Repurpose milk jugs into ghost lanterns.

A person cutting a milk jug.

Save the milk jugs you already use, and you’ll have some seriously cheap Halloween decorations. Rinse them out, then cut a hole in the back big enough for a battery-powered tea light. Draw a cute or scary face on the front and you’re set.


16. Use plastic toys and dish soap to make DIY specimen jars.

Large mason jars filled with water, food coloring, and dish soap, containing dollar tree plastic eyeballs, spider, and snake.

Repurpose old Mason jars for this DIY Halloween decoration. Just pop your favorite bug specimens inside, then fill with hand soap. You could lay the jars around your food table as decoration or add a Mason jar pump lid and place it in your bathroom.


17. Make a “bleeding” candle with red crayon wax.

Two photos side-by-side; A person using a lighter to melt a red crayon all over the outside of a red white candle making drips down the side that look like blood. A person using a lighter to light one of the candles with crayon melted down the sides. Two other candles are already lit.

Grab some pillar candles from Dollar Tree, then melt a red crayon around the edges. Just make sure to remove the paper first! These make for some cheap Halloween decorations that’ll catch everyone’s eye. Be mindful of placement so kids don’t touch.


18. Create a creepy lantern with mason jars, cotton balls, plastic spiders, and glow sticks.

Someone putting glow sticks into mason jar filled with cotton balls and fake spiders, and a finished jar lit up green with spiders.

You can use mason jars or just repurpose food jars that you have lying around. Stuff them with cotton balls, push some plastic spiders along the sides, then stick a glow stick right in the middle. Assign this to your kiddos while you tackle other decorations. A fun and easy DIY Halloween decoration.


19. Chill your punch with a disembodied hand.

A rubber glove filled with water, being put into a freezer. The "frozen hand" made from the rubber glove in a punch bowl.

Simply fill a plastic glove with water, then freeze. Make sure you don’t overfill, or it’ll pop. You may want to have a backup “hand” ready to go in the event it melts before all of your guests can see it.

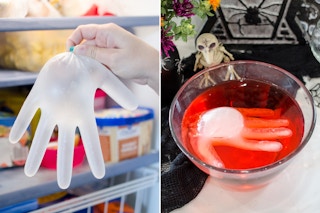
So you don’t water down your punch, try adding lemonade or another non-red beverage. A yellow hand is just as creepy! Use beverage coupons to make this a less expensive project.

Get our best deals on the go

By entering my phone number, I want to receive promotional messages from The Krazy Coupon Lady. Message frequency varies. Text STOP to 57299 to end or text HELP for help. Msg & data rates may apply. View Terms & Privacy.