Get all the new deals and savings hacks straight to your inbox
Will be used in accordance with our Privacy Policy
Why buy designer tie-dye clothing when you can make your own for ridiculously cheap with these tie-dye ideas?! I mean, do you really want to spend upwards for $118 at Lululemon for a bleach tie-die hoodie? Nope, neither do I.
Use these easy and cheap tie-dye ideas and make your own! Before you head out to the store to buy supplies, save extra cash by checking our deal pages for tie-dye kits, clearance apparel, and more.
1. Use toilet bowl gel to bleach tie-dye.
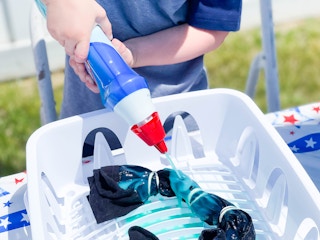
No, for real — it works! Best part? There are often free Clorox coupons you can use to save on toilet bowl cleaner. Use the clinging gel kind for bleach tie-dye anything.
Before you begin, wet the material prior to applying bleach, then wring out excess water. If you plan on touching the fabric in order to massage the bleach gel in, wear gloves.
Wait about 15 minutes before rinsing.
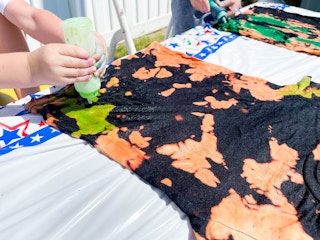
2. Add color to bleach tie-dye fabrics for a reverse tie dye remix.

Once you’ve bleach tie-dyed fabric, wash it thoroughly in the washing machine by itself to remove any excess bleach. Then, use the colors from a tie dye kit to apply dye while the fabric is still damp. Let sit for about six hours before rinsing the dye out.
3. Repurpose a dollar store dish rack when you ice tie-dye.

The ice tie-dye technique is one of the easiest ways to tie-dye — you don’t even need ties or rubber bands, just a Dollar Tree dish rack, tie-dye kit, and fabric. When you ice tie-dye, you’ll get a cloudier, more gradient-like look, versus having clear patterns.

If you like the look of the ice tie-dyed shirts above, here’s what to do:
- Completely wet the fabric and wring as much water out as you can.
- Using a dollar store dish rack (with drip tray underneath), gently scrunch up the T-shirt fabric in the tray, starting with the shirt draped over the rack and working from the middle out so the entire shirt is scrunched up in the center of the dish rack. The tighter you scrunch, the harder it will be for the dye to drip into folds, leaving you with more white spots.
- Cover the scrunched-up shirt with ice.
- Use liquid or powder dye from a tie-dye kit, and sprinkle the colors over the ice. Avoid overlapping colors.
- Let sit for up to eight hours. The longer the dyes sit, the more intense the color.
- Rinse until the water runs clear.
- Wash and dry. Either line-dry, or place your new tie-dye shirt in the dryer by itself so the dye doesn’t bleed into other clothing.
4. Try natural dyes from foods right in your fridge and pantry.

Skip the tie-dye kit, and boil spices, fruits, and vegetables instead! This natural tie-dye idea works super well for leftover produce and vegetable scraps.
Part 1: Prep fabrics with either a vinegar or salt solution after you’ve tied fabrics:
- Berry-based dyes: Boil 1/2 cup salt with 8 cups water and simmer fabric for one hour. Wring out excess water from fabric, then dye.
- Plant-based dyes: Boil 1 part vinegar to 4 parts water and simmer fabric for one hour. Wring out excess water from fabric, then dye.
Part 2: Boil two parts water to one part ingredient for about an hour. Separate the natural dye from unwanted ingredient chunks with a cheesecloth.

These natural dyes won’t be as dark as dyes from a kit. Instead, you’ll get more pastel-toned fabrics that shouldn’t be washed with stain-fighting detergents (because technically, they’re food stains).
Pantry items and produce for natural tie-dyes:
- Black Tea: tan
- Turmeric: yellow
- Blueberries: blue
- Red cabbage leaves: purple
- Red onion skins: pink
- Beets: pink
- Raspberries: pink
- Spinach: green
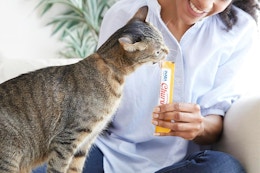
If you’re not gonna use leftover pantry and fridge items, make sure to use a rebate app like Ibotta to save on produce and other natural tie-dye ingredients.
5. Use zip ties instead of rubber bands to get sharper tie-dye patterns.

Zip ties will help you get much cleaner tie-dye design lines than the rubber bands that come in most tie-dye kits. Plus, they’re easier to wrap around fabrics!
6. Shop thrift stores for budget-friendly and recycled clothing to tie-dye.

Who says you can only tie-dye new clothes? Or white clothes, for that matter?! Shop your local thrift store for future tie-dye joggers, hoodies, dresses, tablecloths, socks, bags, towels, and whatever else you think could use a fresh look and life.
Read our thrift-store shopping hacks for even more savings.
7. Buy tie-dye supplies like plastic tablecloths, gloves, and pans from Dollar Tree.

Rubber bands, Ziploc storage bags, and even rain ponchos as smocks to protect clothing are other items to grab while you’re there.
And hey, you might as well check out these Dollar Tree deals before you go!
Download the KCL app to add and redeem coupons in store


For iOS and Android users.
Get all the new deals and savings hacks straight to your inbox
Will be used in accordance with our Privacy Policy