You and your kiddos get bored during the winter? This year keep them entertained with these mind-blowing winter activities and science experiments, ideal for preschool age and up. Have fun, teach your children some concepts about animals and cold weather, and maybe even learn something yourself. Tip #13 surprised the heck out of me!
While these experiments are easy to do and cost next to nothing, it’s important to know that adult supervision is recommended.
For money-saving tips, deals and coupons, be sure to download the KCL app.
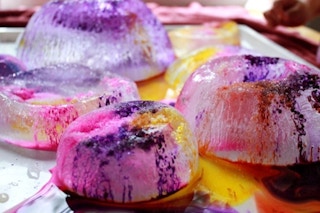
1. Discover how ice forms ravines and tunnels.

Materials needed:
- Freezer safe bowls (varying sizes)
- Water
- Cookie sheet (with edges) or craft/finger painting tray
- Salt
- Liquid food coloring or watercolor paints
- Towel
- Spoon (plastic will do) or dropper
Instructions:
- Fill several varying-sized bowls with water, and freeze overnight.
- Lay a towel down on a table and place a cookie sheet/tray on top.
- Run the frozen bowls under warm water from your sink for a few seconds and turn them upside down on the cookie sheet/tray to release the ice.
- Have your kids sprinkle salt over the ice to start the melting process.
- Drop food coloring onto the ice.
- If using watercolor paints, use a dropper to remove some paint and drop onto the ice. Or, pour some paint into a spoon and dribble onto ice.
The colors will highlight the grooves and cracks, and will be stunning to look at as they travel down the ice blocks.
2. Show kids how arctic animals stay warm with Crisco and ice water.

Materials needed:
- Stock pot or large bucket
- Water and ice cubes
- vinyl gloves
- Crisco or other shortening
- towel(s)
Instructions:
- Place a towel on the table.
- Fill a container with cold water and ice cubes.
- Set the container on the towel.
- Put the gloves on your child.
- Dunk one gloved hand in shortening. (You may have to put a glove on yourself and help coat your child’s hand).
- Have your child put both gloved hands into a pot filled with icy water.
- Ask your child to compare the hand not coated in Crisco with the one that is and notice how much colder it feels.
Explain to your child that arctic animals, like polar bears and seals, have a thick layer of fat under their skin called blubber. Just like the Crisco, it helps them feel warm and protects them from freezing in icy water.
3. Blow frozen bubbles.
If you live somewhere with subzero temperatures, you’ve gotta try this!
Materials needed:
- Bubble solution (or make your own with four cups water, one cup Dawn or Joy dish soap, 1/4 cup glycerin). If you make your own, combine ingredients in a bowl and let it sit for 24 hours before using.
- Bubble wand or straw
- Plastic shallow bowl
Instructions:
- Head outside on a very cold day.
- Use a bubble wand to blow bubbles.
- If you don’t have a wand, pour the bubble solution into a bowl.
- Blow bubbles using a straw, one end dipped into the bowl of solution.
As soon as a bubble forms, it should freeze and later cave into icy fragments.
4. Create light patterns with a CD and paper snowflakes.

via Buggy and Buddy
Materials needed:
- Blank CD or an old one
- White poster board
- Paper
- Scissors
- Clear tape
- Pencil
- And, a sunny day
Instructions:
- Find a sunny blank wall or inside your home or a sunny location outside to reflect your CD. Use a piece of white poster board if you don’t have a blank wall or outside.
- Use the shiny side of the CD to reflect the sun onto your surface (wall or poster board.
- Have kids observe the shapes and colors.
- Now, trace the CD onto pieces of paper and cut-out the circles.
- Have each child fold the paper and cut out little shapes from the paper to create snowflakes.
- Lay one of the cutout snowflakes onto the shiny side of the CD and reflect the sunlight again.
- Explain how the light reflected off the CD is now being blocked by the paper, creating different shapes.
5. Form icicles out of Borax and pipe cleaners.
Materials needed:
- Chenille or metallic pipe cleaners
- Pencil
- String
- Craft stick or spoon
- Clear glass jar (I used a Ball jar, 32 ounces, reg. price $2.19).
- 9 tablespoons Borax
- 3 cups boiled water
- Measuring cups and spoons
- Saucepan
Instructions:
- Form a spiral out of pipe cleaners by wrapping them around a pencil.
- Tie a short piece of string onto the end of each pipe cleaner. (Make sure it’s long enough so you can create a loop after the experiment).
- Tie the other end of the string to a craft stick or spoon.
- Pour the Borax into the boiled water.
- Stir until dissolved, then pour solution into your jar.
- Place the pipe cleaner into the solution and rest the craft stick or spoon across the top of the jar, suspending the twisted pipe cleaner in the jar/solution without touching the bottom or sides.
- If you want to place more than one pipe cleaner in the same jar, you have to make sure they do not touch each other.
- Set the jar in a safe place to let it cool.
Within a few hours you should be able to see crystals forming.
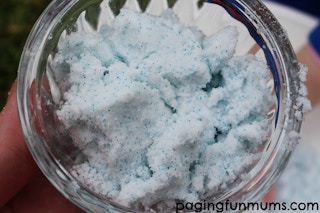
6. Make erupting snow with shaving cream and baking soda.
via Paging Fun Mums
Here’s a Frozen-themed activity your kids will love!
Materials needed:
- Large mixing bowl
- Spoon
- 18 ounces baking soda One can of shaving cream (I used Barbasol Original Thick & Rich Shaving Cream, 10 ounces, reg. price $1.50)
- 2 tablespoons Blue glitter (I used Horizon Group USA Royal Blue Glitter, 3 ounces, reg. price $2.82)
- ¼ cup or so of white vinegar
Instructions:
- Pour all of the baking soda in a large bowl.
- Squirt in about 3/4 of the can of shaving cream.
- Add the blue glitter.
- Stir to combine.
- Let your children play with the mixture. It should be cold just like real snow.
- To erupt your snow, sprinkle vinegar over the mixture (just enough to get it foaming good).
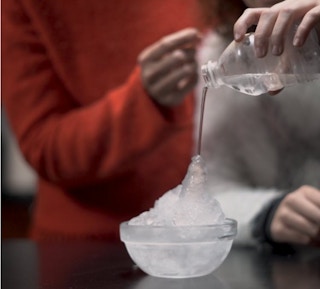
7. Grow ice towers with purified or distilled bottled water.
via The Beaker Life
This experiment is mesmerizing! Although it only takes a few items and steps, the way you handle the bottle and timing are crucial.
Materials needed:
Several plastic bottles of purified or distilled water
- Ice cubes
- Small container or bowl
- Food coloring (optional)
It’s essential that your water is frozen just right for this experiment so you need several bottles, all different. Factors you can adjust that affect the freezing time include:
- Volume of water
- Size and shape of the bottle
- Water temperature when it goes into the freezer
- Freezer temperature
- Position of the bottle in the freezer
Instructions:
If you want colored ice, squeeze a few drops of coloring into individual bottles before you freeze them.
- Start with room temperature water bottles and lay them on their side in the freezer.
- Note the time.
- Check your bottles after 90 minutes, and then every 15 minutes until one bottle freezes.
- Mark the time you notice a frozen bottle and subtract 15 minutes, this should be your “sweet spot” for time.
- For example: I noticed one of my bottles was frozen at 2 hours and 45 minutes. Minus 15 minutes means my bottles should be ready between 2 1/2 hours to 2 hours and 45 minutes.
- To test one remove a bottle from the freezer VERY GENTLY! The bottles are extremely sensitive and even the slightest jolt will instantly freeze your water leaving you no chance to build an ice tower.
- Place several ice cubes in a container.
- Gently open the bottle of water and begin to pour the water onto the ice cubes. If your water is the right temperature your ice will grow toward the bottle.
What’s the science behind this experiment? In order for water to freeze it needs a nucleus to form ice crystals and become ice. Typically tap water and bottled water have some level of impurities or particles that allow water to easily freeze. However, because you’re using purified or distilled water in this experiment, water molecules have nothing to stick onto to create ice crystals. If you jolt or hit a bottle of purified or distilled water after it’s been in the freezer long enough it will force the water molecules to form a crystal. (See tip #13.) This process is called nucleation and it happens as you pour the super-cooled water onto ice cubes in a container; they grab hold and work their way up, forming towers.
TIP: If the ice cubes don’t grow fast, leave your bottles in the freezer another 10 minutes. If the bottles are freezing before you want them to remove them from the freezer five minutes earlier.
8. Build bouncy snowballs with liquid starch and Elmer’s glue.
Materials needed:
- Plastic non-food container
- Measuring cups
- Wooden spoon
- 1 cup liquid starch
- 1 cup Elmer’s Glue-All
- Warm water
Instructions:
- Combine half the liquid starch and half the Elmer’s Glue-All in the container.
- Once mixture begins to firm up, add the remaining starch and glue slowly.
- Continue mixing.
- When the mixture comes together and is firm, remove from the bowl and run under warm water in a sink, while kneading the “snow”.
- Form “snow” into a ball.
Let your kids reshape the ball as they play.
9. Make ice cream in a bag with salt, ice, sugar, and milk.
Materials needed:
- 1 cup whole milk, 1 cup
- 1 teaspoon vanilla extract
- 2 tablespoons granulated sugar
- One 1qt. zip bag
- One 1gal. zip bag
- Measuring cups and spoons
- 4 cups of ice
- 1/4 cup rock salt (ice cream salt)
Instructions:
- Pour milk, vanilla extract and sugar into the one quart zip bag.
- Zip the bag very tightly and set it aside.
- Fill the gallon zip bag with ice and rock salt.
- Place the smaller quart bag inside the larger ice and salt-filled gallon bag.
- Zip the gallon bag tightly.
- Shake continuously for 10 minutes.
After that, you should be able to scoop out some homemade ice cream! If not, shake it some more, until it thickens. If it’s a hot day, add more ice and salt and drain the melted water out. Then keep shaking!
RELATED: DIY Cold & Flu Remedies You Need in Your Arsenal
10. Fascinate your kids with some Oobleck.
Materials needed:
- 1/2 cup cornstarch
- 1/2 cup water
- Large mixing bowl
- Spoon
- Ice cube trays or silicone molds
- Measuring cups
- Food coloring or liquid watercolors (optional)
- Glitter (optional) (I used Horizon Group USA Royal Blue Glitter, 3 ounces, reg. price $2.82)
Instructions:
- Add cornstarch to a large mixing bowl.
- Slowly add water.
- Add food coloring or liquid watercolors if desired.
- Pour the mixture into molds or ice cube trays.
- Place in the freezer for a few hours (minimum).
Oobleck is a non-Newtonian fluid. What’s that? According to ScienceExplorers.com: “It is a substance that can mimic qualities of a solid or liquid and can take the shape of whatever is holding it.” Oobleck was named after the Dr. Suess book Bartholomew and the Oobleck.
Freezing Oobleck creates a solid. However, check out its consistency as it melts!
11. Create a snowstorm in a jar with baby oil, Alka-Seltzer, glitter, and paint.
Materials needed:
- A clear jar or container (I used a Ball jar, 32 ounces, reg. price $2.19)
- Small bowl or container to mix paint and water
- Spoon
- Baby oil (one or two bottles, depending on the size of your jar)
- 1 teaspoon white paint (I used Sargent Art Titanium White 16 ounces reg. price $3.88)
- 1 cup warm water
- Iridescent glitter (I used Horizon Group USA Iridescent Glitter 16 ounces, reg. price $7.46)
- Alka Seltzer, 24 count, reg. price $6.29
- Blue food coloring (optional)
Instructions:
- Fill a jar three-quarters full with baby oil. (For my 32-ounce jar it took 24 ounces of baby oil.)
- Stir the white paint with warm water in the bowl until the paint dissolves.
- Pour the paint mixture into the jar of baby oil, leaving a small amount of room at the top of the jar.
- Have your children add some glitter and a few drops of blue food coloring (optional) in the jar.
- Wait for glitter and coloring to settle to the bottom of the jar.
- Break one Alka-Seltzer tablet into pieces.
- Have your kids sprinkle the pieces into the mixture. They can add more Alka-Seltzer pieces after the mixture settles down.
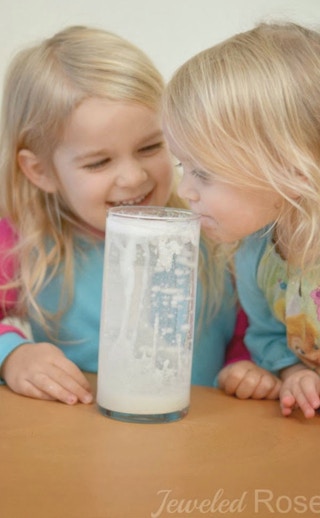
This mixture will begin to fizz, bubble, and swirl like a dancing snow storm.
Use this experiment, inspired by GrowingaJeweledRose.com, to talk to your kids about how snowstorms work. They develop by moist air rising into the atmosphere (clouds) where the temperatures are cold enough they cause water droplets to turn into snowflakes. If the temperatures close to the ground are cold snowflakes or ice will fall and accumulate. If the ground temperatures are warm, the snow will turn into rain.
12. Whip up some reindeer toothpaste with a few ingredients.
Wanna make a big glob of reindeer toothpaste? Why not, they need to brush their teeth, too! Try this fun winter activity inspired by PlayDoughToPlato.com.
Materials needed:
- Small cup or bowl, best if the bowl has a pour spout (I used an Anchor Hocking Presence Glass Small, Clear Round Bowl, 6″. reg. price $1)
- Funnel (optional)
- Container to catch the foam
- Safety goggles
- Empty, clean 12-16.9 ounce plastic water bottle
- 1/2 cup 20-volume (6%) hydrogen peroxide liquid (you can find on Amazon or local beauty supply)
- 1 tablespoon dish soap
- 8-10 drops of liquid food coloring (optional)
- Plastic glitter (optional) (don’t use metal glitter as it may react with the peroxide)
- Few drops of peppermint essential oil, a few drops (not peppermint extract)
- 1 packet or 1 tablespoon active dry yeast
- 4 tablespoons warm water
Instructions:
- Put on safety goggles (the smell of hydrogen peroxide can cause eye irritation, like an onion does).
- Mix yeast with warm water in a small bowl and set aside.
- Place the water bottle into a container.
- Use the funnel to add dish soap, peppermint oil, coloring and a few shakes of glitter if desired.
- Pour in the hydrogen peroxide and swirl the bottle gently to combine ingredients.
- If your bowl has a pour spout remove the funnel, if not hold the funnel just above the water bottle neck and pour the yeast mixture into the water bottle. Foaming happens FAST! So be prepared to quickly move the funnel out of the way.
- Let foam sit for several seconds to cool down enough to play with.
Yeast contains catalase, a common enzyme found in living organisms exposed to oxygen. That includes people! The catalase in the yeast breaks the hydrogen peroxide molecules into water and oxygen molecules. The oxygen produces a gas, which gets trapped in the soap and results in bubbling foam. Why did the bottle feel warm? When hydrogen peroxide breaks down, it releases energy in the form of heat (this is called an exothermic reaction).
RELATED: Cold Weather Hacks to Help You Survive Winter
13. Freeze a bottle of water instantly.
Here’s a simple, easy, and cool experiment for you and the kiddos.
Materials needed:
- Bottle of purified water (must be a PLASTIC Bottle)
- Bowl or large container (if you’re going to freeze a bunch of bottles)
- Spoon
- Water
- Rock salt (ice cream salt)
- Ice
- Thermometer
Instructions:
- Create an ice bath by pouring some ice and water into the bowl or container.
- Sprinkle a generous amount of rock salt around on the ice.
- Stir the mixture.
- Insert a thermometer into the ice.
- When the thermometer reaches -10°C or 17℉ it’s time to add the bottle(s).
- Place water bottle(s) upright into the ice.
- Wait ten minutes.
- Slowly and carefully remove one bottle from the bowl and slam it (upright) against a countertop or table.
What’s the science behind this experiment? In order for water to freeze it needs a nucleus to form ice crystals and become ice. Typically, tap water and bottled water have some level of impurities or particles that ice crystals can easily form upon. However, because you’re using purified or distilled water in this experiment, water molecules have nothing to stick onto to create ice crystals. If you jolt or hit a bottle of purified or distilled water after it’s been in the freezer long enough, the force will create a bubble, which will allow an ice crystal to form. This in turn causes a chain reaction and turns the rest of the water into a solid ice cube! (See tip #7, too.) This process is called nucleation.
14. Teach kids about basic electrical safety with a battery and an old Christmas light.

via Education.com
Who hasn’t wanted to cut up an old Christmas string of lights? Now’s your chance. Before you begin, make sure the light(s) you cut out actually work.
Materials needed:
- Old string of Christmas lights
- AA Batteries (I used Duracell 8-pk. regular price $7.47)
- Copper wire strippers
- Electrical tape
Instructions:
- Use the wire cutters to cut one light from the string, leaving at least 1-2″ on each side of the bulb.
- Help your child to remove the last 1/4″ of the green coating with the wire strippers.
- Explain the green coating protects the electrical copper wires.
- Explain that for the light to work the battery, bulb, and wiring must be in a circuit.
- Explain that an electrical circuit is a circle of wires connected to a power source.
- Have your child experiment with arranging the wires and battery.
- Tape one section of wires onto the top of the battery and the other section to the bottom with electrical tape.
- Watch as the light bulb flickers.
Be sure to explain electrical safety to your child and that their hands must be dry any time they are working with electricity and that they are to only work with electricity when you’re present.
15. Learn how to bend candy canes without breaking them.

via Teach Mama
Use up any leftover candy canes from Christmas, or buy them when they’re on clearance!
Materials needed:
- 3-4 Candy canes
- Parchment paper or silicone baking mat
- Cookie sheet
- Oven mitt
Instructions:
- Heat oven to 250℉
- Lay a sheet of parchment paper or baking mat on the cookie sheet.
- Remove the candy canes from wrappers or packaging and place on the cookie sheet.
- Bake at 250℉ for 3-5 minutes.
- Remove the pan and place it on a heat-proof surface.
- CAREFULLY twist, bend, and create shapes out of the candy canes. They will be EXTREMELY HOT so be sure to wear your oven mitts!
Don’t let them sit too long or they will harden right back up. If this happens you can pop them back into the oven.
RELATED: Shoe and Clothing Hacks to Help You Survive Winter
16. Create snow paint with food coloring.
Materials needed:
- Snow
- Liquid food coloring
- Plastic spray bottle(s) or sports bottle(s)
- Water
Instructions:
- Add at least eight drops of food coloring into the spray/sports bottles.
- Fill the rest of the bottle with water.
- Shake bottles to mix up the coloring.
- Bundle up and head outside and spray or squirt the snow with colors.
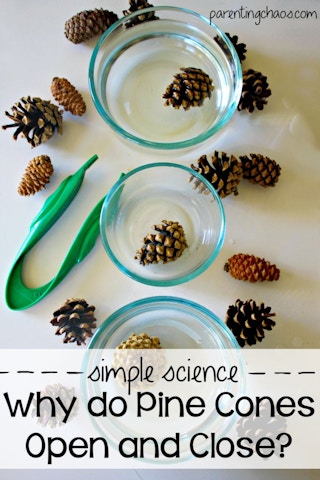
17. Discover how and why pinecones open.
This experiment is pretty cool! I didn’t know why pinecones open and close until I did this one. Thanks to ScientificAmerican.com.
Materials needed:
- One clear jar (I used a Ball jar 32 ounce, reg. price $2.19)
- Three pinecones (all approximately the same size)
- Black permanent marker
- Water (you’ll need cold, with a few ice cubes thrown in)
- Cookie sheet
- Aluminum foil
- Oven mitt
- Tape measure
- Pen and paper
Instructions:
- Heat oven to 250℉
- Measuring the length and circumference of all three pinecones.
- Mark each pinecone on their base with a letter, A, B, and C.
- Make a chart on a piece of paper with three columns marked pinecone A, B, and C.
- Write down the measurements for each pinecone in the chart under its pinecone.
- Place pinecone A in the jar.
- Pour cold water and some ice cubes to fill the jar.
- Place a piece of aluminum foil on the cookie sheet
- Lay pinecone B on the cookie sheet.
- Bake at 250℉ for 45 minutes.
- While pinecone B is in the oven, observe pinecone A.
- Measure pinecone A and write measurements down in your chart.
- Remove pinecone B from the oven, using a mitt, after 45 minutes.
- Measure pinecone B and write down the new measurements in your chart.
- Measure pinecone C to see if it changed at all without doing anything to it.
You’ll immediately notice a difference between the pinecones. Pinecone A in cold water should close up while pinecone from the oven opens up. Pinecone C may not have changed at all. Ask your kids why they think the pinecones open or close? Pinecones close when it’s cold to protect their seeds. However, when the weather is warm and dry the seeds have a better chance of finding fertile soil so they can grow into trees.
Don’t Scroll Up! Here are the articles I mentioned:
DIY Cold & Flu Remedies You Need in Your Arsenal
Cold Weather Hacks to Help You Survive Winter
Shoe & Clothing Hacks to Help You Survive Winter
UP NEXT: How to Get Cheap Diapers All Year (So You Don’t Go Baby Broke)
Download the KCL app to add and redeem coupons in store
