
Get all the new deals and savings hacks straight to your inbox
Will be used in accordance with our Privacy Policy
Spring is finally here and one great way to usher in the feeling of the lighter, (hopefully) warmer season is with some fresh decor. If you’re crafty, there are some affordable dollar-store DIY spring wreaths that will kickstart that refresh. Moreover, making a wreath is an easy way to add some color and cheer to your space. And some of the creative crafters here at Krazy Coupon Lady have put together budget-friendly dollar-store wreaths that you can copy.
Get creative and use a variety of materials such as flowers, greenery, ribbons, and even fruit to create unique and personalized DIY spring wreaths. Copy ours exactly, or personalize yours to fit your own decor. Don’t worry if you’re not a crafting expert, these wreaths are both cheap and easy. So gather some $1 supplies at your local Dollar Tree, put on your favorite spring playlist, and let’s make some wreaths!
Don’t forget to download the Krazy Coupon lady app for even more dollar-store crafts, gift baskets, and organization hacks.
1. Green Foliage and Rose Wreath, $9

This grapevine wreath is simple and fresh. To cut down on the price even more, use greenery from your own yard and just swap it out throughout the season.
What you’ll need:
- Grapevine wreath (we used a 14″ wreath but if your Dollar Tree doesn’t have one, they’re $5.99 at Michaels)
- 3 stems of green foliage
- 2 stems of garden roses in white
- Burlap ribbon

Instructions:
- Trim the foliage into smaller pieces as needed.
- Then, trim seven rose blooms approximately three or four inches below the base of the flower.
- Cut the ribbon to size and attach it to the top for hanging.
- Place the foliage and the blooms around the wreath, shoving the stems between the wreath twigs.

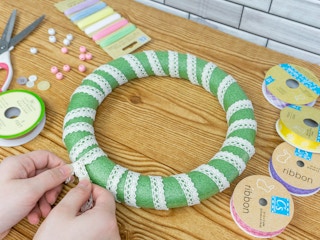
2. Rope Wreath & Felt Flowers

This rope wreath is a versatile door hanger. You can use felt flowers in any color that works with your decor, or you can use other accessories like greenery or a bow made out of striped ribbon.
What you’ll need:
- 3 packages of felt flowers
- 4 packages of rope
- Foam Wreath Form

Instructions:
- Glue the ends of the rope to the wreath form to hold it in place, wrapping it tight around the foam.
- Attach the felt flowers and leaves around the bottom with hot glue or craft pins if you’d like them to be easily removable.
- Add a rope loop with a bow at the top for hanging.

3. Spring Clothes Pin Wreath

This colorful clothespin wreath is perfect for spring and summer. Choose any two colors that match your mood or your floral choices. We love how the yellow and pink match the little bike Welcome sign!
What you’ll need:
- 14″ metal wire wreath form
- 6-stem faux cosmos bunch in pink
- 3 packages of wooden clothespins (you’ll need 84 clothespins in total)
- Acrylic paint

Instructions:
- Use a paintbrush to paint half the clothespins pink and the other half yellow to match the sign.
- Trim five cosmo blooms an inch or two below the base of the flower.
- Choose a pattern and attach the clothespins to the middle two wires. (We were able to perfectly fit 14 clothespins into each of the six sections.)
- Attach the sign with a paper clip or twist tie.
- Place the blooms into the wreath, sticking the stem between or in clothespins securely. You can also use a bit of hot glue here to make it even more secure.

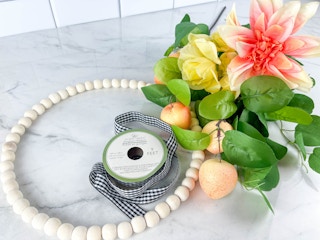
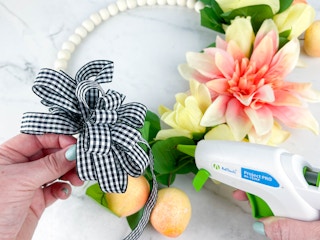
4. Ribbon Wrapped Spring Wreath

This wreath is super simple and can be completely personalized with your favorite colors of ribbon. Ours is ideal for Easter and early spring. However, you could also do different shades of greens and white, gingham, buffalo check, navy stripes. Whatever you like best!
What you’ll need:
- 10″ Craft Artisan wreath form
- Wood beads (similar but not exact)
- 4-5 different spools of ribbon
- Pastel craft string or embroidery floss
- A handful of buttons you have no other use for
- Glue (optional)

Instructions:
- Choose which ribbon with which you want to start. Next, hold one end against the starting point as you wrap the spool through the wreath form and around. Repeat until you go back around to the beginning.
- Tie (or glue) the ends of that ribbon to keep it in place.
- Repeat the above steps with the other colors of ribbon you have. However, try not to cover the ribbons you put on previously!
- Tie a smaller piece of ribbon to what you deem as the top. Use it to make a loop for hanging.
- Use the craft string (or glue) to attach beads and buttons in random places on the front of the wreath.
- Tie some craft string at the top, hanging down under the top loop. String some wood beads onto each of the two ends, then tie them together.
- Lastly, tie a pretty bow out of some leftover ribbon and add a button in the center. Attach it to the end of the dangling beads.
5. Brass Floral Hoop Wreath

Get three for one with this wreath! The brass rings come in a package of three, so for just $9 you can create three matching wreaths at $3 each.
What you’ll need:
- Brass wreath rings
- 5 bunches of mini floral & greens
- 1 spool of ribbon

Instructions:
- Pull apart the flowers and greenery so you can work with them separately.
- Glue each section of greens and flowers to the bottom of each wreath.
- Add a ribbon loop to the top for hanging.
- Repeat with all of the wreath rings.


6. Cloud with Rainbow Yarn

We love this one for a kid’s door or bedroom! Create a hanging rainbow cloud wreath with some cotton balls and yarn.
What you’ll need:
- 6 colors of yarn (red, orange, yellow, green, blue, and purple will get you the best rainbow effect, but you can do any colors!)
- White or clear glue
- Cotton balls
- Sharpie or any writing utensil
- A piece of cardboard
- Scissors

Instructions:
- Trace a cloud shape onto a scrap of cardboard and cut it out.
- Cut a slit near the bottom of your cardboard cloud, almost end to end. Be careful not to go too close to the edge!
- For each color of yarn, take about one arm’s length and cut 10 strands. Your rainbow’s length will be about half of the length you cut.
- Take the strands and pull them through the slit in the cloud, one color at a time, to make the rainbow. Make sure to pull them about halfway through so they hang evenly on either side.
- See the length of the yarn as it will hang, and trim the bottom if needed.
- Spread some glue onto the cardboard cloud. Apply cotton balls to make a fluffy cloud. You can leave them whole or pull them apart for a more wispy look.
- Finally, make a small hole at the top of the cardboard. Pull a piece of yarn through to make a loop to hang it up!


7. Hanging Spring Hat Wreath

The perfect wreath for warm weather! Give vacation vibes by hanging this summer hat wreath on your front door. You can write any phrase you want on the hat, or stick with a classic hello.
What you’ll need :
- Summer woven hat
- Ribbon
- Paint or a paint pen
- 5 bunches of silk flowers

Steps:
- Use hot glue to secure a ribbon of your choice around the hat, creating a bow.
- Paint Hello or Welcome on the front rim of the hat using a paint pen.
- Cut or tear the flowers and greenery into smaller, easy-to-use pieces.
- Attach flowers and greenery to the rim of the hat using hot glue or craft pins.

8. Pom-Pom Floral Wreath

This pom-pom wreath uses handmade pom-poms. You can either use a pom-pom maker, or you can follow the detailed instructions below to make them. Choose colors of yarn that match your decor and flowers. You can even add greenery to make it more fresh.
What you’ll need:
- 8″ Floral Garden Metal Wreath Form (2pc)
- 4 colors of yarn
- A pom-pom maker (you can also just use your fingers, directions below!)
- 2-3 different kinds of fake flowers
- Scissors

Instructions:
- First, you have to make the pom-poms. These beginning steps will differ depending on your method (we’ve listed two methods below).
Using a pom pom maker:
- Wrap the yarn around and around. The more yarn you wrap, the thicker your pom-pom will be.
- Take a piece of yarn and put it in the center of the maker and tie it as tight as you can. If it’s too loose, your pom-pom might fall apart.
- Each side of the pom pom maker should have an edge where you can see where to put your scissors to cut.
- Once cut, you can take it out of the maker and trim it up to make a nice round pom-pom!
Using your fingers:
- Cut a piece of yarn about 5 inches long and lay it between your index and middle finger. Hold both of the loose strands with your other fingers so they don’t get in the way.
- Hold your index and middle finger away from each other in a “V” shape. Wrap the yarn around and around. Again, the more yarn you wrap, the thicker your pom-pom will be. Try to keep holding them apart while you are wrapping so you don’t get trapped!
- Once you have the thickness you want, take the first piece of cut yarn and bring it up and over the wrapped yarn. You will need to tie this piece around the wrapped yarn on your fingers.
- Tie it once to hold it together, but don’t make the knot yet. Pull your fingers out of the yarn while holding it together with the cut piece. Once you have freed your hand, pull it tight and knot it in place. It will look like a bunch of loops on either side.
- Take your scissors and cut the loops. Make sure to cut them at their highest point. Don’t pull them too hard or they may unravel.
- As you cut the loops, the pom-pom will start to look more like a pom-pom. Roll it around between your hands once all loops are cut. It will take the shape of a ball. You’ll have to do some trimming to really shape it into how it’s supposed to look.
- Now we’re back at it. Repeat the above steps to make as many pom-poms as you would like.
- Once you have all of your pom poms shaped and ready to go, use some yarn to tie them onto the wreath form. They can be in any order, or even all one color if you want.
- Add some fake flowers with yarn or glue to really make it feel springy. Then, hang it up for all to see!

9. Floral Bead Wreath

A simple beaded wreath form, along with a few spring flowers and some faux fruit, give this wreath a bright and cheery feel.
What you’ll need:
- Beaded hoop wreath
- 2 faux fruit stems
- 2 faux flower stems
- Ribbon
Instructions:
- Remove the flowers and fruit from their long stems. This makes them easier to work with separately.
- Attach the greenery, fruit, and flowers to the beaded hoop wreath along the side using hot glue or twist ties.
- Create a small designer bow and secure it to the wreath with glue, a twist tie, or more ribbon.
Related: 16 Tips To Get You an Amazing Dollar Tree Haul
10. Spring Rag Wreath
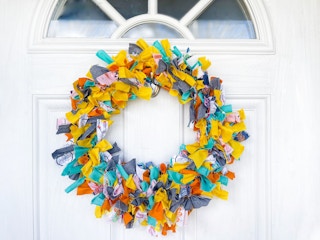
This wreath is made entirely from fabric. That means you can either purchase a few new rolls of fabric and some scraps in your desired color scheme, or you could recycle old clothing in your house!
What you’ll need:
- Round metal wreath form (we used a 14″ form)
- 4 rolls of fabric
- 3 packages of fabric scraps

Instructions:
- Cut all of the fabric scraps into strips that are 5 inches long by 2 inches wide.
- Tie the fabric strip into a knot around the metal wreath form.
- Scrunch the fabric knots together by sliding them close on the wreath form.
- Repeat with as many strips as it takes to get a full, fluffy wreath.

Download the KCL app to add and redeem coupons in store


For iOS and Android users.
Get all the new deals and savings hacks straight to your inbox
Will be used in accordance with our Privacy Policy