
Get all the new deals and savings hacks straight to your inbox
Will be used in accordance with our Privacy Policy
The life of a cat is pretty sweet — toys are readily available, there’s endless stretching, and food is easy to find. But for cat owners, it can be costly and downright exhausting to keep buying toys, food, and cleaning supplies.
Ready for some cat tips to make life easier? Welcome to the world of DIY where you can make homemade cat food, discover cleaning hacks, and even be inspired with cat room ideas (DIY cat tree? Yes, please!). Before you dive in, browse KCL’s cat coupon page. It’s purrfect for all sorts of savings (if you’re not into DIY in all areas).
1. Remove pet hair with hairspray.

Wanna see more hairspray hacks? We gotchu. And while you’re at it, read about pet hair removal hacks.
2. Turn a bed of grass into a DIY cat bed to let your feline chill.
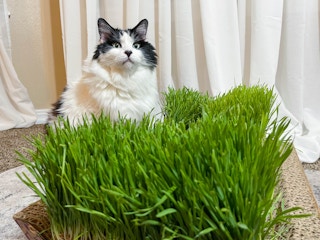
Is your cat into hanging out indoors only? Let them experience the outdoors by buying grass patches to lie on and enjoy. These faux grass mats look natural, are convenient for training, and are durable.
If you’re feeling really ambitious, you could grow your own cat bed (that’s GYO cat bed, not DIY cat bed) from organic seeds. Cat grass seeds for indoor cats are edible (there’s your homemade cat food), and if you spread them out onto a planter box, your cat can chill there and eat a healthy snack.
3. Make a DIY cat tree using IKEA floating shelves.

You can really use whatever type of wall shelves you like for your DIY cat shelf. IKEA just happens to be super affordable! Simply attach the shelves to the wall, spaced out as desired. Let your cat have fun climbing them or just chillaxing.
4. Cut out squares in an old bookshelf for a DIY cat tower idea.

Have an old bookshelf you have no use for anymore? Turn it into a cool DIY cat tower suitable for climbing up and down. You’ll need a quality power tool to cut through the wood. For the safety of your kitty’s paws, choose a bookcase of a soft, but strong wood like pine. That way you won’t have to use sandpaper on the exposed edges.
With a jigsaw, wood router, or hand saw (which would take a long time), cut out sections of the bookshelf for your cat to climb up and down on. Then, add padding (like a scratch pad) to protect their paws. Be sure to bolt the bookcase to the wall so avoid harm to your furry friend (and yourself!).
You can also look for a bookshelf at garage sales or places like Goodwill.
5. Make a DIY cat house out of an old T-shirt and a cardboard box.

Pull an old T-shirt over a box so that the neckline lines up with the box’s opening. Tuck the sleeves in against the box to make the sides look neater, then show your cat its new cozy cat cave. Now you can fill it with toys, a blanket, or homemade cat food!
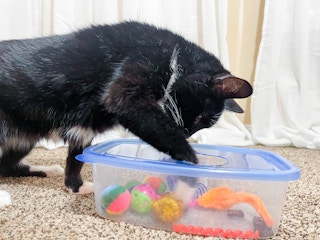
6. Keep cats busy for hours with this DIY cat toy puzzle.

Making a homemade cat toy can easily be done with a few items around your house. Here’s what’s needed:
- old Tupperware
- 4-6 small rubber adhesive feet
- non-permanent black marker
- sharp scissors, utility knife, or x-acto knife
- rubbing alcohol
- lighter
Directions for DIY Cat Toy Puzzle
- Start with a large square or rectangular Tupperware container and adhere the rubber adhesive feet to the bottom (1 on each corner).
- Using a shot glass (or something similar) as your template, draw 3-4 circles on the Tupperware lid using a black marker. The holes should be large enough for your cat’s paw to enter.
- Carefully cut the circles out using the x-acto knife.
- Use a cotton ball or paper towel soaked in rubbing alcohol to remove the leftover black marker from around the holes.
- To level any jagged edges of the holes, you can use a lighter to melt and smooth them a bit. You could also use sandpaper.
Give the top and bottom of the Tupperware a good wash with soap, dry it thoroughly, then just add his/her favorite cat toys.
Are you having trouble organizing your Tupperware? Find out some useful ways to get your Tupperware collection under control.
7. Remove cat hair with duct tape as a simple cat tip for cleaning.

KCL has more pet hair removal hacks that can make your life easier.
8. Make a DIY cat scratching post from wood, rope, and yarn.

Scratching posts aren’t just toys to keep cats busy. The abrasive texture actually helps them groom their claws.
For the DIY cat scratching post, you’ll need:
- 2 pieces of wood (ideally 1″ x 3″ x 24″)
- mitre box and saw or table saw
- sandpaper
- clamp for woodworking
- sisal rope (¼”)
- hot glue gun
- neon string
- leather cord (10-12″)
- power drill and ⅜” drill bit
- Various yarn colors
Directions for DIY Cat Scratching Post
- Depending on the type of wood that you have or purchased, you could add a decorative 30-degree angle at the bottom of the board or leave it straight and sandpaper it. If you opt to create the angles, mark them at 22″ and use the mitre box and saw to make the cut.
- Glue the boards together with the edges flush. Use a clamp to secure and dry them. Wipe off any excess glue with a damp cloth.
- Using a measuring tape, draw a line at the 12″ mark to designate where the sisal rope will start and stop. Place a thin line of hot glue on the line and attach one end of the rope and begin wrapping it around the board tightly and horizontally. Add another line of hot glue to the front of the board for added security.
- After finishing the rope, wrap the neon string in a desired pattern, securing it with hot glue.
- At the top of the board, drill two small holes. Tie a knot on one end of the leather cord and thread it through the hole from front to back. Tie a knot on the other side to secure it.
After all of that work, you should be proud of yourself! Hang the scratching post as desired. For more details and how-to photos, check out DesignSponge.
9. Let your cats scratch themselves with this DIY self-petting station made from toilet bowl brushes.

Just like humans, cats sometimes need variety to keep themselves occupied. This DIY cat toy is great for relaxing, back scratching, or just simply playing. You’ll need a few items to make this happen:
- two toilet bowl brushes (Walmart is the cheapest option)
- small wood spacer (1″ x 1″ x 1″)
- hot glue gun
- 12″ x 12″ chipboard (any shape)
- fabric or carpet to cover the board
- measuring tape
- Sharpie
- power drill
Directions for DIY Self-Petting Station
- Untwist and separate the brushes from the handles.
- Squeeze some hot glue on one end of the brush (the wire part) and feed it through the hole of the wood spacer to cover the exposed wires. Repeat for the other brush so that the spacer fits in the middle of the two brushes, creating one long brush.
- Wrap fabric around the chipboard and glue or staple it underneath to secure it.
- Use your measuring tape to identify the center of the board. Drill two holes – either diagonal or straight – into the board, each being 4″ to 5″ from the center. The holes should be large enough to house the brush wire.
- Add some glue to the exposed end of the brush and fit it into the board hole. Repeat on the other side.
Allow the glue to dry and introduce it to your fur bestie!
10. Build a DIY cat litter box for a fraction of the cost.

Litter box brands like Clevercat can run up to $40 or so. Instead of spending that much, all you need is a large tote with a lid and something to cut a circle in the top of the lid with (like a box cutter).

Use a large plate and a black marker to trace a circle on the top of the lid. With scissors or a box cutter, carefully cut out the hole. Then, just add the kitty litter. You could jazz up the outside of the bin with decal stickers. Poop emoji stickers would be hilarious!
11. Remove pet hair from your house and wardrobe with dryer sheets.

Dryer sheets are magical pieces of magnetism that can make the life of cat owners easier. This cat tip is perfect for furniture and clothes. The ingredients in Bounce Pet Hair sheets repel pet hair, so they’re designed for cleaning up after our furry friends. With over 12,000 reviews (most are 5 stars) on Amazon, clearly they’re a favorite.
Check out even more dryer sheet hacks that’ll blow your mind.
12. Save money by growing your own catnip (aka homemade cat treats).
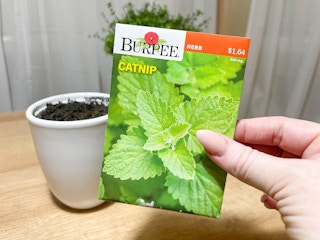
Your cat’s reaction to commercially manufactured catnip can vary from relaxing (like a sedative), or highly stimulated, to severely ill with diarrhea (nobody has time for that!). Why not try a homemade cat treat? Catnip seeds are available online and can be planted directly outdoors or started inside and transferred.
Be aware that this plant grows quickly in moderate to full sun and can reach a few feet in just a couple of months. Once it reaches 18 inches and has thumb-size leaves, you can cut it.
13. Make your own deterrent spray to save your furniture from scratches.

Cats are your precious fur babies, but sometimes they can ruin your good furniture. Here’s a cat tip: make your own deterrent spray. You’ll need a 16 oz. spray bottle, clear dish soap, an essential oil (try lavender, citronella, or peppermint), and water.
Add water ¾ of the way up in the bottle, and add 2 drops of clear dish soap and about 6-10 drops of the essential oil (it can be a strong scent, so start with 6). Shake it up to mix, and spray where you don’t want your cat scratching! Your house will smell great, and your new couch won’t have claw marks.
14. Create a DIY cat scratching post made out of a vase and rope.

For this DIY cat scratching post, use a heavy ceramic vase (not glass). They’re plentiful online, but you could also browse thrift stores for great deals. There’s no need to spend a lot of money on this project. Similarly to the scratching pad (see Tip 8), you’ll need a few items:
- sisal rope (¼”)
- hot glue gun
- rocks (or you could find some outside and pay zero)
- ceramic tile or kitchen slate board
Directions for DIY Cat Scratching Post
- Starting at the base of the vase, use hot glue as you wrap the rope around the vase.
- Fill the vase with rocks to weigh it down.
- To prevent it from toppling over, glue a ceramic tile or slate board to the bottom of the vase (in addition to the rocks).
Now you have the option to make it really decorative by adding faux tree branches or other tall cat toys.
15. Use baking soda as a DIY cat litter box odor absorber.

Due to the chemical makeup of baking soda, it’s an inexpensive way to soak up stenches. So, it works perfectly for your cat’s litter box. Every time you change the litter, just sprinkle in a little baking soda, and give it a light stir with the scooper. This cat tip will help to absorb odors and put your mind at ease next time you have company.
16. Create a stylish DIY cat litter box enclosure with a curtain and a tension rod.

Depending on what your cabinets look like, you can remove the door panel and add a tension rod and curtain in the cabinet. Now your kitty can walk out of your DIY cat litter box in style.
Looking for more inspiration? Check out these tension rod hacks.
17. Prevent hairballs by putting coconut oil on your cat’s paws or letting them lick a spoonful.
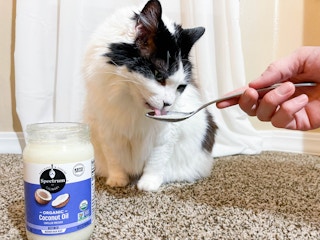
As a cat owner, you know that sound…it’s the sound of a hairball coming. Yuck! It’s inevitable because cats are self-groomers, but there’s a cat tip that can help. Put half a teaspoon of coconut oil onto your cat’s paws, or let them lick a spoonful to keep their coat shiny and prevent hairballs.
18. Use empty toilet paper tubes, pom-poms, and straws to make DIY cat toys.

This all comes together with a hot glue gun, rainbow pom-poms, and flexible neon straws.
Directions for DIY Cat Toys
- Poke 6 holes in 1 empty toilet paper tube for the straws to go through. The pattern is up to you. The idea is for the entire straw to fit from one side of the tube to the other.
- Add a few dots of hot glue to keep the straws in place.
- Hot glue an assortment of pom-poms for decoration.
- Repeat for each tube. You could also use a paper towel tube and add more holes and decoration.
Now, it’s playtime!
Download the KCL app to add and redeem coupons in store


For iOS and Android users.
Get all the new deals and savings hacks straight to your inbox
Will be used in accordance with our Privacy Policy