
Get all the new deals and savings hacks straight to your inbox
Will be used in accordance with our Privacy Policy
If you’re an Amazon addict like me, you’ve got plenty of empty cardboard boxes stacked up somewhere. Don’t toss them out. From DIY drawer dividers and craft projects to kids’ playhouses, there are awesome ways to repurpose cardboard boxes.
Cardboard boxes are often seen as a temporary storage solution or a means of transporting goods from one place to another. But, with a little bit of creativity and some DIY skills, an empty cardboard box can be transformed into a multitude of useful and decorative objects. Read on for some inspiration on how to give them a new lease of life.
If upcycling and repurposing make you happy, find more ideas from these posts:
Text HACKS to 57299 or download the Krazy Coupon Lady app for more life hacks and money-saving tips, deals, and coupons.
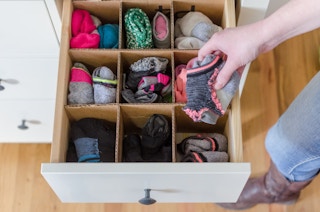
1. Upcycle cardboard boxes into drawer dividers.


1. Measure your drawer and use the dimensions to create lines on a piece of cardboard. You’ll make two sets of divider pieces: one set for the width, and one set for the length of the drawer.

2. Measure about four inches down into each divider section to create slots. Before you cut out the entire divider section, cut out the thin slots—trust me, it’s easier this way.

3. Using the slots as a guide, connect each divider section, place in your drawer, and you’re done!
2. Make a collapsible cardboard box playhouse.
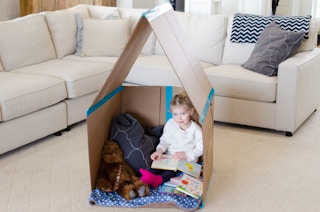
You’ll need two boxes, some tape, and a box cutter for this playhouse.
1. Tape flaps to keep them from folding in (use tape on the inside and outside of the box). They’ll function as part of the playhouse’s floor.
2. Cut off one of the bigger sides of the box. This is where the roof will be. Keep the box piece you just removed—you’ll need it for the roof.

3. Pull out another box or large piece of cardboard. Using the piece of cardboard you just removed (see step 2) as a guide, measure out and cut a duplicate roof piece from the new box.
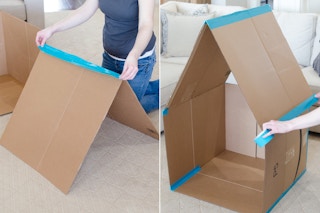
4. Tape the two roof pieces together and attach them to your playhouse’s frame (the first box).

5. Lay the box flat on the floor and securely tape just the vertical back and bottom cuts you just made. Don’t tape the horizontal bottom edge, otherwise, the box won’t collapse properly.
6. Open up the playhouse so it’s standing and secure the inside (back and bottom cuts only) with tape. You may need to add a few more pieces of tape to keep the playhouse together, but that’s it. Let their imaginations run wild!
3. Protect the floor when moving furniture.

4. Donate to a charity like GiveBackBox.com.

Go to GiveBackBox.com to print a free shipping label. Then just drop your box off at any USPS or UPS location. Amazon and other retailers have partnered with GiveBackBox.com to pay for your shipping expenses.
Related: Here’s what to know about the Amazon Give Back Box program.
5. Repurpose cardboard boxes as bird feeders.

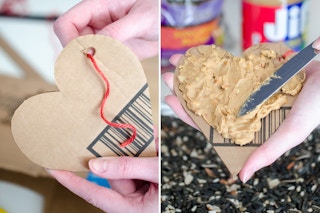
1. Cut pieces of cardboard into shapes. Then create holes for some twine or string to loop through.
2. Spread peanut butter on the cut-outs and press on some bird seed.

3. Roll the peanut butter and cardboard in birdseed and hang on a branch. That’s it!
6. Prevent overspray with an old cardboard box.

7. Reuse Amazon boxes as decorative wrapping paper wastebaskets.

8. Create a cat tent with an old shirt and an empty cardboard box.

9. Make paint palettes from a piece of cardboard.

I’ve seen paint palettes at Dollar Tree, but free is better, right? This is much more fun than using a paper plate — plus you get to recycle an old box.
10. Repurpose a cardboard box as a lights organizer.

11. Make homemade coasters.

1. Gather your materials. You will need cardboard, a ruler or measuring tape, scissors or a craft knife, glue, and decorative paper or fabric.
2. Cut out the coasters. Use the ruler or measuring tape to mark out squares or circles on the cardboard. Cut out the shapes using the scissors or craft knife.
3. Get to decorating. Cut out squares or circles of decorative paper or fabric that are slightly larger than the cardboard coasters. Glue the paper or fabric to the cardboard coasters, making sure to smooth out any wrinkles or air bubbles.
4. Add a protective layer to protect your new coasters from moisture. Just add a layer of clear varnish or acrylic sealer to the top of the paper or fabric. This will make them waterproof and durable.
5. Allow the varnish or sealer to dry completely before using your new coasters.
Download the KCL app to add and redeem coupons in store


For iOS and Android users.
Get all the new deals and savings hacks straight to your inbox
Will be used in accordance with our Privacy Policy